Saturday, February 28

ACW revisited part 3...

...and with the thump of parcel on door mat the happy arrival is announced of the first samples of American Civil War troops in Steve-the-wargamers house... what follows are the figures that I ordered from Warrior.

I chose a selection of infantry, a couple of cavalry, and an artillery piece but when I opened the parcel I found that Warrior had also thrown in a couple of extra infantry figures free - and the parcel arrived within two days of me placing the order. I've said it before but will say it again - their customer focus and mail delivery is second to none...

So what about the figures - well all I can say is "nice, very nice" - first the infantry - I've included a Minifigs 25mm Grenadier for scale comparison.

First the infantry (click on any of the photo's for a bigger view):
.. a selection of types; one zouave, three US types with kepi (one with sack coat & two without, but one of the latter with blanket roll) and a Confederate type in soft hat..
I brought the camera down to desk level for this one to give a better idea of the size. The Minifigs is usually seen as being a "true" 25, these guys are slightly taller but with similar heft...
The infantry are very nice, hands look to be holding rifles, truly horrific looking bayonets on the end - one of the union infantry has a magnificent walrus moustache that can clearly be seen.. definitely feeling enthused to paint up a few to see how they look!

Good as the infantry are I thought the cavalry were even better... these are two piece casts, the riders come with saddlery moulded on...
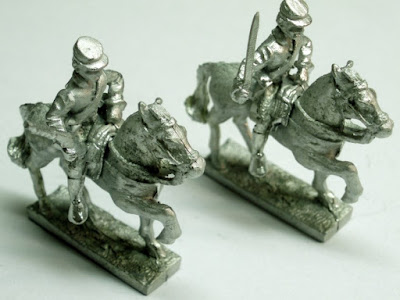
...and then the piece de resistance - the gun. This is dry fitted - not glued yet. You can see the wood grain in the trail (which Warrior sent two of - not sure why!) The wheels are magnificent - no flash at all - and a really chunky gun barrel. There is also a sponger/rammer... end of the barrel is drilled out slightly which looks good!
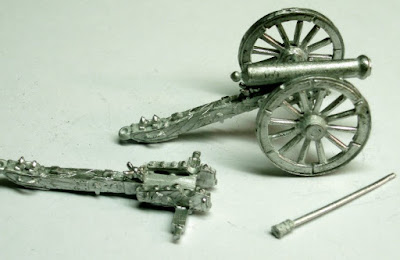
To be honest I don't think I have much extra looking to do!! John/DC - good suggestion, gents

More anon....

Sunday, February 22

"Regulars versus Irregulars".. in the Sudan..

"News has reached your correspondent of a dreadful calamity having befallen our glorious troops in the eastern Sudan. A column of troops under Major the Honourable St John Wade-Smith has been ignominiously defeated, and bundled from the field by a determined foe...." London Illustrated News, June 1885...

...but that's jumping the gun slightly....

Some of you may remember that back in August of last year, while I was on holiday, I played scenario no. 3 in Grant and Asquith's "Scenario's for All Ages" - "Disciplined versus Irregulars" [click here].

On that occasion I used my green baize travelling mat, with units made from card, books for hills and bits of car park gravel (!) to mark morale... (needs must when you're on holiday!) but I thought at the time that the AWI period I'd set the game in was not perfect, and that this would make a fantastic Sudan period game, so this weekend I finally got to test my hypothesis...

Scenario:
Briefly a small force of regulars is trying to cross the table in the face of a significantly larger irregular force. The downside for the irregular force is that in addition to any reductions in morale etc. as a result of being irregular, they are also armed only with hand to hand weapons apart from a small number of their units.

For this game - having experienced the effect of European gunnery on un-armed Dervish in previous games I scaled down the number of Anglo-Egyptian units while leaving the Dervish units pretty much as per the scenario.

So without further ado, here are the orders of battle for each side:

Three company's of foot - one of them being British Regulars - a troop of British Cavalry (the West Sussex Yeomanry of recent posts!), and one screw gun carried by camel. In addition to these I also provided two transport camels carrying ammunition - small arms and for the gun respectively... numbered in real terms this comes to about 450 men in all arms..

The Dervish comprised all units I currently have painted - 9 bases of foot and three mounted - but only three of the foot units were rifle armed so to help them out slightly I also allowed them to have a gun (one smooth bore cannon, no transport, no ammunition re-supply) This gave the Dervish just over 1200 men in real terms, so a significant outnumbering of the Imperial troops..

Set up at the beginning of the game they looked as follows:

In the meanwhile the table was set up as follows - a small village about a half of the way up on the western/left edge, and two stands of palms just over two thirds of the way up the table - one west and one east - being the only relieving features....

The Dervish deployment area is split between the top left and the top right of the table, and as I played this game solo, to add in a little spice, I diced for each Dervish units deployment area - the idea being that one side or the other might end up comprising more troops... as it turned out both sides were pretty equal.

The remaining "bit of spice" was to hold back one unit of cavalry, one unit of foot, and the gun as they would appear in one of the three features described above. This would be decided by dice throw once the head of the Anglo-Egyptian column came within spotting range..

The Anglo-Egyptian column was to enter at the edge of the table at the bottom of the picture (South) and make their way to the edge at the top of the picture (North)

So... on to the game...

Move 1:

The Anglo-Egyptian column enters - cavalry first in line, then the British regulars, the Egyptian regulars, Major the Honourable St John Wade-Smith, the artillery train and then the ammunition camels with the Sudanese regulars bringing up the rear.

In the Gilder Sudan Rules I use the Dervish are entirely event driven which makes the rules ideal for solo play, so at this point I started rolling on the Dervish reaction tables to find out what they would do. Once I'd finished some were stationary, some started moving towards the centre of the table, one unit had joined up with another unit - all of them were doing something, however.

With the British cavalry in sight of the village at the end of the move I diced for the first random appearance which turned out to the gun!

Move 2:
The British cavalry, being British Cavalry, immediately decided to charge the gun. I have no excuse for this decision (seeing as I was playing them) other than the fact that I was planning on the Dervish gunnery being bad, and my recently painted cavalry being more than a match for them!

In the meanwhile the Anglo-Egyptian column continued to advance towards end of table - the British regulars and the Egyptian infantry successfully deploy into line, and by the end of the move the Sudanese also arrive on the table.

With a rattling of sabres (no time to make up those cumbersome home made lances for this unit!), the British cavalry start to gather pace towards the waiting gun. The cannon fires but .... completely stops the British Cavalry in their tracks! 1SP damage and a drop in morale level to 'shaken'...

Not the best of starts for the British...

In the Dervish movement phase they continue to advance their units from the deployment area's - further consolidation occurs with units joining together into bigger bands..

Move 3:

...and it doesn't get any better for the British in the next turn as the British cavalry fail their morale test and degrade another morale level - they are now "suppressed". While the column continues to march on to the table, the Dervish gun fires again but this time despite point blank range misses..

Dervish movement works out as being a general movement towards the Imperial force - but just as things seem to going so well for them, a poor throw on the reaction table results in disaster as large rub comprising two units depart the table… the Emir commanding throws his hands to the air when his sub-commander tells him that they were two of the three rifle armed units!

With the cavalry as far forward as it is, I dice at the end of the move for the units appearing in the two remaining terrain features. This turns out to be a Dervish mounted unit in the west feature (camel riders), and a unit of Foot in the other..

Move 4:

In move 4 things up a little as the British cavalry pass their morale test and improve one level - now shaken. To celebrate they dismount and get out their carbines (which is what they should have done in the first place!):

The Anglo-Egyptian column continues to move up, and Major the Honourable St John Wade-Smith joins the cavalry in an effort to bolster their recovery, but in the Dervish firing phase the cannon scores yet another hit on the British cavalry - extraordinary! Cavalry become suppressed again....

In the next round of Dervish movement, most units continue to move up, but another 'rub' leaves the battlefield as a result of a poor dice throw on reaction.

British firing is fairly (entirely!) ineffective - despite rapid fire (double volleys to allow them to fire twice in a move but for triple the ammunition expenditure) the cause no casualties, although the suppressed cavalry do manage to shake the gun crew - the Rutlandshire's miss completely!

Move 5:

The British cavalry again pass their morale test, with the help of Wade-Smith, and they are now merely shaken but are low on strength points. The British infantry from the column comes into line alongside cavalry to give support.

The Dervish gun fires again but misses.... that's more like it!

The Dervish movement sees continued consolidation as a result of the greater number of Imperial troops now appearing in view (a feature of the reaction table is that Dervish units will "clump" together in the face of greater numbers of opposition - this in turn results in more favourable reaction tests for the Dervish as the larger units are not then so overawed - clever!).

The British shooting continues its diabolical path - rapid fire from both the cavalry and the British regulars causes not a single hit - eight volleys and just one hit - they couldn't hit the side of a barn at 20 yards!

Move 6:

The British cavalry test morale again, pass, and are now fully recovered. After all that firing the cavalry and Rutlandshire's re-arm from the pack camel carrying small arms ammunition. In the meanwhile the Egyptians, the Screw Gun and the Sudanese push on northwards leaving the Dervish gun to the cavalry and British foot.

The Dervish gun fires again and causes cavalry to become shaken (low strength points making them more fragile) but cause no further casualties.

In the meanwhile the Dervish gunners recover their morale following that single point of damage - laughter is obviously a sovereign cure!! There is no further advance by the Dervish main body but even more consolidation - in essence the Dervish now comprise two large blocks of troops, with only one independent unit remaining.

The British cavalry and infantry having re-armed again open fire, but despite four volleys still only manage to inflict one casualty!

Move 7:

It's getting tedious, but the British cavalry recover manage to recover fully (again). To celebrate, they and the infantry declare charges on the Dervish artillery, while the rest of column moves to the west of the sand dune in front of the village to pass between it and the village.

The Dervish gun fires and causes the cavalry to halt, but the Infantry charge home and the Dervish crew need to test to stand against the British infantry - amazingly (I don't know why I'm amazed - this crew deserve medals for their efforts in this game) they stand! It does them no good - in the ensuing scuffle the British charge home and soundly rout them - they abandon the gun and run to the north.

In the Dervish move, what we were expecting finally happened….the Dervish units had got to the point where they outnumbered the Imperial units in sight, and one of the groups get a "charge!" result - in these rules once one group charges, all other groups also in sight charge. The black flag is raised (continue charging until stopped).

The Egyptians open fire on the camelry - slightly long range but rapid fire, their first shots of the game and.... no hits!

Move 8:

The British cavalry fail to clear their morale check and retire on their horses still shaken. The Rutlandshire's occupy the buildings to their right, knock out loopholes and prepare to receive the enemy. The screw gun and the Egyptians deploy in the open to their right..

The Sudanese deploy to line and move up on the left of the central dune to face the bigger Dervish standard - they'll need the cavalry to support them - and soon!

No Dervish firing as the remaining rifle armed unit is at the back of the westerly standard of Dervish...

Dervish charge continues - the western of the two forces is now within charge reach, but the British firing is OK for once!

Rutlandshire's, Egyptians & Screw Gun all rapid fire causing one unit of Dervish foot to break off and retire, but despite inflicting casualties on the camelry it's not enough to stop them charging home on the Egyptians and the Screw Gun. In the morale tests both the Egyptians and the gun crew fail, and as a result break and run!!

Move 9:

In the British movement the cavalry tested morale and recovered, they then moved their left flank forward to face the onrushing Dervish - the British foot withdraw from the house. The ammunition camel is moved to a position where it can supply both the the Sudanese and the cavalry.

The Dervish charges continue like juggernaut.

The Sudanese fire and inflict some damage on Dervish horse but despite this, they test on the reaction tables and get get a continue to charge result.

The cavalry fire and manage to halt the Dervish camelry - they withdraw out of range.

In the ensuing melee the Sudanese test to stand but break - not surprising given the large numbers of Dervish bearing down on them… one rub of Dervish capture and destroy the artillery train, and the artillery supply camel is now seriously exposed.. things not looking good for the British!

Move 10 (last move):

Despite the presence of Wade-Smith the Egyptians continue to rout, the gun crew recover but with the gun overrun there's little they can do. The British infantry are very low on ammunition but turn to face the Dervish charge.

Dervish charge home on the British cavalry, and the artillery ammunition camel. The artillery camel is quickly taken out - the cavalry test to stand but fail and rout.

The small arms camel is also captured and destroyed.. at which point the British commander orders sauve qui peut - a Dervish victory is won.


Post Match Analysis:
  • In retrospect the "dumbing down" of the Imperial force was a mistake but they didn't help themselves,and some days the dice just don't go your way.. in this instance the dice were poor enough that they hid the fact that the imblance was not quite as great as it seemed...
  • I need to give some more thought to the way that Dervish reaction tests can be "carried over" - example, a unit tests on the reaction table and gets a movement order, I need a way of easily identifying what the order was int he enxt move, and the move after that... some kind of counter is required I think...
  • The sheets I use to mark casualties and ammunition expenditure get very muddled as ammunition is crossed off and then reinstated following re-supply - a better method is required for this as well - may be a little pile of tiddlywinks - too fiddly?? More thought needed...
  • The supply camels should carry more ammunition - in this game they carried an additional twenty rounds, but the Imperial regiments were carrying eight rounds already - I think we can safely increase them to 30 or 40 rounds without gaining the attention of the RSPCA.. :o)

Friday, February 20

ACW revisited part 2...

DC [click here for his blog] gets the kudos I mentioned was up from grabs in my last post, for accurately identifying that the little metal men at the bottom of the post were from Jaclex [click here] .... well done that man.....

Lots of comments from you fine folks so rather than write a long response I thought I'd make it into a post as they raised some interesting points...

Metals or plastics???

Grimsby Mariner [click here] recommended the Perry plastics for the project and I'd be the first to agree there's some truth in what he suggested; they're cheap, a quality product, and indeed a lot of people (including Grimsby himself who I consider no mean slouch when it comes to selecting figures) like the Perry's, but (heads for the bunker...) I don't....

I've looked at them in the flesh (plastic?) and tried to like them but can't.... that's them just above, if you click on it you'll get the usual bigger view...

There's two entirely personal reasons that I can't like them:

  1. I think the infantry all look like they have a case of piles - if you look in the picture check how many of them have bended knee's - all those straight legs make for a very static looking bunch of people, not at all what I imagine the ACW to have been like... (I think the cavalry however are very, very, nice...)
  2. They're plastic...... I know, I know, I can mount them on washers to give them some heft, or I can mount them on metal bases to do the same, etc. etc. but at the end of it they’re still plastic…..


I think my antipathy to plastic comes from my defining wargame experiences…. When I was a spotty callow youth I wargamed with Airfix plastics and thoroughly enjoyed the experience.. if it’s not too grandiose a statement, the experience was life changing - I have now pursued the hobby for 30+ years as a result of the enjoyment I had at the time. Something as defining as that however, can have other side effects as well, I still scratch build scenery on occasion (who does that much any more!), I write my own rules occasionally (usually just before going out and buying a commercial set!) but that early hobby experience taught me that metal figures are something to *aspire* to…

Now that I am (reasonably) well employed I can buy what I always aspired to when I looked in the magazines and books of the day… and that was metal figures. So I have to say that if I was going to buy Perry I’d probably buy the metal one’s before I bought any plastic… I guess that psychologically, I’ve “done” plastics, got the t-shirt (considerably smaller than my current one's) and moved on....

Figure Choice - new style or old style:

...and then John [click here] opened a veritable can of worms by raising the horrible “o” word - opinion, this time over new or old style figures....

Over many many years, I've seen more wargamers in on-line news groups & Yahoo groups get "excited" about the design and make of our little metal men than possibly any other thing.... I've no idea why these people get so worked up about what is basically a perfect stranger expressing an opinion, but nonetheless it happens again and again...

I suspect that personal opinion is such a hideously ephemeral thing that no-one is ever going to be able to persuade someone else that their choice is the right one….. but I'll start by answering the general question John posed first - which would I prefer Perry Plastic or Spencer Smith plastic?? Well, I think it's a great question, and I've added it as one of a number of polls on the side, but if I’m to be brutally honest, it would be “neither, thanks”…

If you said which do you prefer, Perry plastic or Spencer Smith’s in metal - then I’d have a harder time of it, as I’ll be entirely honest and say that I did look at the Spencer Smith’s and was *almost* convinced that they were the one’s for me until I saw the cavalry, which were just a step too far… (see following)
..the step too farI suspect that in certain circles this would be considered heresy, but that same wargaming experience I talked about above didn't just stay in the 70's, I've seen and liked the likes of Foundry, Front Rank, Redoubt etc. and the SSM's are a little too plain.... i'm not a good painter and I need a few raised surfaces so that I know where the brush has to stop...

Slightly separately John also mentioned a range I'd never heard of before - Wodensfeld - this blog [click here] makes interesting reading on the range, and also some other slightly better known one's...

Bluebear Jeff [click here] raises an interesting thought, and Jeff - the figures are exquisite - look at these guys, not a straight leg among them..!

.. but the scale is too big - if I go 20 or 25mm I can re-use my American Revolution scenery, so I had a look at the 25mm Sash and Sabre instead, and I'll admit I'm slightly torn...

...over here I can get them through Old Glory UK, they're not expensive, but on the other hand they're not very old school either... decisions, decisions....

Then I also discovered Newline [click here] which up until now I'd only know because of their Fantasy stuff, but they have a pretty big 20mm and 25mm historical range - I like the 20mm ACW range over the 25mm - here's an example:

So... bottom line, the search goes on and thanks for all the comments chaps. Current research to date:

Wednesday, February 18

ACW revisited...

Oh dear... Littlejohn over at Lead Gardens [click here] has got me all interested in the American Civil War again.... in a recent post he mentions that:

"I had this idea to do two small ACW brigades for a little collection (since I already have a bunch of older style unpainted Old Glory figures that I got on ebay a long while ago.) for some small ACW battles...I was thinking a good start would be the forces in Don Featherstones classic "Battles With Model Soldiers" that he used to demonstrate his rules: 2-20 man regiments and one 12 man cav and one gun per side. A little cav heavy for the period but classic stuff and I am the proud owner of a 1974 vintage hardbound copy!"

Renegade MiniaturesNow the issue I had with my project, and the reason I put it on the back burner in the first place, was the thought that I really couldn't take on another 'figure heavy' period - I have enough trouble at the moment getting the enthusiasm to paint up some more War of the Spanish Succession figures, never mind the American War of Independence project (....and the Sudan Project and the WWII project...! )... but 4 regiments of foot, two of cavalry and a gun aside is immensely manageable... isn't it??

I also hooked out my copy of "Wargames" this evening and had a look at Don Featherstone's "Horse and Musket" rules - beautifully simple, they gave me a lot of fun in my youth playing Napoleonics... so now a seed is beginning to germinate... an old school, classic, wargaming project... small number of units aside and the original rules.... hmmmmmm... got to have Zouaves though - I always wanted Zouaves... so three regiments of foot a side... still do-able...

EssexThen I started thinking about model soldiers (don't we all?!), and then I started thinking about scale.... when I kicked off the American Civil War project originally I had decided I was going to use 15mm Peter Pig ('cos I love them - characterful little figures that are full of life..) but for a project like this I started to think about 25's, and there are so many nice figures about! The picture at the top of the page is from the Renegade Miniatures site (click on it to go to the web page), but there's also Essex (next one down) and Dixon, and Minifigs, and Old Glory.... and the list goes on (and on)...

I'm tempted by the Renegades and the Dixon's, I like the Essex & the Minifigs (and they fit my idea of the classic Old School wargaming project being of that era)... but then I spotted these little guys:

I'm thinking I may have to buy some samples.... but in the meanwhile the kudos goes to the first gamer to leave me a comment with the name of the manufacturer - one clue, they're not quite 25mm!

Thursday, February 12

Sudan cavalry... and a new flag for an old unit...

Just a short post to show the newest British cavalry to join the forces of Queen Victoria in the Sudan... these are the mounted component of the figures used to represent the first troop of the West Sussex Yeomanry, and will join the figures I showed previously (second troop) in forming a squadron should I need them on the battlefield... I have a yearning to return to the sandy wastes after the recent AWI campaign game so may well set something up soon.


Voting also having closed (for which thanks to the 32 of you who did), I can also share photo's of the militia with their new colours! These won by 17 votes to 15...

A truly fine sight, and I think well deserved - though I suspect DG may not agree!

Combat Stress Appeal...

I spotted this first on Soapy's blog [click here], and then also at The Miniatures Page [click here] and think that it deserves as much coverage as we gamers can give it...

In summary, Figures in Comfort [click here] are trying to raise money for Holybush House (Combat Stress [click here]), the organisation that helps ex-service men and women who have mental health issues which have resulted from the stress of military service. Those of you who read "Battlegames" magazine will also know that Henry is also supporting this charity (you can make donations here [click here]),

They plan to commission twelve figures from various sculptors within our industry, and any proceeds will then go to the charity... the first figure has already been sculpted (see picture below) and is by Soapy (who sculpts for Gripping Beast / Woodbine), and I think is absolutely lovely...

Figures should be available at Salute (I shall certainly be investing there).. spread the word - this is a good thing...

Tuesday, February 10

The skirmish ends... and who are those infantry regiments??

Without a bang or a whimper, I can report that the skirmish at Carnine has now ended as of move nine.... I was preparing myself for a long 'stern chase' (apologies, too much time spent on the excellent Warhammer "Trafalgar" Yahoo group recently!) as DG was beginning to make his remaining Ranger unit scarce, but in the end the damage had been done sufficiently that his two failed morale tests in move 8 and 9 resulted in further losses as his unit continued to rout to eventual extinction...

In the picture, at the top of the page you can see the Rangers routing to the north, being followed by the first of my Militia units (the unit that's recently been awarded battle honours - please vote for your flag design of choice by the way - less than 12 hours to go..) further towards the bottom of the picture Lauzun's (the cavalry) are beginning to hit top gear, and you can almost hear the scrape of swords as they are loosened in the scabbard. They are accompanied (more slowly) by the second Militia unit...

Post match analysis:
  • With regard to mechanics, nothing really to add over and above what we've already discussed - nine moves took just over 5 weeks of virtual gaming, and probably would have taken half an hour face to face across the table... I guess we were turning moves round every couple of days or so, but the moves were split down into phases as described in the rules we use..
  • Casualties for the Americans (me) were fairly light - with the Dragoons taking the only damage, suffering 3 SP's lost. Using the campaign rules discussed earlier I rolled and discovered that with a “Current Morale Value” (CMV) of 2 (made up of 1 Strength Point (SP) left and 1 for their morale bonus which is +1 ie. better than average). I then throw 2D6 with the following results:
    1. 2: 2-CMV = 0 = immediate recovery of 1SP
    2. 8: 8 - CMV = 6 = 1SP recovered in 6 hours/turns
    3. 8 again...

    So 1SP back immediately, the other two in 6 turns...


More detail will be added to the campaign page...

On to other stuff - after a marathon session at the painting table in the newly re-organised loftwaffe I have now completed the last stands of the other troop of British cavalry for the Sudan. I'll post some pictures once they're fully based (they don't "count" until then!) but that now gives me the required bases to represent two troops of British cavalry in mounted & dismounted mode - with enough horse holders for both. My Sudan rules use Peter Gilders suggested organisation, & in those two troops make a squadron....

What else?? Nick Dorrell responded to my original post on the research I'd done to see what I could find out about those War of the Spanish Succession units he was trying to identify (thanks Nick) - he seems to have had the same kind of success I did, so once again if anyone has any information on the following units get in touch with Nick via the Early Linear Warfare Yahoo group (click here), or leave a comment here...

When I left this in the last post I said I was going to have a go at finding what I could about the Infantry Regiments next... for the record they are:

Infantry: Mohun's/ Dormer's, J.Caulfield's / Bowles, Lepell's / Richards', Munden's, Gore's, Bourke's or Bourgay's, Dalziel's.

  • Mohun's/ Dormer's: Some success - "Lord Mohun's Regiment of Foot" is listed as having been on the establishment from 1702-1713. They had two tours of duty in Spain - once in 1706, and once in 1710 (and Flanders in between), and according to the history Mohun would have commanded in 1706, and Dormer in 1710 as Dormer became colonel in May 1708. Regiment was disbanded after the Treaty of Utrecht... unfortunately nothing in Grant for their uniform..
  • J.Caulfield's / Bowles: There are two Caulfields listed in regiment.org, but J would be John who was colonel of an unnamed foot regiment from 1704 - 1705; much more difficult search this one - I can't find anything for John Caulfield at all on Google, there are a lot of Caulfields in Ireland at the time though, so I suspect he was Irish gentry?? Now it gets really difficult as the Bowles family seemed to have a liking for the name Phineas - there are two listed! One was colonel of a dragoon regiment so I don't think he's the one.. he was founding colonel of the 12th Dragoons who were raised in 1715, and after our specific period of interest. The other one seems more likely, and according to this site he came from a family of London glass makers, in 1710, aged just twenty, he was commissioned a captain in the 27th (Inniskilling) Regiment of Foot, initially stationed in Spain.... aha! In 1713, Bowles transferred to the 3rd Foot Guards (later the Scots Guards), as captain and lieutenant-colonel. In 1715, he helped in suppressing the Jacobite rising, and in March 1719, he succeeded his cousin (the first one I mentioned) as colonel of the 12th Lancers, stationed in Ireland. Again, nothing in Grant for their uniform..
  • Lepell's / Richards': Probably the one I have most information on already, as this is the same regiment of foot that Nicholas Lepell left when he became Colonel of the Dragoon regiment of the same name (see previous post) - we know that the foot regiment were in Ireland up until the point they were recalled on February 6th 1709. Lepell remained their colonel until 1710, when left to take over command of the aforementioned etc etc etc. According to Regiment.org Lepell was at the Battle of Saragossa in August of 1710 but no idea what regiment it was he was in charge of! The Richards referred to is probably Michael Richards (that's him to the right), who is listed on regiment.org as being colonel of an un-named foot regiment from 1710 to 1711..... a google of his name along with "colonel" and "regiment" got a reference to a Colonel Michael Richards who had commanded the artillery train in 1697 for the "The Newfoundland Expedition [click here]" and this page is his diary from the Siege of Limerick [click here] - is it the same man I wonder?? There are no other Richards's listed in regiment.org, but this guy was artillery/engineer? It does say on this page that engineers at the time had no formal military rank - they bought them in the same way everyone else did - it makes reference to him being on a stipend of £100 per annum, it also says on this page that he ended up as the Chief Engineer, he was also a Brigadier and Surveyor-General of the Ordnance, when he died in 1721. Either way, fascinating sites, and I do recommend the Limerick site for a contemporary account of a siege in the age (roughly) of Marlborough (by the way the file is an SGML file, just save it an open with wordpad, or notepad etc.), but no uniform details! Who said that Google isn't really a gigantic black hole for a geek with an interest in military history?!!

...and that's enough fun for this post - I'll have a go at the others later!

Saturday, February 7

Susan Travers and stuff...

So far the James Holland book "Together We Stand: North Africa 1942-1943, Turning the Tide in the West" that I told you about a few posts ago, has not quite lived up to the high expectations I had - don't get me wrong, it's eminently readable and I am enjoying it, just not quite as much as I hoped to...

Why not?? Well part of the reason is that I really enjoy my military history when it includes lots of personal insight/experience from those actually on the ground - this book is sold on the grounds that it has that in spades, weeeeeellllll, not quite - there is personal experience, but from a fairly small cross selection of participants. Having said that it is readable!

Here's one of the interesting snippets I picked up - at Bir Hacheim where the Free French held the flank of the Allied line during the Gazala battles, they had a woman serving with them. Susan Travers is to this day the only woman to have ever officially served with the French Foreign Legion! At the time she was a driver (and lover!) to the French general Koenig and served throughout the battle..

An amazing woman with an astonishing life.. when war had come in 1939 she was living in the South of France and joined the Croix Rouge, the French Red Cross. Up to then she had been what we'd now call a jet setter doing pretty much nothing at all all day so it was quite a jump, especially when she later confessed she had a dislike of blood and illness - either way she qualified as an ambulance driver. In 1940 she was with the French expeditionary force sent to help the Finns in the Winter War against the Russians. France fell while she was was still in Scandinavia so she made her way to London. She then volunteered as a nurse with General de Gaulle's Free French forces, attached to the 13th Demi-Brigade of the Legion Etrangere, she accompanied them to West Africa where she was in the abortive attack on Dakar. She was then posted to Eritrea and took on the hazardous job of driving for senior officers - surviving mines, enemy attack and crashes - she was also wounded by shellfire. She got the nickname "La Miss" from the Legionnaires, and appears to have had the time for a number of affairs! In June 1941, she became the driver for Colonel Marie-Pierre Koenig, commanding officer of the 13th and they soon fell for each other (though it was secret as Koenig was married). In the spring of 1942 the 13th were attached to 8th Army and ordered to hold Bir Hacheim.

"At the start of May, Italian and German forces attacked in strength, Rommel having told his men that it would take them 15 minutes to crush any opposition; the 8th Army hoped the fort would last a week. Instead, under Koenig's command, the 1,000 legionnaires and 1,500 other Allied troops held out for 15 days, and Bir Hakeim became for all Frenchmen who resisted the Nazis a symbol of hope and defiance." (from the Telegraph obituary for Susan Travers)

When the ammunition ran out, Koenig ordered a breakout at night - Travers drove him through the minefields and three concentric cordons of German panzers that encircled them. They were discovered when a mine went off, but she just accelerated to maximum leading the other vehicles out of the German lines - the car was hit by a score of bullets, and at one time during the night she drove into a German camp full of parked tanks, she got back to the British lines. She was awarded the Croix de Guerre and the Ordre du Corps d'Arme for that.

The affair with Koenig ended (his career was taking off so it wouldn't do would it....) but she remained with the Legion through Italy and France until the end of the war acting as both a driver and a nurse to the wounded and the dying.

In May 1945 she applied to join the Legion officially, lying on the form about her gender - her application was accepted and she was appointed an officer in the logistics division and so became the only woman ever to serve with the Legion.

After the war she served for a time in Indo-China, and married a legionnaire. She resigned her commission in '47 (she'd had children and wanted to look after them) but in 1956, she was awarded the Medaille Militaire in recognition of her bravery at Bir Hacheim (I'd like to have seen that as the medal was pinned on by Koenig who was minister of defence by then!) Forty years later, in 1996, she was given the Legion's highest award, the Legion d'Honneur, in recognition of her unique part in the force's history.

Susan Travers died on December 18 2003 aged 94 and is survived by her two sons, her husband having died in 1995.

Like I said - an amazing woman - hope you enjoyed that!

Next post, back to some more wargaming stuff.....

Wednesday, February 4

British cavalry completed.. and some battle honours!

The horse holders being now complete, I can report that Troop No. 2 of the West Sussex Yeomanry have joined His Majesty's forces in the Sudan!

Here they are - front:
..and from the side..

..and here they are as I will use them on the table top - the firing line can move wherever it likes, but must return to the horse holder figures in order to re-mount..

Figures are 15mm, and from the Peter Pig "Patrols in the Sudan" range..

On a totally separate subject I have been so impressed by the performance of that militia unit in the current skirmish at Carnine, that I've decided to give them a battle honour.. yes I know that militia in the American War of Independence were very unlikely to be granted such things, but they are my armies, and I can do what I like! Question is, I can't decide which one I like most, so I've started a poll (see left)! Look forward to seeing which way you go..

Design#1:


Design #2: