Wednesday, April 28

Raid on St. Michel - Game 4 - "Counter Attack at the Bridgehead"..

While DG was down for the Salute weekend he and I took the opportunity to play the next game in the "Raid on St Michel" linked series of games..

This one is called "Counter Attack at the Bridgehead" and is one of the smaller games in the series without a doubt... All things going to plan the French (as attackers) will have the most troops with 3 battalions of foot, a squadron of horse, and a battery of guns. The defenders (in our case the British) have whoever was left as a rear guard at the end of game 1 [which you can read about by clicking here] which in DG's case was a half strength squadron of horse, and a battalion of foot...

You may remember that one of the concerns I had at the end of the game was the lack of guidance on what kind of threat you should prepare yourself for, and so it proved.. DG found himself trying to hold the river bridge with vastly outnumbered forces and no artillery, and in the end it was the artillery that won this game...

Before we launch into all that however, first the orders of battle for the two sides... click on the following and any other picture for a larger, more agreeable, view...

The French:


The British:


It was clear that this was a one sided scenario - the offer of some artillery to DG then was a way of balancing up the scenario a little - DG being the "complet'ist" he is, of course turned them down so as to play the campaign as designed. A true player...

Next the table... Two views of the table - the French entry point is bottom right - the British (as defenders) deploy anywhere within two feet of the town..

The river is impassible along it's whole length with the exception of the bridge... all hills were classed as "gentle", all woods "open". The majority of the table was therefore open ground (even area's covered by darker green, cornfield etc..)

The Game:

DG opted to place his foot in the middle of town, with his cavalry squadron split into four bases so as to act as a screen...

In the following he is pulling his cavalry back to the village in the face of my cavalry advance guard...

Here comes my main force - cavalry leading - you can see that DG's cavalry has now almost completed re-combining..

DG's plan was, perforce, simple - he moved his infantry over the bridge to where they couldn't be outflanked, and then guarded the bridge with his cavalry (see following)...

Hoping for a quick and bloodless win I of course attacked immediately with my cavalry and eventually managed to push his cavalry back over the bridge in rout...

In the following, the British cavalry have routed from the field - probably best as this gives them the chance of recovering - the French cavalry meanwhile mill in confusion as a result of a failed change of formation die roll (blue pin = disorganised), you'll note that the standard of drill in the French army is not good!

Having eventually managed to change formation, my follow up charge (only one base frontage wide because of the width of the bridge) was repulsed quickly and bloodily by the well timed volleys of the British infantry....

I pulled back, made room for my infantry, and sent the Bourbonnais across the bridge - with the same results!

At which point common sense prevailed and I waited for the artillery to turn up and deploy and then just blasted him out of the way before taking the bridge and the game...

Post Match Analysis:
  • A poor scenario if you haven't put a decent rear guard in place in the first scenario - the problem is that it's kind of difficult to know what travails you have to face in the rest of the campaign when you haven't had a chance to review the campaign book in detail (and the book advises the non-referee'ing player not to). As a result, your planning in the dark (very realistic I suspect, but you would have had some idea surely??) and the obvious thing to do in such a situation is to take as many troops with you to St Michel as possible!
  • Far better I think would have been to do for the British what this scenario did for the French - in this scenario the French are an "extra" they weren't part of the original defence force. You could call the British force "reinforcements" if you wanted to..
  • Battle honours in this game went to the French cavalry and British infantry - both of whom had significant success..

The Butchers Bill:
The coloured boxes indicate a casualty on the unit - the red or the green indicates whether there was then a successful saving throw or not...

Mixed fortunes for the British..

..and finally the French - a more balanced recovery..

All in all then, although pleasant to push some lead, not a particularly satisfying scenario and over quite quickly. Given I don't get to game with DG that often, some more lead was quickly pulled from the boxes and we had a quick encounter game on the same terrain. I have no pictures but this was one of those excellent games where the fortunes of war swing both ways and after a very enjoyable tussle we ended up with a bloody draw... not a wasted evening at all!!

Sunday, April 25

Salute 2010..

As promised a fairly big review of Salute, which DG and I attended yesterday...

This is one HUGE show - the Excel Exhibition Centre is not small by any stretch of the imagination, but the Salute show only occupies one of several exhibition halls (one of which this year was taken for the Virgin London Marathon Exhibition & Registration which takes place today - two more diverse crowds it's difficult to contemplate given the size of you average wargamer, and average long distance runner! sad smileys). The hall I would say must be the size of a couple of football pitches if not larger - truly monstrous....

So what were my impressions of the show? All in all, and on balance, I'd say that I enjoyed the day immensely.. meeting some people I knew was nice (good to see the irrepressible Henry Hyde), the number of traders was immense, plenty of room to move about, some good demonstration and participation games (of which more later), got a bargain or two, bought some of the things on my shopping list - yes, it was a good'un..

..and the downside?? London basically... very, very busy, and a right royal pain of a location to get to as it's in the east end of London... (worth it when you get there though). As to the show? Some thoughts...

  • there seemed to me to be a lot of fantasy traders at the show...all flavours of Warhammer fantasy, and about a million other genre's as well - far more than I remember previously
  • There didn't seem to be so many traders, on the plus side those there were were nicely spaced out
  • The re-enactment numpty's were there - Alan from Tunbridge dressed in his finest dark ages finery .. and trainers.... waving his rubber sword at Jeremy from Penge dressed similarly..... why oh, why...! sad smileys Each to his own I suppose..

So purchases??? Everything I wanted...!

Things started off well at the Caliver stand where I grabbed the "Annexation of Chiraz" - my initial thoughts are that this book has the production values that I think the "Raid on St Michel" should have had - at least 25 extra pages, all in colour, loads of pictures, thicker card stock for the covers, but only £1.50 more - I look forward to playing it immensely! While browsing I also spotted two of the Troiani books on the American Civil War troops at just £7.50 a piece - I had to have the one on the Zouaves!

Zouaves then seemed to become the flavour of the day as when I hot footed over to the Newline Designs stand, to my great good fortune I managed to get two unit packs of Zouaves for my ACW project. I rounded them off with a pack of dismounted cavalry (shades of the Sudan Camel Corps here, as I 'll need to paint mounted, dismounted, and a selection of horse holders for each regiment).

I finished off with four packs of bases suitable for either the ACW or WSS project, and that was me spent up!

To finish off, I had a half hour walk around taking some photo's - trust these are of interest... any mistakes in description by the way are mine - please advise and I'll correct...

OK - here we go - and just to keep you on your toes the first one is of a fantasy game - not my usual haunt but I was much taken by the giants, the blue was very effective (ice or water elementals??) By the way - click on any of the following for a bigger view...


So... in time honoured fashion, in reverse order...

This game was called "Meuse or Bust!", set in the Ardennes during the
Battle of the Bulge - 20mm of course, but what attracted me to it was the rocket firing aircraft - seen it before in games but rarely as effectively...


Next an Ancients game put on by Muswell Militia Wargames club representing the battle of Zama - loads more pictures at bigredbat.blogspot.com


Next up, some more Ancients action - this time in the Dark Ages, and sponsored by Gripping Beast & Grand Manner and demonstrating the new Gripping Beast dark Ages Rules "Beast Wars" - beautiful game - would have been higher only if the period had been more to my liking sad smileys:


...this is more like it though!! A demonstration game to show off the new Napoleonic rules by the League of Augsburg, guys - lovely stuff - and only pushed down the hit list by the hideous counters they were using!

Beautifully painted Scot's Greys:

Now that's a grand battery!

See what I mean about the counters?

Next - forward in history a 150 years or so - D-Day and the Orne River Canal - endlessly popular with war-gamers but this was a very nice, very clean, very neat depiction by Honnington Wargames group - especially interesting to me as I only visited it last summer [click here] and it's still fresh in my mind...


Next up - and unusually for me - I found this participation game absolutely fascinating. "Ride the Divine Wind" was put on by Whitstable and Herne Bay Wargames group.

Usually these games are built to handle large numbers of visitors so are a little basic, but this was absolutely beautifully made... all those flak bursts are individual balls of teased out wire wool... was talking to one of the chaps on the stand and he said the blisters had only just healed!

Basically, the aim of the game is to pilot your torpedo bomber through the flak towards the carrier and sink it... simple, but good terrain, colourful setup and playable simple rules made this a winner...


Next up, and in second place, this was a winner at the show for best terrain - not surprising as that was one of the reasons it caught my eye - this represents the Battle of Bussaco in the Napoleonic wars - the whole game comprised a battle on a modelled slope - beautiful figures - standing on the upslope edge of the table really gave you an impression of being high up!


...and in my first place, yet again, Matt Slade and Martin Holme's depiction of the Battle of Blenheim in 25mm - they painted everything themselves over a period of 5 years. This was the game I first saw at the Warfare show, they didn't win there and yet again they went away without a prize!!! smiley emoticons I'm sorry - I'm just speechless... makes you wonder what you do have to do to win a prize!


...and that's it for Salute 2010 - roll on 2011!

Friday, April 23

Stay tuned...

..dear readers - things are happening, honest!

DG attends Steve-the-Wargamer's 'crib' this evening; we intend playing the fourth teaser in the Charles Grant and Phil Olley "Raid on St Michel" linked sequence of games.. standby for an account soonest, the camera battery is on charge even as we speak for a plethora of action pictures..

Tomorrow DG & I attend "Salute [click here]" - quite possibly the largest wargame show in the United Kingdom - in fact there's little doubt that it is the largest - again, standby for an account with pictures... looking forward to it immensely..

I am part of the way through painting the Union armies 67th Ohio Regiment of Foot - this will bring my American Civil War forces up to brigade strength for each side - three regiments of foot, with artillery, each. Stand by for a potted regimental history, and pictures of the regiment soonest...

Thursday, April 15

War wounds!


...oh, and I put up a post about breaking the boat as well... [Click here]

Wednesday, April 14

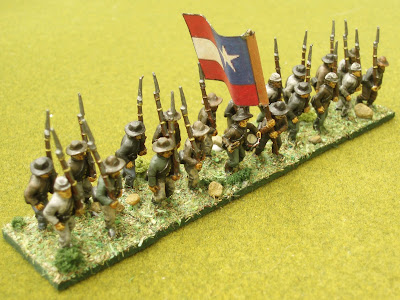
5th Virginia Infantry - the "Fighting Fifth"

Fear not - I am still in the land of the living, though real life has been making a more than unwelcome apperance lately.. last weekend was the weekend from hell with damage sustained to both Steve the Wargamers cat and boat (it had to happen!)

I'll blog separately on the issues with the boat, but suffice to say that after spending a four figure sum, the cat is back among us.. all I can say is thank goodness for pet insurance!!!

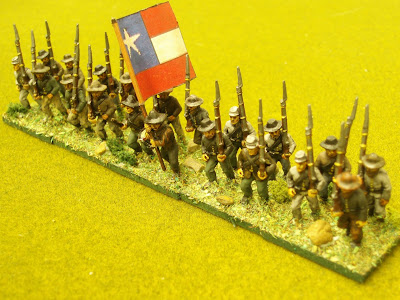
Either way - here's what I've been working on... can I introduce you to the "Fighting Fifth"...

Like the other regiments in the "Stonewall Brigade" the Fifth trace their origins to the concentration of militia companies at to Harper's Ferry at the start of the war.

The 5th Regiment of Virginia Volunteer Infantry (to give it it's full name) was formed in April/May 1861 (sources differ). It was made up of men from Augusta, Frederick, and Rockbridge Counties, and the town of Winchester, which were all in the Shenandoah Valley.

The 5th was originally placed under the command of Colonel Kenton Harper. On July 1, 1861, the Fifth was accepted into the service of the Confederate States, and was assigned to the First Brigade, under Brigadier General Thomas J. Jackson.

There's some interesting stuff on the web about this regiment amongst which I found that "the original muster roles show that most members were between the ages of 18 and 30. The youngest was 15 and the oldest, was 60. Well over half of the men were farmers and laborers, but there was also listed seven lawyers, six teachers, five cigar makers, two dentists, a toy maker, a confectioner, a surgeon, an undertaker, a
"gentleman", and one man listed as "nothing" in the ranks".

It saw action throughout the war, and in the period we're interested in served at First Manassas, First Kernstown, and in Jackson's Valley Campaign. It reported 9 killed, 48 wounded, and 4 missing at First Kernstown, and when they finally surrendered at Appomatox numbered just 8 officers and 48 men.

At Kernstown they were commanded by Colonel William H. Harman (that's his grave over there to the right). Harman was a Mexican War veteran, where he was a 2nd Lieutenant in the 1st Virginia Volunteer Infantry. After the Mexican war he became a lawyer but retained a role in the Virginia milita. In April 1861, two days before Fort Sumter he was appointed Brigadier General of Virginia Militia.

With a brigade of almost 1,000 men, he helped take and hold Harpers Ferry, Virginia, before regular Confederate troops under Stonewall Jackson arrived to occupy it.

In May 1961 he became Lieutenant Colonel of the 5th Virginia Infantry, serving under Kenton Harper until he resigned in the September after First Bull Run. On his resignation Harman was promoted Colonel and took over the regiment until it was re-organised in April 1862 (just afer Kernstown). In the re-organisation he ended up without a command as another officer was elected as the 5th Virginia's Colonel (I wonder why??).

He went on to serve throughout the war but with his health not good he was finally given a command of the reservists. He eventually died after much service, and much fighting, on March 2nd 1865 - within spitting distance of the end of the war.

There's lots more here - he seems an interesting chap, and all other things aside you have to admire him sticking to his guns through all that adversity, right up until the end.. http://www.findagrave.com/cgi-bin/fg.cgi?page=pv&GRid=8706888 [click here]

Figures are Newline Designs in 20mm - for this regiment I went with the buttenut/homespun look with just the odd item of official uniform scattered among them. I quite like them - but they're a pretty dark and menacing bunch!