Monday, September 27

1st Michigan finished!

Pleased to report that the 1st Michigan are now totally complete.. click on any of the following for a pleasingly enlarged view....

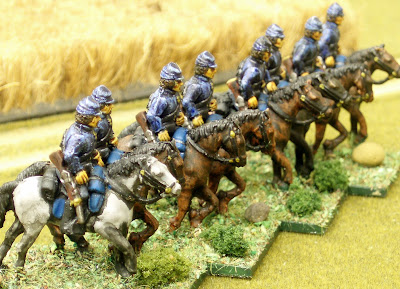
That's in all their table-top guises, dismounted [click here - and also for unit history], with their horse-holders [click here] for when in dismounted mode, and now also in this, their mounted mode...

I could rave for hours about how much I like these figures, but I think the best thing about them is that even my "painting savagery" doesn't spoil the lines...

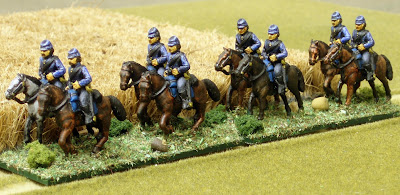
Purposeful I like to think...

I especially like the grey on the end - he worked out quite well in this batch...

Figures are 20mm Newline Designs - painting was done in my usual style (rushed and botched... ) - black spray undercoat, dampbrush all over in white, and then predominantly a succession of inks/washes.

For the horses I used an old bottle of Citadel "Chestnut", the darker one is Vallejo "Smoke" - I didn't use anything for the grey - just a slightly heavier damp brush with the white than the others.... I then washed them all over with a very thin black wash... I went back to do mains/tails/bottoms of the legs/harness in plain black...

Coat tunics are Winsor and Newton Calligraphy ink "Dark Blue" - I like the way it highlights & shades all in one coat when painted on top of the white... I used their "Black" for the previous step... I like these inks so much I may try some of the browns for horse colours... only "downside" is that the inks are water soluble, but I like it, as it means a simple wet paintbrush easily fixes mistakes...! The inks are then fixed at the end with a matt fixative spray..

Dismounted mode - extended skirmish line with horse-holders behind....

The next eight are already under-coated and waiting to be turned in the Confederate 7th Virginia...

Tuesday, September 21

Horse holders...

Wow - clearly the trip to the Colours show was more affecting than I thought.. I had an almost overwhelming urge to pick up a paint brush when I got back... these guys were already under-coated so they were the unlucky candidates and drew the short straw!

These will provide the markers for my cavalry regiments when they dismount... these are the horse-holders for the Confederate 7th Virginia Cavalry [click here].


The following are the horse-holders for the Union 1st Michigan Volunteer Cavalry [click here]


..actually I think it's more to do with DG's visit and the sheer pleasure of pushing some lead around!

Figures are 20mm and Newline (I will try some other manufacturers at some point in time, but at the moment I'm wholly enjoying painting these little guys!)

This time I tried a new technique with these horses.. my favourite horses are bays - usually I use a paint to get the reddish brown colour (Vallejo Maron). This time I decided to save time - black undercoat, damp brush white, generous coat of some (very old) chestnut coloured Citadel ink, once that is dry over-brush with a generous coating of (very) dilute black ink, with a final darker black ink for mane and tail and the bottoms of the legs - done! No more than 10 minutes for all four, but I think they look OK... a little dark, but in the flesh they're good.

Next step - and already started - is the mounted versions of the regiments. First off the chocks will be the 1st Michigan.

Monday, September 13

The Depot..

Seeing as my regular wargaming opponent DG was down for the weekend to attend the Colours show [click here] we also took the opportunity to have one of our all too rare games... I gave DG the choice for the game and he said either AWI or ACW; ACW if there was enough units... by putting everything on the table I think I had enough for an ACW game, DG agreed, so ACW was to be the game of choice.

So choice of game decided, the next issue was "what scenario"?

This one was also easy - while reading the "Wargaming in 28mm" blog the author happened to mention a scenario that he'd found called "No Room at the Inn [click here]", and I liked the idea's in it so much that I took it, shook it around it a bit, and renamed it "The Depot".... so here for your reading pleasure is what happened when the Confederates under the command of DG, met the forces of the Union (that would be me then), at "The Depot"..

Background

A Union brigade comprising three regiments of infantry, a dismounted cavalry regiment (acting as skirmishers) and a 12pdr Napoleon has been given the task of holding a strategically important area on the flank of the main Union advance - they are faced by a similar sized Confederate force with similar orders.

The are is strategically important as it is dominated by three geographical features, and a logistics feature - specifically in the following, then hills labelled 1/. and 2/., and the bridge (labelled 3/.) and the logistical feature is the depot itself..

By the way, click on any of the pictures in the post for a pleasingly bigger view..
The hills are the highest points in the immediate vicinity and provide a commanding view of the surrounding area, the bridge provides an easy access route to the open country on that flank. The depot contains stores and equipment useful to either side, but garrisoned at the start of the game by the Union dismounted cavalry detachment..

We diced for table sides..

Orders of Battle:

All the following are Infantry unless otherwise stated. As we are still in learning mode on Regimental Fire and Fury (RF&F hereafter) rules, the brigadiers & colonels were all standard quality ie. no exceptional/distinguished leaders (which struck us both as being exceedingly apt!).

Confederate Order of BattleQualityFresh/Worn/Spent valuesComments
2nd VirginiaTrained8/5/3Rifled muskets c/w bayonets
4th VirginiaTrained10/7/4Rifled muskets c/w bayonets
5th VirginiaTrained10/7/4Rifled muskets c/w bayonets
7th Virginia Cavalry (dismounted)Trained8/5/3Breechloading carbines
Union Order of Battle QualityFresh/Worn/Spent valuesComments
14th IndianaTrained8/5/3Rifled muskets c/w bayonets
8th OhioTrained10/7/4Rifled muskets c/w bayonets
67th OhioTrained10/7/4Rifled muskets c/w bayonets
1st Michigan Cavalry (dismounted)Trained8/5/3Occupying the depot building. Breechloading carbines


Victory Conditions:

One point each for the terrain features, two points for the depot. Person with the most points wins..

The Game

Any mistakes in the following are purely mine - I neglected to take notes on the evening, so am remembering the gist of the action from the pictures!

Both DG and I set up with the majority of our troops at the far end of the table in the picture above - clearly hill #1 would be a heavily contested feature. DG as Confederate commander had one regiment facing hill #2, two regiments in the half of the table with hill #1 with the skirmishers as a screen to the regiment furthest on his right. His artillery started the game unlimbered, on the little hill within his deployment area.

I set up mine with two regiments facing hill #1, supported by the limbered gun. My skirmishers were already in the depot, and I had my third regiment on the road leading to the depot as I wanted to make sure I retained the two points represented by the depot.

The game started in fine style with advances on all sides, and with DG opening fire with his artillery as soon as he had a reasonable target.. as a side note we found the artillery particularly ineffective on the evening - one they were only 12pdr Napoleons (not rifles), but also we only had one each so lost the "battery" bonuses you get in RF&F

In the picture above, which is taken looking towards the Union left one regiment in column is moving swiftly towards the hill supported by the artillery. Between them and the viewer another regiment has already deployed into line to reduce the damage cause by the Confederate artillery (black flag - that unit has lost a stand). Nearest the picture the remaining Union regiment is hot footing it towards the depot to provide assistance..

...as DG had rapidly advanced the 2nd Virginia down the road to try a coup de main against the garrison. In this picture the Union troops are actually in the building - they're placed where they are to indicate their positions within the building..

With some quite superior shooting the Union skirmishers cause multiple hits on the 2nd but are eventually driven from the building - elsewhere DG had moved his infantry to the foot of hill #2 as well - things were not looking good for the Union side...

Happily this was the low watermark of their experiences on the night..

As the Confederate skirmishers reached the bottom of hill #1, the Union artillery deployed and opened up an (ineffective) counter battery fire on the Rebel gun...

while the Union infantry deployed into line and charged over the hill sweeping the skirmishers, and the following infantry off the field... got to love that "cold steel"!

With the attack by my remaining infantry on the 2nd Virginia in the depot being successful, I then opened up a withering fire on DG's remaining regiment on hill #2 before DG conceded that he didn't have enough strength left to stop me from gaining all victory points (if I wanted), and conceded...

Post match analysis:

  • An excellent game of swings and roundabouts - truly did swing both ways this game - but I had some lucky dice throws in the second half of the game that in the end swung it my way. I suspect DG might also have reconsidered his decision to sashay the 2nd Vg. up the road in light of the damage they subsequently took from the occupants..

  • RF&F is an excellent set of rules, and in fact I have now ordered the full version (up until now DG and I have been using an old beta version) but one of our bugbears is tracking the mods each move - a regiment might have to check modifiers up to four times within a move (for the move, for firing, & for possibly two rounds of melee) - what we would like is a way of noting this easily so that we don't have to keep working it out. If anyone has any idea's on this please leave a comment! In the meanwhile I think we're going to try using small index cards - one per regiment - laminated, so that we can make notes and cross off values with a foil pen...


Roll on the next game...

Colours Wargame show.. 2010

Just for once, this year DG and I attended the Colours show on the Saturday - traditionally we've always attended on a Sunday but for one reason or another Saturday was the only day I could make (a complicated story involving the current Mrs Steve the Wargamer, the availability of Steve the Wargamer's sister, and the Southampton Boat Show which I won't recount..)

Arriving bright and early (just after 10) the first surprise was the large queue - not something we're used to seeing on a Sunday (the second surprise was the hideous downpour when we were still 25 yards from the door!) - I wonder if it isn't time for the Newbury & Reading Wargames Society to consider queue buster badges a la Salute... might make things easier...??

Either way, it warms the cockles to see so many wargamers piling into a show and Colours continues to be a huge attraction - the move to the racecourse at Newbury those years was inspired - if only for the perfect light that seems to stream into the building (well the first and second floors anyway!)

So.. a busy show, and because of all my sailing activity this summer I wasn't looking to buy any lead (though Newline and Black Hat were both their trying to tempt me out of some cash!) - I have stuff ready to paint, it's time I've not had; though that will change soon enough as my boat comes out of the water for the winter in two or three weeks time..

No - this trip I had one thing I definitely wanted, other than that I was there to browse... the thing I definitely wanted was a copy of the recently published "Regimental Fire and Fury" which I got. A small moan - why does Caliver have to be more expensive than everyone else??? It seems a small thing, but their copy of the rules was almost 10% more expensive that where I went and bought it - OK, it's only a couple of quid but I find it slightly irritating.... so if any of you want a copy, you can buy it cheaper from the Wargames Emporium and although it's not listed on their website I also saw it on the Miniature Wargames site...

Elsewhere, have you ever had that amazing feeling to have found a bargain on the bring & buy only to find out that you already have the item in question when you get home?? Me too on this trip!! I could have sworn I didn't have a copy of this book (Omdurman by Ziegler), but when I got home I found out that I have it in a different version.... bah - n'er mind, it will go to a good home eventually.

As was my wont, I had a look around the demonstration games, and have to say that in my view it was a "fallow" year - there were no really stand out games... so as usual, here's my top 3, in reverse order...

In third place, a large Napoleonic game put on by the Bedford Gladiators - 28mm and depicts actions during the Borodino Campaign ... impressive, but let down a little by the lack of sign-age to explain what was going on... click on any of the following for a gratifyingly bigger view by the way..


In second place a much better documented game - "Operation Hands Up!" - and a very friendly set of gamers who explained to me all the game was tying to represent - this depicts a fictional invasion of southern Brittany in July 1944 by a US infantry division and 1st British Airborne - fictional, but based on an actual WWII plan to do exactly that so as to capture an Atlantic port intact... lovely looking game, using Rapid Fire rules and put on by Maidenhead and District Wargamers..


..and in first place, a bit of deja vu as I last saw this game at Salute just five months ago (where it won "Best Terrain") this is the game by the Loughton Strike Force, based on the battle of Busaco, and with the most amazing terrain ever - the whole table depicts a ridge, most effective... beautiful figures too.


Some honourable mentions as well for Mid Somerset Wargamers who had a nice game based on the British garrison in Tangiers during the 20 years we held the town (the following from their website)

...also a very nice Spanish Civil War 10mm game which just wouldn't photograph well - Russians versus Italian put on by Dunbristenham Gaming Collective (cool name!)...nice looking - nice people too - happy to chat about the game...

..and that was it - roll on Colours 2011!

Thursday, September 9

Dawn Attack - End Game & Post Match Analysis

..with the imminent arrival of DG for a visit it was time to crack on and complete this game so that I could free the table up for another gargantuan tussle between our two giant intellects.. (yeah yeah.. ). One of the joys of having a permanent wargame table in a separate room is that I get to leave the game in situ, picking up a move every now and and again, whenever I have time - this one has been set up for about two weeks now though, and even my little one's had noticed I was being relaxed...!

So let's push on - you may remember that the last two moves were phenomenally "busy", the next two moves were not so..

In move 12 the the Confederate attack seemed to slow almost to a half as the dice that had definitely been flowing in their direction up until then, suddenly turned - the Confederates ended up with almost universal half turns and stand fasts.. the Union firing on the other hand had definitely picked up, and they caused the first casualties tot he 5th Vg. in this move. Unfortunately the Union couldn't capitalise on this as they also got slow movement rolls..!

End Move 12 - a lot of firing but nothing conclusive

On move 13 though, the Confederate juggernaut picked up. In their movement phase the 2nd Virginia (bottom right of the above picture) crashed home on the remnants of the 14th India and we had another massive dice difference that resulted in the 14th being removed from the field...

End Move 13 - End of Game

...and there I decided to end it - with only one effective unit remaining, the Union player had lost as the Confederates had pinned his only unit and were bringing round their two other regiments for further flank and rear attacks... On to Richmond? I think not.... on this occasion at least...

Post Match Analysis:
  • Despite appearances, this game is quite balanced - what made it not seem that way was the push that the Confederates go from some quite phenomenal dice throws in turns 9 & 10 - but that's "war" for you, sometimes you get lucky...
  • If you wanted to give the Union side more of a chance, then you might want to allow the outposts buglers/gunshots etc. to wake the camp earlier - if you do my suggestion would be to ensure they are not too far away from the camp.
  • As an alternative to dicing for which move the outposts see the Confederate columns, you could allow sighting rules - just making it easier and easier to see the column as it gets closer.. use dice with plus modifiers as they get closer to the outpost...
  • In the original scenario Charles indicates that dawn strikes the moment the first outpost sees a Confederate column - I played it that dawn was when the first Confederate unit reached the camp.. this effectively gives the Union player a small advantage, as the Confederates are moving at a slower rate for longer and he therefore has longer to deploy..
  • In the original scenario Charles allowed the outposts to move though the camp alerting troops in a curve as they moved through the camp - I used alerting by grid - it was much easier to manage, and to work out who was and wasn't, alerted.. each outpost could move one grid within the camp per turn, and everything in the grid was alerted at the same time..
  • Lastly, it wasn't my original intent, but at the end of the game I allowed the Union outposts to form and serve as a unit - dismounted cavalry in this case. Not that it made much of a difference!
Good fun - yet again an enjoyable tussle using the Regimental Fire and Fury rules..

Stay tuned for a review of the game DG & I played (more ACW I'm afraid, but as DG was visiting I gave him the choice of game and he wanted to see how the rules played on the tabletop), and also a trip report as it was/is the Colours wargame show this weekend - which was why DG was down..

Wednesday, September 8

Dawn Attack - Move 11

Another action packed move - I'm exhausted....

In their move the Confederate's spent some time consolidating - having dealt with the gun, the 4th Virginia deployed into march column with a view to moving up the left flank, outside the camp, to support the 2nd Virginia..

In the town, despite a desperate volley the two bases of the Union 8th Ohio regiment who had managed to gather, were unable to check the 5th Virginia who crashed home with so much force they later said it could be heard in Richmond... the two bases of the 8th Oh. were destroyed, and the regiment is now "worn".... (Regimental Fire and Fury uses opposed die rolls for melee - the difference once modifiers had been applied was +9 to the 5th Vg.!)

To the north of the camp the 2nd Vg. were doing very nicely thank you... shades of the previous move as they clash again with the 14th Indiana forcing them back again for the loss of another stand, but the 14th are reinforced this turn to bring them up to strength again... the move ends with an exchange of gun fire with the Union dismounted cavalry (you'll note that in the following I've allowed the surviving Union outposts to serve in their original capacity as dismounted cavalry)

Positions then are as follows:

I suspect the end is in sight, but despite what appears to have been a relatively easy Confederate victory (so far!! ) this was only because they have been consistently lucky on the dice rolls!

Monday, September 6

Dawn Attack - Move 10

Very definitely a key move - but I'm not completely sure yet for who (although I have my suspicions!)

The following shows the position at the end of move 10, and it should be clear that some fairly major actions have taken place..

Starting in the top right we have the action at the redoubt where the gun has done sterling service for the Union to now, but whose luck finally broke this turn allowing the 4th Virginia to storm over the top of the breastwork, "a screamin' and a hollerin' fit to bust"... In rules terms, a poor dice throw by the artillery resulted in a disordered result on the Confederate infantry, but not sufficiently strong enough to check them. In the ensuing melee, despite the bonuses for being in the redoubt, they are outnumbered and unsupported, and the gun is abandoned...

In the next part of the move (the Union movement phase) the other Confederate regiment (the 5th Virginia) turned half the ranks and a devastating volley resulted in the crew being dispersed permanently...

In the middle, the Union 8th Ohio regiment has formed enough ranks to try and advance on the other face of the 5th Virginia, but neither side is strong enough to get a telling result from the firing.. You'll note that the Union regiment has a little black flag next to it - I use double stands for my Regimental Fire and Fury bases, a black flag indicates one of the stands is dead - the next casualty will then result in a full base being removed...

Last of all, we have the other melee in the bottom left - now this turned out to be immense fun. In the Confederate movement phase the 2nd Virginia charged home on the Union regiment as the 14th Indiana were unable to stop them by firing (shades of the artillery engagement). The first round of the melee resulted in a dead draw, and an immediate second round of melee, which this time the 2nd Virginia won - causing the 14th Indiana to go tumbling back in some disorder.

End of this round of the melee - both regiments disordered, both lost a stand, but the 2nd Virginia hold the ground, and the moral victory (??).

In the Union movement phase, the 14th are reinforced by one of their arriving bases, and charge home again - the 2nd Virginia hold their fire for the cold steel bonus. In the ensuing melee the 14th Indiana are again sent tumbling back - a further stand lost results in a whole base being removed. Laurels to the 2nd Virginia...

Now that's what I call an action packed move - and in real terms that represented 15 minutes of action. In game terms the action so far has represented two and a half hours. Quite realistic I think..

Sunday, September 5

Dawn Attack - Move 6 to 9..

Not wanting to bore you all rigid with the turn by turn mechanics of how the game unfolded, I'm switching to a more narrative style..

So when we left off in the previous post, it is sufficient to say that the hornets were soon buzzing in the Union camp - some Union troops were deploying, others were still stirring, and in the interim the Confederate troops were forming and beginning to approach the camp..

End Move 6

In turn 7, one Confederate regiment (2nd Virginia) was still in march column and heading north, with the camp to the east - there orders were to try and disrupt any Union troops leaving the camp from forming. The other regiment in the brigade (4th Virginia) had deployed into line and moved towards the (now manned) Union gun in the redoubt.. a charge was declared, but in the Union firing phase somewhat amazingly the Union gun threw a 9 - with other bonuses it was enough to bring them screaming to a halt, and the first casualties of the game were scored... one up to the Union. Elsewhere, the Confederate 5th Virginia regiment had entered the Union camp via the road...

End Move 7

The Union artillery continued to provide stirling service and continued to keep the Confederate infantry at bay - I threw a nine in move 7, but I threw a 10 in move 8! Now you may remember that DG and I use two D10, and divide the result by two when playing regimental Fire and fury, rather than using a single dice - so yes, I threw two 10's! Happily, I also got away (by 1) with not getting a low on ammunition result..

End Move 8

Both sides continue to deploy and, the Confederate infantry on the road have deployed into line.. the 4th Virginia still haven't managed to get past the gun but have managed to silence it on at least one turn...

End Move 9

Third blood to the Confederates as the 5th Virginia on the road cause there first casualties to the Union infantry... the Union troops however are beginning to form...

Stay tuned!!

Wednesday, September 1

Dawn Attack - Moves 3 to 5

Move 3:

Confederate movement:
  • South-western column - gets a “tardy” dice throw (half movement) and slow progress continues..
  • Eastern column – clearly the performance of the south-west column is catching as they to throw a tardy result, but this is enough to allow them to capture one of the Union outposts.
Union movement:

Things on the Union side begin to start moving and shaking....

The first outpost jumps the barricade into the redoubt (the first grid square) containing the gun – the gun is not manned so no reaction throw is required..

The second outpost scouting the south-western column reaches the camp limits, as does the lone outpost scouting the east column.

All being well at least one of the outposts will start raising the alarm next turn.

Move 4:

Confederate movement:
  • South-western column - picks up the pace with a well handled result – my plan is to march across the front of the camp so as to shake into line with plenty of room to deploy..
  • Eastern column – also gets a “well handled” result – same plan…
Union movement:

  1. The first outpost (A/. hereafter) runs into the buildings (4.) where the gun crew is sleeping and blurts out the alarm. They throw a “7” on 2D6 resulting in a “Horses retained but guns cannot be moved” result, but the “Gunners move to man gun”.

  2. The second outpost (B/. hereafter) scouting the south-western column, enters the camp in grid A3.

  3. The lone outpost scouting the eastern column (C/. hereafter), enters the camp in grid A1.

Move 5:

Confederate movement:
  • South-western column - continues the pace with another well handled result – I’m almost at the point where I want to move into line..
  • Eastern column – also gets a “tardy” result – just coming in line with the farmhouse
Union movement:
  1. Having alerted the gun crew the outpost then moves into 7/. to alert the first half of the 14th Indiana sound asleep in their tents (two bases/four stands)
  2. Moves from A3 to building 3/. where he alerts those elements of the 8th Ohio asleep there (two bases/four stands)
  3. Moves from grid A1 and into 2/. To alert the other half of the 8th Ohio (three bases/six stands)
Not surprisingly then the camp is beginning to buzz!

I placed the brigadier in the house (3/.) with the 8th Ohio; I’m allowing him free movement to decide what he wants to do… for the others, there was a lot of dice throwing, and on the assumption a picture is worth a thousand words – here’s what’s happening:

The blue dices represent the outposts moving through the camp, grid by grid… starting on the left then we have

C/. Alerting the 8th Ohio – three bases – one of them got a deploy immediately result and I put them on the table – the two other bases are obviously groggy and have got wait two turns and test again results (bases stay on the map, the yellow dice indicates the turn to the next action – I turn them over each turn so that way I only have to make a note of the action, not when it happens)

B/. Alerting the 8th Ohio – two bases – one of them has a “1” he’ll deploy out of the camp next turn – the other has a “wait two turns result”

A/. Alerting the 14th Indiana – two bases – both of them have a “wait two turns result”

...spot the error - the gun crew were not actually there, they deployed in the previous turn. Scuba Site

==============================


Stay with us for turn 6!