If you're a control freak like me you love using tables in blog posts for things like battle reports/casualty tables/orbats and the like.. just found this site, it's the dogs nadgers... 😀
http://www.tablesgenerator.com/
Just create your table, push the button to generate the code (I suggest using the "no CSS" option its simpler) and then push the button to copy to clipboard. Go to your new post and copy the contents of the clipboard into the HTML tab of your post and jobs a good 'un..
The interweb is a wonderful thing...!
Saturday, October 31
Thursday, October 29
"Marston Moor" - a review


The latest in Michael Arnold's fictionalised account of the English Civil War (amazing to think that this is number 6 in the series!) as seen through the eyes and sword arm of his eponymous hero Major Stryker.
This time the year is 1644, their loss at Cheriton a few months before has sent a shock wave through the Royalist cause, but the focus has now shifted to the North where York is held strongly for the King but is threatened by a Parliamentary force now strengthened and reinforced as a result of the signing of the Solemn League and Covenant [clicky] by a strong Scottish force.
The King orders Prince Rupert to relieve the siege and set things to rights in Yorkshire and the north, and Stryker, of course goes with him, this time though as a 'reformado', an officer without command (his force of musketeers was lost/drowned/captured in the previous book) he has only his closest companions, including his sergeant Skellen, to help.
The book opens then with the siege and taking of Bolton - one of the more bloody events of the 1st Civil War. The victorious Royalist forces ran amok as a result of the garrison of the town having hanged a Royalist officer on the battlements following an earlier failed assault... in the chaos that follows the successful attack, Stryker interrupts a band of Royalist mercenaries ( Hungarians) lead by a splendidly over the top character called the "Vulture" (he likes to sharpen his teeth to points with a file in his spare time
), who are about to torture a young girl, the last of her family still alive. It transpires of course that she is the key to the source of a cipher that the Vulture is trying to recover, and the Vultures efforts to kill Stryker, and take back the girl are a background theme for the rest of the book as it seems the Vulture is working for a spy master who is keen too cover his tracks...Having taken Bolton, Rupert then moves on Liverpool (he needs a port in order to land supplies and reinforcements) and having taken Liverpool relatively easily, he gathers his forces and moves on York, and an appointment with disaster..
The campaign was a disaster for the Royalists (of course) and Arnold is very good on the ambiguous letter from Charles to Rupert which Rupert took to be a command too attack and destroy the Parliamentary army (despite being hideously out numbered), but which other advisers didn't see the same way. Following a couple of lightning marches Rupert managed to out manoeuvre the Parliamentary forces outside York, and having lifted the siege joins his army with the Royalist forces from the city and then moves to force battle - the two sides meet on Marston Moor..
The outcome of the battle is pretty well known to anyone with a passing interest in history, military or otherwise, so it is no spoiler when I say the Royalists not only lost, but lost badly... the battle is very well described in the book and I would say comprises a good quarter/fifth of the entire book (in his notes at the end the author said he was planning to write an entire book featuring just the battle!). Within the confines of what is essentially fiction, the author describes well how each piece unfolded and how the Royalists eventually managed to snatch defeat from the jaws of victory (at one point, all three Parliamentary commanders had left the field convinced they had lost)...
The book ends with Stryker and his friends captured after the final last stand of Newcastle's "Lambs", the famous White Regiment... stirring stuff indeed.
The publishers (I note) are still including the "Sharpe of the Civil War" sticker on the cover of the books, if I was the author I think I'd be a bit irritated by now given that this is the 6th book, and his hero really is standing on his own feet/merits now, though having said that, and I'll say it again, my favourite character is Lancelot Forrester, a mere captain of foot, but I think far more well rounded as a character - Stryker is a bit too much of a cartoon/exaggeration...
Cracking bit of escapism... I'll give this one an 8...
Sunday, October 25
Bengal Lancers in the Sudan
..wonders will never cease - he's finally lifted a paint brush on something other than the boat... 😏
The Minifigs figures I bought have finally seen some paint applied by something other than a spray can (ie. the undercoat)!
This is what I was trying to represent..
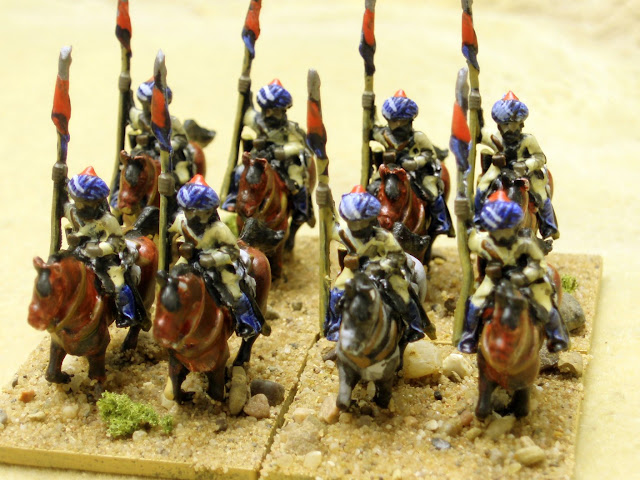
This is how they came out..
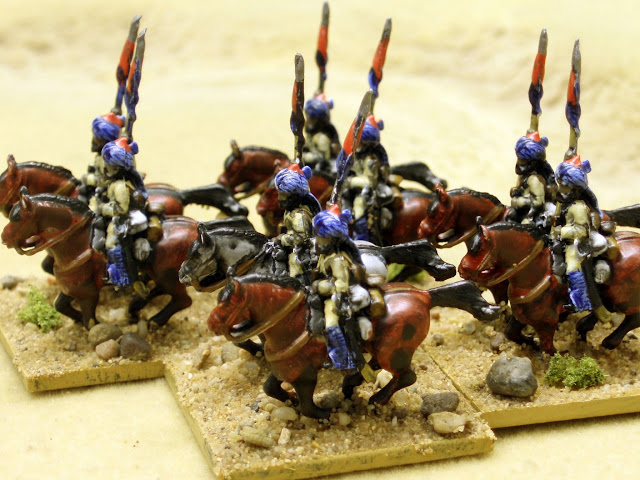
My research would indicate that three regiments of Bengal Lancer/Cavalry served in the Sudan at various times - there were thirteen or fourteen regiments of them in total but the rest served in either Afghanistan/Peking or locally in India...
The Minifigs figures I bought have finally seen some paint applied by something other than a spray can (ie. the undercoat)!
This is what I was trying to represent..
 |
| Caton-Woodville (of course!) - illustrated London News 1882 - 13th Bengal Lancers in the Sudan showing campaign dress/equipment |

My research would indicate that three regiments of Bengal Lancer/Cavalry served in the Sudan at various times - there were thirteen or fourteen regiments of them in total but the rest served in either Afghanistan/Peking or locally in India...
- the 9th [clicky] - in 1885 which was the year they became Lancers - there is an excellent regimental history of their time in the Sudan on this page and I recommend it highly - fascinating reading... I painted mine to represent this regiment using the excellent Perry Miniatures uniform guide [clicky].. I'll be honest and say I picked them purely because the turban looked to be the least complex to paint!

- the 10th [clicky] - in 1885 at Suakin
- the 13th ( (Duke of Connaught’s) [clicky] - in 1882 they served at Tel-el-Kebir where they impressed the aforesaid Duke so much that he asked the his mother (who happened to be Queen Victoria!) for the honour of being their Colonel in Chief.

Given they were my first painted figures in some considerable time (the first three or four units after a hiatus* are always troublesome, and then you kind of get into the swing.. which isn't to say they get any better painted, just a little quicker..!
)
So eight figures, Minifgs, 15mm, painted with Vallejo and Games Workshop paints, and Rowney inks (turban, puttees and lance pennant).. 2 pts a figure on the Olley scale, 16 points to add to my pitiful yearly score...
* from here on defined as any period long enough for your water jar/mug/beaker/receptacle to completely dry out... clearly this doesn't apply to those still on the Humbrol dark side...
Wednesday, October 14
Portsea Island Beer Festival - 2015

A most enjoyable event, the venue is beyond compare (a Victorian era building, now a theatre, but originally a school, and the site where Mrs Dickens went into labour the night before Charley arrived), but not an outstanding festival in the humble opinion of the cognoscenti I was with... poor'ish beer choices, an execrable band playing far too loud music of hideous provenance (psycho-banjo-billy cod-Irish covers of Dolly Parton classics from what I could tell - difficult to say though, as my ears were bleeding at the time...😏)
Once we had slipped away downstairs however, all became far more civilised... a table to ourselves (albeit the room became busier and busier as the festival went on.. funny thing that..) and much banter was had - as is the way of these events.. friend Richard availed himself of the festival food offering, which was so picturesque I have to share it with you:

That my friends is a Goan Curry sausage from the O'Hagan Sausage company [clicky] - in this case covered with a sweet mango chutney, and just seconds away from being devoured (he practically inhaled it!), sometimes only a meat based product wrapped in starch will hit the spot... 😋
So without further ado here were the beers partaken of..:
| Brewery (clickable) | Beer (click for more info) | ABV | Notes (from brewery website) | What I can remember... |
| Thornbridge | Brother Rabbit | 4% | "Lemon zest in colour with a clean, hoppy aroma. A resinous finish and some bitterness." | From the same brewery as one of my all times favourites - the inestimable "Jaipur" - so a definite shoe-in as my first choice.. not disappointed; lovely and tangy. |
| Stewart | Pentland IPA | 3.9% | "A golden dry ale, with slight fruit tones and a moderate bitterness. Fresh hop cones are added in four stages to contribute a more complex character, resulting in an easy to drink ale that offers refreshment with a little extra spice." | Tasted excellent, but having swallowed it you were lift with nothing but a watery taste... Shame |
| Oakleaf | Hole Hearted | 4.7% | "The use of Cascade hops gives this golden ale powerful floral and tropical fruit flavours, and a delicate bitterness." | This is a tried and trusted ale for me and a particular favourite - the brewery note (for once) do not lie - recommended... |
| Phipps | Midsummer Meadow | 3.9% | "A fresh interpretation of the classic Phipps style of sweet, amber-gold ales but using modern aromatic Amarillo hops." | This was good - a very hoppy/bitter ale... |
| All Gates | Gin Pit | 4.3% | ”A saffron coloured ale with a dry finish from juniper berries” | An object lesson in not letting marketing people name beers.. who in their right mind would want to try a beer with "pit" in the name? Glad I did, this was recommended by one of my fellow imbibers, and it was my beer of the festival.. vibrant, lively, bitter, citrus, with an ever so slight gin/juniper hit.. cracking... |
| All Gates | Samhain | 4.5% | “A dark Ruby ale with lots of aroma from the wonderful Bramling X hops” | Liked their Gin Pit so much I thought I'd also try their other offering - not so good, too sweet for me.. |
| Bank Top | Pavilion Pale | 4.5% | "Created shortly after the brewery moved site to a tennis club pavilion, this ale is extremely pale. The flavour is well rounded using primarily First Gold Hops and Cascade to finish." | No notes for this one... |
| Oakleaf | IPA | 5.5% | "Initially dry and bitter, full flavoured and complex marmalade/aniseed notes follow,which leaves a lingering bitterness on the palate". | Last one, and I'd been saving myself for this one - big flavours, but a bit heavy.. "Gin Top" wins it by a nose.... |
 |
| Cheers! |
Sunday, October 11

Wednesday, October 7
"One Hour Wargames" - Scenario 4 - "Take the High Ground" - revisited...
With a few hours to spare yesterday, and as the table still set up from the last excursion, I thought it might be time to put my words where my mouth is and have a go at the alternative tactics I proposed at the end of the last post... time would tell if I was talking my usual bolleaux.. 😏
With apologies for the quality of some of the pictures - which were taken direct from my Hudl - here's how it unfolded...
Set up - following - Confederate deployment pretty much as it was in the last game.. I have the Zouave's (my "elite" unit) on the front slope of the hill supported by another regiment of infantry (Virginian's, as were all the Confederate foot ... Stonewall Jackson's famous "foot cavalry", but for this game all classed "average")... the Union deployment has that rifle armed regiment to the fore in the centre - supported by another regiment in reserve.. the other regiments were deployed in column on each flank for a little enveloping action... given the Confederate deployment however, I bolstered that flank with the Union Zouave's (Duryee's.. also classed "elite".. all other regiments on the Union side "average")

End of the first move - following - poor Union command roll so only the Rifles, and the right flank have moved.. the Confederates have withdrawn their units behind the brow of the hill in anticipation of the rifle fire (better range than them, so only two options - either come off the hill and attack, or go for cover)

End of second/third (?) move - following - the Union assault on the hill is in progress; having forced the Confederates back by the potential for damage from the longer ranged rifles it gives them an opportunity t get a foot hold on the hill that would be foolish to ignore (the hill is the objective for the game).. to the left other Union column is deploying to protect (one) against the Confederate regiment I have sent to disrupt their activities, and (two) to assault the hill from the flank.. should give the Tigers pause for thought. On the Union right, their Zouave's are charging the guns (I know..not normally a good idea, but I needed to clear it if I could... you can see that one of my regiments already shows the 'red dice of death' marking hits from artillery fire)

A move or two later - following - sorry,, slightly fuzzy.. low command rolls on both sides so not a lot of movement. The Confederate envelopment on the Union right flank is under way - you can see one of the regiments in column going through the woods.. the dice of death are multiplying (once again I used the "Hearts of Tin" rules which calculate casualties in terms of points per base, 3 hits [in this case] and a base is removed, I use the dice to track 1's and 2's that are carried over)

A move or two later - following - sorry,, also slightly fuzzy.. high water mark of the Confederacy. The Confederate force on the hill has thrown the Union troops off in a triumphant assault, but the Zouave's have suffered sorely. The Union Zouave's have destroyed the artillery but were forced to retreat shortly after (bottom right picture) as the result of being charged by the Confederate covering infantry (middle right). Lots of Union yellow pins (they need to rally before being able to do anything else)... the one bright spot is that Union infantry all set and ready to charge the flank of the Tigers... fingers crossed!

So they charged - threw 8 dice, they were hitting on a 4, 5 or 6 and got this ==>

Following - with no need to count hits already stored, that was exit the Tigers, stage left (pursued by bear?).
Behind the hill a series of melee's between the two opposing regiments had just ended for the first time with a Union success.. lot of blue in the following....

Can't remember what this was for (), but I think this was Union firing the same turn - a 3 base unit clearly, they would have been hitting on 5's and 6's.. devastating...

Next move- following - the Confederate flank force, that was marching through the woods, has arrived (too late I feel, poor command rolls blamed) we are lining up for the denouement on the hill. At this point the Confederates were only one or two bases away from a force level morale result..

..but - following - a last desperate charge by the Confederate flanking regiment, and the remaining base of one of the other regiments sees off the Union Zouave's - they are a spent force... in the distance the second melee behind the hill see's Confederate arms triumphant...could this be the turning point? Foreground centre the (full strength) Union rifle regiment makes life awkward for the recently triumphant Confederates. Poor command rolls leave the denouement un-fought (for now).

..end of the game - following - rifle fire has seen off the Confederate flanking regiment, and a massive charge, supported by a second regiment has seen the Confederates bundled off the hill -at this point the Confederate force suffered an army level morale reduction but given the lack of any other cohesive force I decided they had lost anyway..

Post match analysis:
With apologies for the quality of some of the pictures - which were taken direct from my Hudl - here's how it unfolded...
Set up - following - Confederate deployment pretty much as it was in the last game.. I have the Zouave's (my "elite" unit) on the front slope of the hill supported by another regiment of infantry (Virginian's, as were all the Confederate foot ... Stonewall Jackson's famous "foot cavalry", but for this game all classed "average")... the Union deployment has that rifle armed regiment to the fore in the centre - supported by another regiment in reserve.. the other regiments were deployed in column on each flank for a little enveloping action... given the Confederate deployment however, I bolstered that flank with the Union Zouave's (Duryee's.. also classed "elite".. all other regiments on the Union side "average")

End of the first move - following - poor Union command roll so only the Rifles, and the right flank have moved.. the Confederates have withdrawn their units behind the brow of the hill in anticipation of the rifle fire (better range than them, so only two options - either come off the hill and attack, or go for cover)

End of second/third (?) move - following - the Union assault on the hill is in progress; having forced the Confederates back by the potential for damage from the longer ranged rifles it gives them an opportunity t get a foot hold on the hill that would be foolish to ignore (the hill is the objective for the game).. to the left other Union column is deploying to protect (one) against the Confederate regiment I have sent to disrupt their activities, and (two) to assault the hill from the flank.. should give the Tigers pause for thought. On the Union right, their Zouave's are charging the guns (I know..not normally a good idea, but I needed to clear it if I could... you can see that one of my regiments already shows the 'red dice of death' marking hits from artillery fire)

A move or two later - following - sorry,, slightly fuzzy.. low command rolls on both sides so not a lot of movement. The Confederate envelopment on the Union right flank is under way - you can see one of the regiments in column going through the woods.. the dice of death are multiplying (once again I used the "Hearts of Tin" rules which calculate casualties in terms of points per base, 3 hits [in this case] and a base is removed, I use the dice to track 1's and 2's that are carried over)

A move or two later - following - sorry,, also slightly fuzzy.. high water mark of the Confederacy. The Confederate force on the hill has thrown the Union troops off in a triumphant assault, but the Zouave's have suffered sorely. The Union Zouave's have destroyed the artillery but were forced to retreat shortly after (bottom right picture) as the result of being charged by the Confederate covering infantry (middle right). Lots of Union yellow pins (they need to rally before being able to do anything else)... the one bright spot is that Union infantry all set and ready to charge the flank of the Tigers... fingers crossed!

So they charged - threw 8 dice, they were hitting on a 4, 5 or 6 and got this
==> 
Behind the hill a series of melee's between the two opposing regiments had just ended for the first time with a Union success.. lot of blue in the following....

Can't remember what this was for (
), but I think this was Union firing the same turn - a 3 base unit clearly, they would have been hitting on 5's and 6's.. devastating...
Next move- following - the Confederate flank force, that was marching through the woods, has arrived (too late I feel, poor command rolls blamed) we are lining up for the denouement on the hill. At this point the Confederates were only one or two bases away from a force level morale result..

..but - following - a last desperate charge by the Confederate flanking regiment, and the remaining base of one of the other regiments sees off the Union Zouave's - they are a spent force... in the distance the second melee behind the hill see's Confederate arms triumphant...could this be the turning point? Foreground centre the (full strength) Union rifle regiment makes life awkward for the recently triumphant Confederates. Poor command rolls leave the denouement un-fought (for now).

..end of the game - following - rifle fire has seen off the Confederate flanking regiment, and a massive charge, supported by a second regiment has seen the Confederates bundled off the hill -at this point the Confederate force suffered an army level morale reduction but given the lack of any other cohesive force I decided they had lost anyway..

Post match analysis:
- A hard fought Union victory - they were very lucky with the dice when they needed to be, but their command rolls were fairly appalling. The Confederates also suffered from poor command rolls - which meant their attacks were not quite as coordinated as they might have been...
- Early loss of the artillery didn't help the Confederates.. I did think of deploying the artillery on the hill, that might be an alternative option as the artillery would out range the rifles...
- Butchers bill was fairly close, the Union were about 2 or 3 bases behind the Confederates
Friday, October 2
I have been to... Tower Armouries...
The recent trip to the "smoke" [clicky] allowed the current Mrs Steve the Wargamer and I to have a very enjoyable overnight stay (we stayed at Imperial College London [clicky] for the night which I wholeheartedly recommend - cheap for London, but clean/modern), and a little bit of sight seeing the next day..
When we got off the tube for the college it takes you past the entrance to the Victoria and Albert Museum (in fact it also take you past the Natural History, and Science Museums as well - the accommodation was really well located), and Steve the Wargamer has never visited it - over dinner I suggested we go, and as the the current Mrs Steve the Wargamer hadn't been either (or so she thought - she remembered going a while ago once she was in there) the first stop of the day was there....
From a purely wargaming perspective (and that is I guess the primary point of this blog at least) there isn't a lot there of specific interest - the museum specialises in fine arts through the ages, so clothing, sculpture, furniture, etc. Clearly there is some crossover though, and I found some of the 18th century galleries interesting (swords and some armour)...
What it does house however (and mea culpa I had no idea), is Trajan's column! Now I'm no Ancients player or specialist, but even I know the importance of this particular piece of stonework with regard to our knowledge of later/Imperial Roman military dress... I've left these full size in the event anyone wants a closer view (just click to embigen)... the column(s) are by the way, mucking huge!


....all in all it was most enjoyable, but I passed on the opportunity to visit the "Shoes: Pleasure and Pain" exhibition!
After a memorable lunch at the second best pub in Christendom [clicky] we then crossed the river as the one place I've wanted to (re)visit for ages was the Tower of London - I have a distinct memory of visiting when I was about 12 and haven't been since, and as the current Mrs Steve the Wargamer is very knowledgeable on, and interested in, Tudor history (Henry VIII and his wives especially) and was also keen to see the Crown Jewels (shiny.. shiny!), decision made..
Having recovered from the eye watering entry cost (£25 each!) I have to
say that the Tower is well worth every penny... the crown jewels are
well presented, and everyone gets an excellent view, but being a
wargamer of course, my main interest was the contents of the White Tower,
or Armoury (plus ca change by the way - that was my main interest when I
was twelve as well!)...
The following may assist with orientation of some of the following pictures....

This is Outer Ward - the modern day entrance is through the Byward Tower (which is behind me in this photo - looking down towards Wakefield (left) and St Thomas (right) towers..

Tower Green from the entrance steps to the White Tower... Sauron's tower.. err, the Shard, in the distance....

...and in to the armoury/White Tower itself.. I recommend this wholeheartedly, but my camera struggled with the dim lighting conditions so my apologies for the poor photo's.. based on this exhibit alone I would say the £25 was well spent, but I've heard that the Leeds Armoury has the far bigger collection (purely due to space)
So the ground floor has a display of mounted troops - the horses are as much an exhibit, as the figures on them as they are stupidly old (325 years+)... the story goes that 300 odd years ago after the restoration of Charles II he opened an exhibition (the "Line of Kings" [clicky]) at the Tower where each figure represented a previous king in the armour of the time - basically, a propaganda activity reinforcing the mite of kings and his right to rule... Over time the exhibition changed/coalesced/moved but the current display tries to bring back together most of that original display.. the whole of one wall is covered with breast plates supposedly taken from the French cuirassiers at Waterloo...

A lot of the displays feature the armours of James I/Charles I/Charles II and of course Henry VIII, and also of that period - mostly tournament armour... magnificent nonetheless

There is also a large collection of pikeman's armour - note the similarity between the front set and the set I saw at the Victoria and Albert - same source I think

More like it - a large'ish selection from the ECW - the boots were almost solid..

Also a mannequin with buff coat, and equipped as a harquebusier [clicky]...

Close up of the carbine and horse pistol..

...and finally - the last room contained artillery and firearms


..I could have quite happily spent another hour in there, but there's only so many muskets Mrs Steve the Wargamer can put up with...
Following - entrance to Waterloo Barracks (in the Tower) first stone laid by the Duke himself in 1854.. accomodation in there for 1000 men! This is where the Tower Guard live (who are a detachment of whichever Guards regiment is currently detailed to guard the Queen at Buckingham palace so they rotate) - Scots Guards in this case (thistle on the collar, buttons in groups of three)

On the way out.. Bloody Tower in front (Tower Green to my right) - the dude with the red rucksack is going into Wakefield tower - the alleged site where the two princes were murdered [clicky]

A brilliant day out, the Tower is magnificent...
When we got off the tube for the college it takes you past the entrance to the Victoria and Albert Museum (in fact it also take you past the Natural History, and Science Museums as well - the accommodation was really well located), and Steve the Wargamer has never visited it - over dinner I suggested we go, and as the the current Mrs Steve the Wargamer hadn't been either (or so she thought - she remembered going a while ago once she was in there) the first stop of the day was there....
From a purely wargaming perspective (and that is I guess the primary point of this blog at least) there isn't a lot there of specific interest - the museum specialises in fine arts through the ages, so clothing, sculpture, furniture, etc. Clearly there is some crossover though, and I found some of the 18th century galleries interesting (swords and some armour)...
 |
| Pikeman's armour... they were most dismissive of the lack of skill shown in the making of the helmet... |
 |
| War of the Roses era sallet - they were the opposite with this as the entire helmet (not visor) was beaten out from a single sheet of metal... |


....all in all it was most enjoyable, but I passed on the opportunity to visit the "Shoes: Pleasure and Pain" exhibition!
After a memorable lunch at the second best pub in Christendom [clicky] we then crossed the river as the one place I've wanted to (re)visit for ages was the Tower of London - I have a distinct memory of visiting when I was about 12 and haven't been since, and as the current Mrs Steve the Wargamer is very knowledgeable on, and interested in, Tudor history (Henry VIII and his wives especially) and was also keen to see the Crown Jewels (shiny.. shiny!), decision made..
 |
| Fine view from Tower Bridge... love that juxtaposition of old and new... |
 |
| ..this is opposite and also on my "bucket list" |
The following may assist with orientation of some of the following pictures....

This is Outer Ward - the modern day entrance is through the Byward Tower (which is behind me in this photo - looking down towards Wakefield (left) and St Thomas (right) towers..

Tower Green from the entrance steps to the White Tower... Sauron's tower.. err, the Shard, in the distance....

...and in to the armoury/White Tower itself.. I recommend this wholeheartedly, but my camera struggled with the dim lighting conditions so my apologies for the poor photo's.. based on this exhibit alone I would say the £25 was well spent, but I've heard that the Leeds Armoury has the far bigger collection (purely due to space)
So the ground floor has a display of mounted troops - the horses are as much an exhibit, as the figures on them as they are stupidly old (325 years+)... the story goes that 300 odd years ago after the restoration of Charles II he opened an exhibition (the "Line of Kings" [clicky]) at the Tower where each figure represented a previous king in the armour of the time - basically, a propaganda activity reinforcing the mite of kings and his right to rule... Over time the exhibition changed/coalesced/moved but the current display tries to bring back together most of that original display.. the whole of one wall is covered with breast plates supposedly taken from the French cuirassiers at Waterloo...

A lot of the displays feature the armours of James I/Charles I/Charles II and of course Henry VIII, and also of that period - mostly tournament armour... magnificent nonetheless

There is also a large collection of pikeman's armour - note the similarity between the front set and the set I saw at the Victoria and Albert - same source I think

More like it - a large'ish selection from the ECW - the boots were almost solid..

Also a mannequin with buff coat, and equipped as a harquebusier [clicky]...

Close up of the carbine and horse pistol..

...and finally - the last room contained artillery and firearms


..I could have quite happily spent another hour in there, but there's only so many muskets Mrs Steve the Wargamer can put up with...
Following - entrance to Waterloo Barracks (in the Tower) first stone laid by the Duke himself in 1854.. accomodation in there for 1000 men! This is where the Tower Guard live (who are a detachment of whichever Guards regiment is currently detailed to guard the Queen at Buckingham palace so they rotate) - Scots Guards in this case (thistle on the collar, buttons in groups of three)

On the way out.. Bloody Tower in front (Tower Green to my right) - the dude with the red rucksack is going into Wakefield tower - the alleged site where the two princes were murdered [clicky]

A brilliant day out, the Tower is magnificent...
Subscribe to:
Posts (Atom)