Friday, September 25

The search for the perfect set of ACW rules #1... "Rebel Yell"

The first in an occasional series dedicated to Steve the Wargamers search for the "perfect" set of wargame rules for the American Civil War... now "perfect" is a difficult thing to define, and I'm solidly of the opinion that one mans perfect is another mans mind numbing tedium, so as part of the analysis I'll try and define each of my plus and negatives, so that it might mean more to you...

What I'm looking for, in no particular order, is
  • fairly simple (ie. no big calculations and tables)
  • regimental level
  • playable with 20mm figures
  • multiple bases per regiment
  • covers/allows skirmishing
  • playable on a 6 foot by 4 foot table (possible extension to 8 foot)
  • no written orders
  • no commander ratings decided by dice (yuck) - or able to ignore it...
..and I may add and modify these as the search progresses..

First up then a nice simple introduction to the series - Rebel Yell by Simple Systems Inc. -

Price Cheap as chips as we say here - Spirit Games sell them for £2..

Format: A5 white paper, typed, black and white drawings, no photo's, contains pull out A4 quick reference sheet - think Wargamers Newsletter before it went A4 sized..

The RulesA curious hybrid between regimental and brigade level.. which has possibilities... (tick)

The rules are designed for 5mm figures (which I've never seen - 2mm yes, and also 6mm, but never 5mm) but obviously scaling up may be a possible.

Figures 5 to a base for regular infantry - representing 50-100 men - Cavalry are 4 figures to a base. Multiply the bases to make a regiment (according to historical numbers) so 4-7 bases and a CO (tick)

One of these bases can be swapped for two skirmisher bases (tick), or one dismounted plus a horse-holder unit for cavalry (tick)

A Brigade would then be 3-5 regiments plus any attachments - artillery etc. (tick)

..but then it starts to get complicated... they recommend a sheet of graph paper to track the status of the brigade (oh no) and that's because you track regimental training factor and also a separate "effectiveness" measure, which you then add up to get brigade morale, which decides what you can do,... and there's lots of pluses and minuses when working out morale (uh oh)..

Movement is alternate.. moving is by "impulse" - each troop type gets a number of impulses which they can spend on doing things like moving, wheeling, changing formation, etc (interesting)

Command and Control: Staff have their own impulses to cover writing orders and at this point I lost the will to live... have a look at this example....

"An example may help clarify all this. Colonel Green (commanding 2nd brigade, delay factor 3), has just received an order from division telling him to advance on the left. Green spends his delay factor, (3 staff impulses), in understanding the order. He issues an order for his 1st regiment in the 4th staff impulse (actually writing the new instructions on the organisation display) and hands it to an aide. The 1st regt. spent their first normal impulse loading their rifles. The aide rides 4" and over a wall, arriving in the 7th staff impulse, hands over the order, which is understood in the 9th (regt. delay factor 2 always). Meanwhile, Green rode 4" to his 2nd regt., arriving at the end of the 6th staff impulse. He wrote them an order in the 7th, which was also understood in the 9th (3rd normal). If Green's troops had four impulses they could move off in the 4th normal impulse. Otherwise they must wait until their next move."

Do you feel "clarified"?? (big cross)

Firing is by element, calculate effectiveness then read off on a big table for your percentage chance to hit - then throw a percentage dice. Hits are individual - so some more record keeping is required...(yuck)

Melee is a straight compare between the effectiveness of the units engaged - with more modifiers - no dice throws... (bit simplistic)

Summary:This set is described as being "simple and effective" and "allow players to get on with the action avoiding excessive calculation"... I think not....

What did I like.. unit organisation, represented skirmishers, reference sheet, unit impulse to decide what they can do, the idea that units can contribute to the health of their brigade (something similar to what DG and I are doing with the Sudan rules at the moment where the Dervish group concept is currently being discussed)

What didn't I like.. all the calculation and record keeping to make the effectiveness work - which is the core of the rules....

Steve the Wargamer rates these 5 out of 10...but I'd like to hear from anyone who's actually used them...

Monday, September 21

Raid on St Michel - Game 1 - "Bridgehead"..

A little overdue in providing a report, but I can report that DG and I have finally kicked off our next campaign, and have just finished the first game in the "Raid on St Michel" mini campaign (5 linked "teasers" by Charles Grant and Phil Olley...)

For our campaign the forces of the Vereinigte Freie Stadte (VFS) were represented by the troops of his excellency the Duke of Marlborough, while the French took the part of the Duchy of Lorraine - what follows is a brief description of how the battle went, and what interpretations we had to make based on the decision to base our game in the War of the Spanish Succession, rather than the Seven Years War or the Napoleonic War.

First off, the troop types...
  • The Teasers sometimes call for light troops - either foot or horse. As I've set our campaign in the War of the Spanish Succession where that degree of troop differentiation was not really the norm, I substitute mediums ie. regular infantry for light infantry, and normal cavalry for light cavalry.
  • The scenarios also need some militia - to represent these I also used regular infantry, but gave them a "-1" on morale.
  • Heavy cavalry however, is OK - cuirassiers filled the bill nicely..
So, for this first game we had:

British:


..and for the French:


..and now, on to the battle...!

The Battle:

This first game in the campaign is similar to the old "Crossing the River" scenario that DG and I fought back in February 2007 (!) - here [click here] but with the complication that this river is impassable along its entire length except at the single bridge. So basically, unless the attacking (British) commander is a nutter, he'll deploy his numerically superior artillery and then blast his way across the bridge and on to everlasting fame and glory... and so it turned out...

Following you can see a good overview of the table with the river, the bridge, and the peaceful (up until now) village of Fleur in the distance - as is usual, click on any of the pictures to be taken to a bigger view.


The picture above is taken at move 8 - in the foreground is the British column (commanded by DG) now well advanced, and it's possible to see much scurrying about on the French camp as orders are sent to recover the scouting cavalry (which can be seen heading rapidly towards the village)...

In the picture above, you can see a close up of the bridge on the same move - in the distance DG is preparing for his assault, he's keeping his cavalry back (that's Schomberg's you can see) with some of the infantry behind. You can also just see his artillery coming into view.

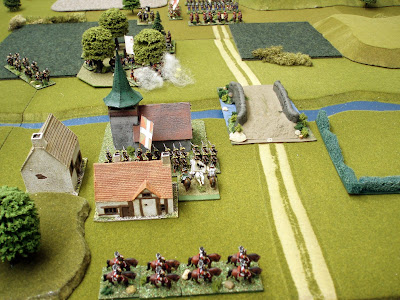
At the bridge I've temporarily blockaded it with the half of the cavalry regiment present at the start of the game, but the Navarre Regiment have now formed and are moving up behind them to take over. The Royal Italien are in the church. In the foreground you can just see a glimpse of my artillery shifting from my left flank to the right - their original deployment spot had a limited line of sight due to the woods just in front. It was clear DG was going to use those to shield his advance and I needed to make sure he couldn't!

Shortly after this photo was taken I completed manoeuvring my artillery, and a quite spectacularly lucky shot from them caused DG his first casualties when at long range I managed to bounce a ball through the ranks of Schomberg's horse causing them a casualty..

DG continued to bring his troops forward however, but it became abundantly clear that his main push was with the guns, supported by some infantry, directly through the woods.

Once he'd got his guns to the edge of the wood, he then opened up a sharp fire causing casualties to both the Navarre now guarding the bridge, and also the Royal Italien who were in the church.. my return fire from the artillery was weak, I think DG would agree that my dice didn't exactly roll well!

As a result of the casualties taken both Navarre and Italien rout - in the case of Navarre however, they end up routing from the table.

The next picture was taken at move 19 (so just over 3 hours in "real" time as each move represents 10 minutes in the rules we use) and the French have scored a lucky hit on one of the British guns, who then promptly do the same on the French gun! It wasn't all bad though as the Royal Italien had now recovered, and were in position in the square between the Church and house and I realised that was by far and away the safest place to leave them! In the bottom foreground you'll notice that my French cavalry are now at full strength and are about to move to a position where they can provide support to anyone defending the bridge... you'll note that none of my units are in the open, the cannon fire was too hot!

Two or three moves later and DG thinks the time is ripe, and sends Meredith's across the bridge. The French return fire was ineffective, and in the British firing phase they cause the French cavalry further casualties such that in their subsequent morale test they fail and rout from the table... in the following Meredith's can be seen breasting the crown of the bridge - and what a fine sight they make! Schomberg's horse in support..

...and this is the end state - all over for the French, and a rather disappointing end result. The British had inflicted further casualties on the Royal Italien who had routed leaving only the French artillery on the table - who eventually decided that discretion is the better part of valour, and legged it!


Post Match Analysis:
  • This is a real black and white scenario - little or no shades of grey - and not a little frustrating for the Lorraine/French player. You know the French are going to lose (they're meant to), but what was frustrating to me was the lack of room to make a tactical difference. For example - the position of the woods was key - placing his guns in the woods gave DG a clear view of the open spaces around the bridge, while also giving him a cover bonus against return fire - bad news. I also couldn't think of anything I could do to counteract that. An attack across the bridge was the obvious solution, but not an option due to the fact that DG had brought up a number of his other foot and cavalry units in support (good combined arms!)... Musketry did not feature due to ranges - in fact I don't believe any unit fired muskets, it was all artillery. Like I say - frustrating.... I'd welcome some thoughts from readers with any other idea's..!
  • There are a couple of editorial typo's in this scenario to be aware of -
    1. On page 13 under "Coordinating instructions" it should read "have left the table at points C [not A] and B" otherwise half the French cavalry squadron will enter the table in the middle of the British column of march.
    2. On page 14 under "Game Mechanics" the third bullet should (of course) have 'five moves'..
  • Casualties for the scenario are carried forward at the rate of one fifth dead, two fifths badly wounded, and two fifths available to fight again - DG and I decided to throw a percentile dice for recovery with each point being a percentage of the total strength of the unit - this resulted in the following:


  • The scenario calls for a guard to be left behind - one of the problems with this is that there isn't much guidance or indication to the VFS/British player on what to base the decision on. To be fair to DG I let him know what the total size of the French/Lorraine forces were to give him an idea, we also read the post match reports from Charles and Phil for other clues... in the end DG decided to leave Schomberg's and Meredith's.
  • Tea was PG Tips and the biscuits were a particularly fine packet of oat & raisin cookies - one of your five a day, and a cholesterol busting grain, all in one biscuit!! Magnifique (but don't mention the butter! )

...onwards and upwards - the next game awaits!!

Thursday, September 17

I have been to.... Pegasus Bridge

I can't tell you how many years I've waited to visit Ouistreham and the Pegasus Bridge, but suffice to say the current Mrs Steve the Wargamer and I have been holidaying in France with the spuds for at least 12 years, and we almost always come home via the Caen/Portsmouth ferry route for the convenience of the sailing times. Now Pegasus Bridge is only 10 minutes from the ferry port, but in all that time I've always been too late to make the detour and visit.... up until now. This year we were on a much later boat, so game on!!

I've divided these up into two groups - first the battlefield, and second the Memorial Museum... I'd say up front that this site is well worth going to if you get the chance...

So, a brief background first (and this is verbatim from the Wikipedia entry).

"On the night of 5 June 1944, a force of 181 men, led by Major John Howard, took off from RAF Tarrant Rushton in Dorset, southern England in six Horsa gliders to capture Pegasus Bridge, and also "Horsa Bridge", a few hundred yards to the east, over the Orne River. The force included elements of B and D Companies, 2nd Battalion, Oxfordshire and Buckinghamshire Light Infantry, a platoon of B Company, Royal Engineers, and men of the Glider Pilot Regiment. The object of this action was to prevent German armour from crossing the bridges and attacking the eastern flank of the landings at Sword Beach".

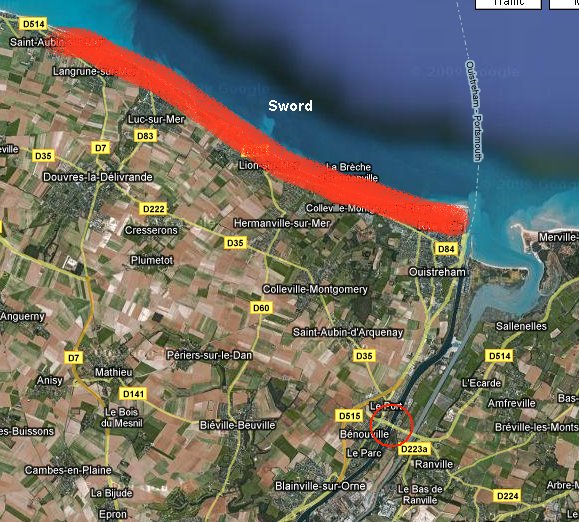
A picture is worth a thousand words so the following may help with orientation...

The red circle is Pegasus....you can see how critical the bridge was in strategic terms - it is the first major bridge across the canal...

First off, a view of the canal showing the modern bridge (the original was replaced in 1994) and how wide the canal is - the canal can get up to 200m wide in places, but I'd say it was about 50m at this point:

Next the landing area itself next to the current bridge... poor planning on my part prior to the visit (it was spur of the moment, I hadn't expected to be able to get there) lead me to believe that the water you can see was the Orne River, it isn't - it's a tributary.

What this tributary does do however, is tighten the available landing area for the gliders considerably... the following shows you how narrow it is. In the film you can see concrete plinths, these mark the landing points of the three gliders... as is often the case, I stand in total awe of the skill of the men who landed those gliders, in the dark, on an unknown landing area, in such a small area... absolutely astounding. The film is taken with the bridge directly behind me no more than 20 yards..

The site is well supplied with information on the men involved in the operation, and each of the markers you see in the film had descriptions so you could understand who had landed where...


On the other side of the canal, opposite the actual cafe, there is this rather sad looking Centaur, standing on a section of bailey bridge..


..and here is the Cafe Gondree itself.. during the battle the cafe was used as an aid post. The cafe owner, Monsieur Gondree, allegedly dug up his hidden supply of champagne (200 bottles!) which he had buried in his garden to safeguard it, and gladly shared it with his liberators... definitely better than the NHS, then!

...and so on to the museum which houses the original Pegasus Bridge in the grounds. The museum is new and well worth a visit for many reasons...

...the exhibits inside being one of them - I didn't really have long enough to do these justice, but there is huge amounts of original letters, documents etc and the exhibits are chock-full of original items of equipment..

..the grounds of the museum contain a number of other exhibits which seemed to me to be a little out of place - I think I would have preferred to see some more Airborn orientated equipment - specially adapted Jeeps, maybe even a Tetrarch, etc? For all that the exhibits were all in excellent condition..


The best from my perspective was this M3 - I've had a thing about M3's ever since Airfix brought out the kit all those years ago and I added them (totally incorrectly) to my western desert forces!!


By far and away the best bit though was the bridge itself - totally open, and you were allowed to walk on it and across it..


They did have a recreation of a Horsa glider however, which was a bit of an eye-opener, I hadn't realised how big they were...


They also had an original bailey bridge in various stages of build to show how they were put together..


...and less we forget that this is a memorial - there is this lovely, and recently added, set of stones by the bridge itself.


...well worth the wait I'd say, and both informative, awe inspiring, and sobering at the same time.....

================================================


In my efforts to get in as much sailing as possible before the end of the sailing year, I headed out solo last Saturday for a pleasant afternoons sailing...(it would seem that a new 'Jonas Brothers' [click here] DVD purchased just that morning - with four free pairs of 3D glasses apparently - seemed to be a bigger attraction than the opportunity to sit on the boat with her Dad for two or three hours! )

Started out with two reefs, got as far as we had the weekend before, where I then had to shake the reefs out (wind was dropping all the time). By the time I was half way up the harbour it had dropped to almost nothing so the donk was switched on and we motored home through a very quiet, very still, gloaming...

A huge sunset, a pleasant cigar, and a can of Tanglefoot [click here] just underlined what was a memorable sail. Winter approaches though - it was dark when I moored at 7.30 in the evening!

Distance: 10 miles (105 miles year to date - there's the century)
Wind: "Changeable" (Started out Force 4 dropped to nothing)

The best thing to come out of ... the Sudan....!

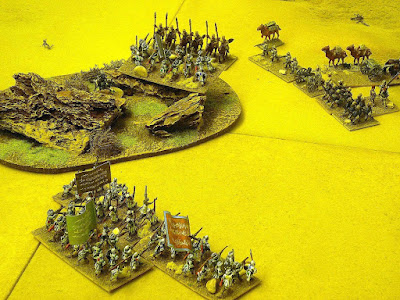
As promised previously, last week I had another (solo) go at rescuing the redoubtable Captain Lucien Verbeek, Belgian observer for his majesty King Leopold II of Belgium (and his horse Teufel), who had (somewhat carelessly) got themselves captured by a small'ish mixed Dervish force comprising foot and mounted troops (see http://steve-the-wargamer.blogspot.com/2009/08/third-best-thing-to-come-out-of-belgium.html for further background, and the story of the previous rescue attempt). The picture following shows the gallant captain and Teufel at the mercy of their captors (taken from a balloon* perhaps?):

The table was set up as follows (I'd left it set up since the previous time - one of the advantages of having a permanent wargame area!):

Forces were also the same as last time, seven units of Dervish - one mounted on camels. Three of the Dervish foot units were rifle armed (which included the unit of Dervish guarding the redoubtable captain).

The British comprised one troop of Egyptian lancers, one company of Sudanese infantry, one company of dismounted Camel Corps, the commissariat (comprising two ammunition camels), and a horse drawn Gatling gun.

All entry points were diced for using a D8, and ended up with one Dervish foot unit coming on at 1, two units coming on at 2, the camels coming on at 4, with the two remaining foot units coming on at 6 & 7. The British diced for the remaining edge and came on at 5, both the main force and the Lancers coming on at the same point..

This time the British opted to come on in an open backed square for defensive purposes:

..infantry on either side, lancers up front and the gun and commissariat in the middle.

It wasn't long, of course, before I sent the Lancers out to reconnoitre while the rest of the force advanced slowly towards the rough ground where Captain Verbeek was being held (apologies for the yellow'y picture by the way, a sure sign there wasn't enough light for picture without flash). The Dervish on the other hand were busy conforming to "merge" orders from the reaction table.. in the rules we use, the more of them that are in the group the more likely they are to turn nasty, so it pays the Imperial player to keep his troops concentrated..

Four or five turns in, and I was within striking distance of the Captain. The Dervish had merged to the point where they obviously believed they had a chance of taking the Imperials on - a long line of advancing Dervish swept over the rough ground and towards the waiting Imperial forces... the sound of the Gatling began to be heard across the battle field, as the Sudanese and Camel Corps also opened rapid fire at the advancing hoard with ..

One of the Dervish groups gets to close range - it was real tooth and nail stuff, and true to form the Gatling jammed on a number of occasions - happily the Sudanese managed to generate enough casualties on one unit that the critical mass of the group as a whole became less than the Imperials so they backed off...

The Imperial commander (me!) then decided it was time to start inching forward towards their final goal - I chose to advance in 2" hops for no other reason than that this was enough to keep me within small arms range of the Dervish groups remaining, but also caused them to back off as well... the lancers saw off the small group to their front with the assistance of some small arms fire from the Camel Corps..

In the picture above you can see that I'm now well within small arms range of the rough ground, and more importantly the guarding Dervish unit within it - I'm also about to do a very stupid thing, and launch the Lancers at the guarding unit (note to self.. "doh!"!) Not surprisingly they took heavy casualties and were immediately routed... in my defence I had the Dervish pinned from the front and was hoping for a cheap flank attack... yes, I know.... with Lancers.... up a very rocky hill....... on horses.. what a plonker...

To compound the error however, I then decided to launch the Camel Corps at the rock to do the same job - now this might have been the right thing to do, was certainly the better thing to do, but unfortunately lady luck decreed otherwise and the dice came up in favour of the Dervish - and another Imperial force routed.

From a position of great security therefore, I was now down to just the Sudanese and the Gatling gun (jammed, of course!) and swiftly running out of ammunition! Talk about turning the tables, and all within a couple of moves!

With the Dervish inching forward things were not looking good and I was all set to retire but luckily a couple of decent dice throws stopped the incipient routs, and also unjammed the Gatling; sharing their ammunition out between them the Sudanese and the Gatling crew opened fire. The Sudanese on the remaining group, the Gatling on the Dervish in the rocks.... with just 2 or 3 rounds left the Dervish guard unit was destroyed, and Captain Verbeek (and Teufel) made their escape..

In the following you can see the happy re-union (there are no records of what the British commander said in private, however!) with the Sudanese and the Camel Corps halted (and shaken) in the background..

..and a close up of the re-union.


Post Match Analysis:
  • What a brilliant game - this was fought using my home grown Gilder inspired, with a twist of McNally rules - this time however, I used some simplifications and recommendations from DG based on his last game... in essence it significantly simplifies the Dervish reaction and therefore speeds up the game no end..
  • Rapid fire - in my rules Imperial troops have the opportunity to fire twice in the move for a 30% uplift in the amount of ammunition used - given Imperial units carry about 8 rounds of ammunition this is enough to allow 2 turns of rapid fire (6 ammunition points) plus two rounds left over... the intent is to use it when the Dervish are closing to hand to hand..
  • Gatlings jammed - in my rules the gun can fire up to 6 rounds per move but for each round fired there's a 1 in 6 chance of it jamming (6 on a D6), after the third round it jams on a 5 or 6. It may just have been me, and I'll leave it for a few games yet, but I was quite amazed at how often that damn Gatling jammed even when I was firing no more than four shots out of the possible maximum six...
  • The Imperial forces suffered 8 casualties from a total of 20; 40%. The Dervish suffered 11 out of 35; 31%. So despite taking greater casualties, the Imoperial force won. Interesting... having said that al least two of the casualty points on the Imperial side were as a result of that stupid decision with the Lancers...


* Interesting snippet time - on the Suakin expedition in 1885 their are records that a balloon party under a Major Templar, of the King's Royal Rifle Corps Militia, was attached to the Royal Engineers... what a lovely idea for a little vignette, or better still a scenario!