==========================================================
Background..
Objectives/Victory Points
Confederate Order of Battle>
Campaign Rules
Battle Chronicler
Campaign Diary:
Day 1 - 09:00:
Day 1 - 10:00:
Day 1 - 11:00:
Day 1 - 12:00:
Day 1 - 13:00:
Day 1 - 14:00:
Day 1 - 15:00-18:00:
Day 2 - 06:00:
Day 2 - 08:00:
Day 2 - 10:00:
Day 2 - 11:00:
Day 2 - 14:00:
Day 2 - Battle of Rogersburg
Day 2 - 16:00:
Day 2 - 17:00:
Day 2 - 18:00 - Overnight:
Day 3 - 06:00:
Day 3 - 07:00:
Day 3 - 09:00:
Day 3 - 10:00:
Day 3 - 11:00:
Day 3 - 12:00:
Day 3 - 13:00:
Day 3 - Battle of Waynes Junction:
Day 3 - 14:00-15:00:
Day 3 - 16:00-17:00:
Day 3 - 18:00:
Day 4 - 06:00:
Day 4 - 07:00:
Day 4 - 08:00:
Day 4 - 09:00:
Day 4 - 10:00 to 12:00:
Day 4 - 13:00:
Day 4 - 14:00:
Day 4 - 15:00 to end of day:
Day 5 - 06:00:
Day 5 - 08:00:
Day 5 - 11:00:
Day 5 - 12:00:
Day 5 - 14:00:
==========================================================
Background..
DG and I have both invested significant amounts of time (and money!) this year in the "Regimental Fire and Fury" wargame rules, and also in building up forces of miniatures to allow us to play games... DG in 12mm, myself in 20mm (as documented in extraordinary and detailed depth on my main blog..)
Whilst chatting after our last game, our thoughts turned again to campaigning, so I suggested that DG might fancy running one set in the American Civil War... happily, he took me up on the offer and the following campaign diary documents the outcome..
For this campaign we used Berthier for the strategic manoeuvring, and the Regimental Fire and Fury for the battles..
We diced for sides and I chose Confederate..
Back to top...
Objectives/Victory Points
First and most importantly the map:

Confederate Player briefing:
Initially all the units of your Division are at Stewart Springs.
Mission:
The II Corps commander, Lieutenant General R.S.Ewell, requires you to capture Waynes Junction (see map). It is the major supply town for the Union in this area and those supplies are desperately needed for our own forces. This is especially true of the shoes and boots which, as you know, we are in urgent need of after the last few months campaigning. Our intelligence is that there is a weak Union Division holding the area and our approach has alerted them to the vulnerability of their position.
As a result they are gathering reinforcements to be sent by rail from the East. Our best estimate is that these will arrive within the next few days. Once you hold Waynes Junction gather as much local transport as you can to transport and escort those supplies back to Stewarts Springs, with priority given to the footwear.
Jackson is protecting your right and as yet (my emphasis!), your left is not threatened
Victory Points:
For each town controlled [last side to have passed through - no need for units to occupy] the owning side will receive 1 VP.
At Waynes Junction there are also 4 VP's worth of supplies; which will only be received by the Confederates on arrival at Stewart Springs [Create a Wagon unit to transport them when there are no Union units in the square]
So there are a total of 9 VP's in the scenario. The Player with the most VP's wins.
Back to top...
| Division 1st - HQ/C-in-C | |||||
| Commander | Ability | Objective | |||
| Early | Gallant | ||||
| Unit | Experience | Weapon | Status | Effectiveness | Comments |
| 5th Virginia Cavalry | Crack | Breech Loading Carbine | 4 / 3 / 2 | ||
| Brigade Hays | |||||
| Commander | Ability | Objective | |||
| Hays | Gallant | ||||
| Unit | Experience | Weapon | Status | Effectiveness | Comments |
| 5th Louisiana | Crack | Rifle Musket | 5 / 4 / 3 | ||
| 6th Louisiana | Crack | Rifle Musket | 5 / 4 / 3 | ||
| 7th Louisiana | Crack | Rifle Musket | 6 / 5 / 3 | ||
| 8th Louisiana | Crack | Rifle Musket | 7 / 6 / 4 | ||
| 9th Louisiana | Crack | Rifle Musket | 9 / 7 / 5 | ||
| Brigade Hoke | |||||
| Commander | Ability | Objective | |||
| Avery | Able | ||||
| Unit | Experience | Weapon | Status | Effectiveness | Comments |
| 6th North Carolina | Veteran | Rifle Musket | 13 / 10 / 7 | ||
| 21st North Carolina | Veteran | Rifle Musket | 11 / 9 / 6 | ||
| 57th North Carolina | Veteran | Rifle Musket | 7 / 6 / 4 | ||
| Brigade Smith | |||||
| Commander | Ability | Objective | |||
| Smith | Poor | ||||
| Unit | Experience | Weapon | Status | Effectiveness | Comments |
| 31st Virginia | Trained | Rifle Musket | 7 / 6 / 4 | ||
| 49th Virginia | Trained | Rifle Musket | 7 / 6 / 4 | ||
| 52nd Virginia | Trained | Rifle Musket | 6 / 5 / 3 | ||
| Brigade Gordon | |||||
| Commander | Ability | Objective | |||
| Gordon | Able | ||||
| Unit | Experience | Weapon | Status | Effectiveness | Comments |
| 13th Georgia | Crack | Rifle Musket | 8 / 6 / 4 | ||
| 31st Georgia | Crack | Rifle Musket | 6 / 5 / 3 | ||
| 38th Georgia | Crack | Rifle Musket | 9 / 7 / 5 | ||
| 60th Georgia | Crack | Rifle Musket | 7 / 6 / 4 | ||
| 61st Georgia | Crack | Rifle Musket | 7 / 6 / 4 | ||
| Brigade Artillery | |||||
| Commander | Ability | Objective | |||
| Jones | Able | ||||
| Unit | Experience | Weapon | Status | Effectiveness | Comments |
| Charlottesville Virginia | Crack | Heavy Smoothbore | 2 | ||
| Courtney Virginia | Veteran | Light Rifle | 2 | ||
| Staunton Virginia | Trained | Heavy Smoothbore | 2 | ||
| Louisiana Guard | Veteran | Light Rifle | 2 |
Back to top...
Campaign Rules
DG provided me with the following background information.
Turn sequence:
- Union orders
- Union intelligence reports
- Confederate orders
- Confederate intelligence reports
- Resolve any combats via Battle Chronicler
- Daylight is from 06:00 to 18:00 hours
- Night is one turn from 19:00 to 05:00 hours and is only used for rest, recovery, reorganisation and resupply. All units are given a Hold order. (Exception: All Attacker [see below] brigades in contact first withdraw into one of their 3 unoccupied, rear squares [if terrain allows]
- Infantry Brigades need to comply with the "one Infantry Brigade per square" requirement.
- If you wish detach Artillery units [batteries] from Jones' Artillery Brigade at any time then create a new Berthier unit for each as described above. These detachments of course start from the Brigade's position.
- The same goes for Cavalry detachments.
- Infantry units are never detached from their parent Infantry Brigade
- All troop movements on the campaign map are in March Column
- There will be no Fatigue calculation in this campaign ... the Morale and Effectiveness ratings will suffice. Stands lost during the day may return to the colours overnight otherwise they are permanently lost. Roll per stand lost and success returns the stand:
- D10 <= Experience
- 7 Crack
- 6 Veteran
- 5 Trained
- 4 Green
- For Berthier "Out of Supply" situations I propose a RF&F local rule: All Manoeuvre, Musketry & Cannonade, Charge DRM's are at -1 for being Out of Supply
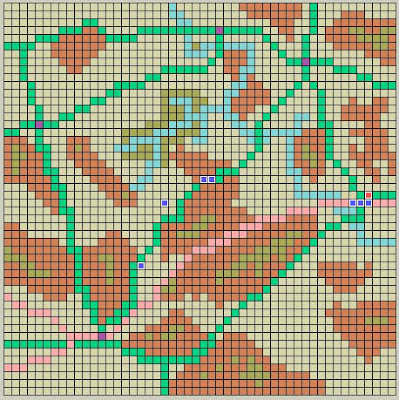
- Berthier: 50 x 50 squares (map just above)
- 1 square = 1 mile
- Each square contains a terrain type as per RF&F [Open/Broken/Rough]
- Road and Rail squares are Open terrain
- River squares are impassable to vehicles
- Each Berthier turn [consisting of 2 Player turns] represents 1 hour
- 1 square = 1 mile
- The defender of the square determines the terrain within it, based on the terrain type
- The size of the BC square will be 60 x 60 inches [Rifled artillery may cause some problems here]
- Each BC Turn equates to 12 minutes [Therefore 5 complete BC Turns to 1 complete Berthier Turn]
- For simplicity ... to avoid pro-rata-ing the BC turn ... the combat will deemed to have commenced at the start of the Berthier turn just completed
- If the combat does not reach a conclusion after those 5 turns it continues into the next Berthier turn. Should this happen then the only way for either side to withdraw is by physically moving all its remaining units from the BC square.
Day 1 09:00:
Three hours on the road and the cavalry have arrived outside Laddsville to find a Union unit there.

Back to top...
==========================================================
Day 1 10:00:
Berthier will not give me a clear indication of what these actually are until I make contact (that's the way DG has set up the reconnaisance options in Berthier).
As I suspected, when my cavalry entered the town I found Union cavalry there.. this is a combined reconnasiance report and position report from Berthier:

Back to top...
==========================================================
Day 1 11:00:
Mystery solved then - they are a Union cavalry vedette comprising one base of the 6th New York …
 Either way the 'blue bellies' have now pulled out of Laddsville and moved south - I am following up - my plan remains the same but I have some decisions to make once I reach the fork in the road to decide who to send south to Rogersburg and who to send to Waynes Junction.
The cavalry will have to split as I'll need recon for both forces, but what to do with the rest I wonder…
Back to top...
==========================================================
Day 1 12:00:
 He's falling back in front of my advance - going cross country so as to monitor both roads.. I've split my cavalry in half so I still outnumber him and have pursued aggressively...
Back to top...
==========================================================
Day 1 13:00:
He's not giving up.. :
 My decision is made on the split of forces; depending on what that Union cavalry does it will be as follows..
Rogersburg force:
==========================================================
Day 1 14:00:
My main force has now split as the fork was reached - I am continuing to drive cavalry off whilst keeping my main forces outside of the two square reconnaisance range of his cavalry... real cat and mouse stuff, he's desperate to break past my cavalry screen but moves at the same rate I do... As long as I can keep my infantry three or four squares behind the cavalry they're safe from view, I on the other hand have no idea if he has extra cavalry that is shadowing my infantry from outside their reconnaisance range!
Back to top...
==========================================================
Day 1 15:00-18:00:
…and so it continued until the end of the day.. what am I going to find in Rogersburg? More importantly what am I going to find in Wayne's Landing!
Back to top...
==========================================================
===================================================================
Day 3 - 06:00:
Start of the third day.
Train roll 7.
 Interesting!
My cavalry report that the Union sighting is infantry strength 1.. so one unit of infantry:
MOVE: 26 POSITION: 1296
UNIT: C01 1st Div Cavalry
CONTACT
1296 No contact.
SIGHTINGS
1245 Sighted 1 enemy unit(s) of total size 1.
TYPES SEEN
Infantry
I order all units in Rogerbsurg vicinity to hold… the march on Waynes Junction continues
Back to top...
===================================================================
Day 3 - 07:00:
Train roll 5
Back to top...
===================================================================
Day 3 - 09:00:
Train roll 7
Back to top...
===================================================================
Day 3 - 10:00:
Train roll 5 (this is getting tedious!)
 The good news is that DG looks to be pulling his infantry back at Rogersburg.. things are going to get interesting at Waynes Junction though - I'm getting close!
Back to top...
===================================================================
Day 3 - 11:00:
Train roll 8

Aha - now is that the same cavalry as before I wonder... somewhat foolishly I didn't take a note at the time - time to check my archives.. they aren't - this is 6th NY E, the previous guys were 6th NY C. One to bear in mind for the "return trip".
 Meanwhile the first recon reports are coming in as to what I can expect when I get to Waynes Junction... I have no choice anyway as this is point of the whole campaign, but the numbers look ..... "interesting"...
The sighting in 1916 is the cavalry above - but this is telling me that there are either four of five units of infantry and artillery (and possibly more cvalry) in Waynes Junction.


The advance continues - looks like we're due a second set-to..!
Back to top...
===================================================================
Day 3 - 12:00:
Train roll 9 (close!)
The Union cavalry has backed off - but look at those numbers rack up as I get closer to Waynes Junction! I'm guessing the cavalry withdrew on Waynes Junction (?? I'm not convinced - I suspect they're loitering in the hills), I'll know for sure when I get to the town.


Rogersburg all quiet...
Back to top...
===================================================================
Day 3 - 13:00:
Train roll 7 - battle is started at Waynes Junction.


Back to top...
===================================================================
Day 3 - Battle of Waynes Junction:
Battle of Waynes Junction.. Part 1
Battle of Waynes Junction.. Part 2
Battle of Waynes Junction.. Part 3
Back to top...
===================================================================
Day 3 - 14:00 - 15:00:
Train roll 9 - all quiet elsewhere while the battle rages..

Back to top...
===================================================================
Day 3 - 16:00 - 17:00:
Train roll 11!! A train has arrived and as the Battle at Waynes Junction comes to a close I embark Smith's brigade at Rogersburg. I order Gordon's to march down the rails to my mid-country rendevous point - they take wagons with them.. I'll use the cavalry as a screen when I leave...
Train leaves for Waynes Junction..
Back to top...
===================================================================
Day 3 - 18:00:
The battle at Waynes Junctions ends a Confederate victory!
The campaign of disinformation, smoke and mirrors starts.....
==========================================================
Day 5 - 06:00:
Start of the fifth day and out of the dawn something wicked comes...... Union cavalry!

Using their superior reconnaissance range they must have sat there watching for the opportunity yesterday...
Back to top...
==========================================================
Day 5 - 08:00:

Back to top...
==========================================================
Day 5 - 11:00:

Back to top...
==========================================================
Day 5 - 12:00:

Back to top...
==========================================================
Day 5 - 14:00:

Back to top...
==========================================================
Day 1 10:00:
Berthier will not give me a clear indication of what these actually are until I make contact (that's the way DG has set up the reconnaisance options in Berthier).
As I suspected, when my cavalry entered the town I found Union cavalry there.. this is a combined reconnasiance report and position report from Berthier:
Back to top...
Day 1 11:00:
Mystery solved then - they are a Union cavalry vedette comprising one base of the 6th New York …
 Either way the 'blue bellies' have now pulled out of Laddsville and moved south - I am following up - my plan remains the same but I have some decisions to make once I reach the fork in the road to decide who to send south to Rogersburg and who to send to Waynes Junction.
 The cavalry will have to split as I'll need recon for both forces, but what to do with the rest I wonder…
Back to top...
Day 1 12:00:
 He's falling back in front of my advance - going cross country so as to monitor both roads.. I've split my cavalry in half so I still outnumber him and have pursued aggressively...
 Back to top...
Day 1 13:00:
He's not giving up.. :
 My decision is made on the split of forces; depending on what that Union cavalry does it will be as follows..
 Rogersburg force:
- Gordon
- Smith
- Hays
- Hoke
- Jones(the artillery)
Day 1 14:00:
My main force has now split as the fork was reached - I am continuing to drive cavalry off whilst keeping my main forces outside of the two square reconnaisance range of his cavalry... real cat and mouse stuff, he's desperate to break past my cavalry screen but moves at the same rate I do... As long as I can keep my infantry three or four squares behind the cavalry they're safe from view, I on the other hand have no idea if he has extra cavalry that is shadowing my infantry from outside their reconnaisance range!

Back to top...
Day 1 15:00-18:00:
…and so it continued until the end of the day.. what am I going to find in Rogersburg? More importantly what am I going to find in Wayne's Landing!
Back to top...
Day 2 - 06:00:
..and the standard progress of the previous day started again at the beginning of the next day; by now though I was only five squares away from Rogersburg.
On the other flank Waynes Junction is 32 squares (miles) away which at the current rate of march is going to take about a day and a half to reach (about 16 moves).
Plan: Start dicing for a train as soon as my force reaches Rogersburg!
Back to top..
==========================================================
Day 2 - 08:00 - 09:00:
As I start to approach closer to Rogersburg I come into contact with some additional cavalry on the left flank!
The intel.dat file below is from Berthier and basically is my intelligence rport on all enemy elements that my forces can see or know about..
C02 1st Div Cavalry are my guys - the one's on the left of the map... 1094 is the map square reference they're in.. so I'm now in contact on both the left and right flanks...!

Back to top...
==========================================================
Day 2 - 10:00:
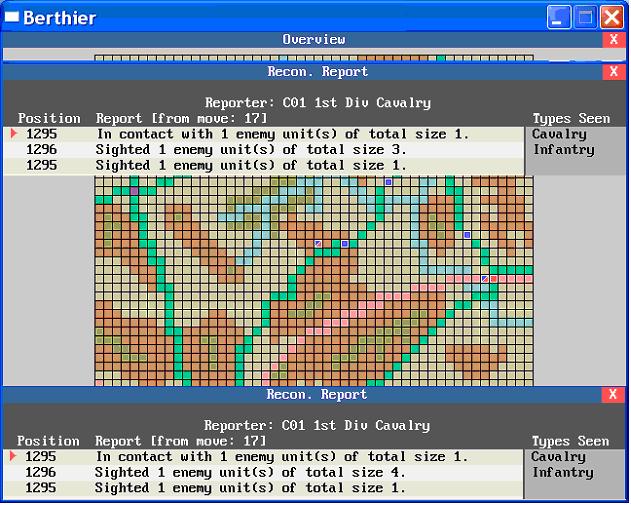
..and then - if things aren't already complicated enough - they get more complicated!
Intelligence report from Rogersburg:
MOVE: 17 POSITION: 1295 [square reference for Rogersburg]
UNIT: C01 1st Div Cavalry (my cavalry recon screen)
CONTACT (uh oh)
1295 In contact with 1 enemy unit(s) of total size 1.
SIGHTINGS
1296 Sighted 1 enemy unit(s) of total size 4.
1295 Sighted 1 enemy unit(s) of total size 1.
TYPES SEEN
Cavalry Infantry (Ah!)
Back to top...
==========================================================
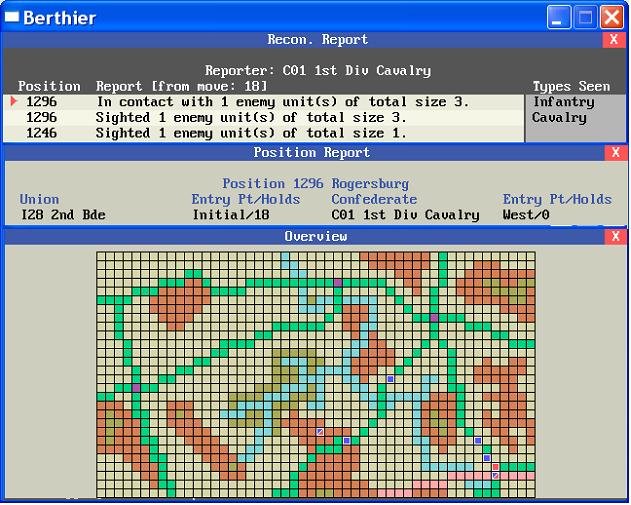
Day 2 - 11:00-13:00:
Hmmm.. a few more present than I would have wished… clearly the Berthier fog of war is at play - I got two separate recon reports (as I'd split my cavalry into two separate units) one showed 3 units and the other 4!
When I actually made contact I've met up with an ACW infantry brigade of 3 regiments (size 3) comprising 28 bases (I28) - against them I have a half regiment of cavalry and two brigades of infantry comprising 8 regiments and 57 bases… neither of us has artillery, however.
On the assumption DG's force is roughly the same size as mine - that would be half his total force…
Back to top...
==========================================================
Day 2 - 14:00:
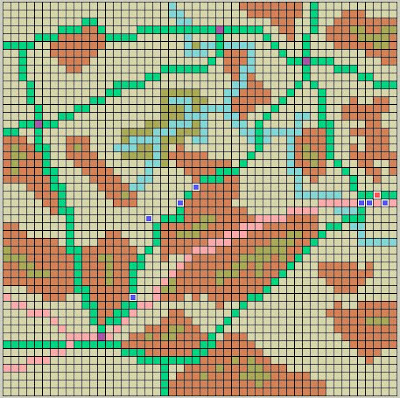
My brigades have now entered Rogersburg - current sitep as follows:
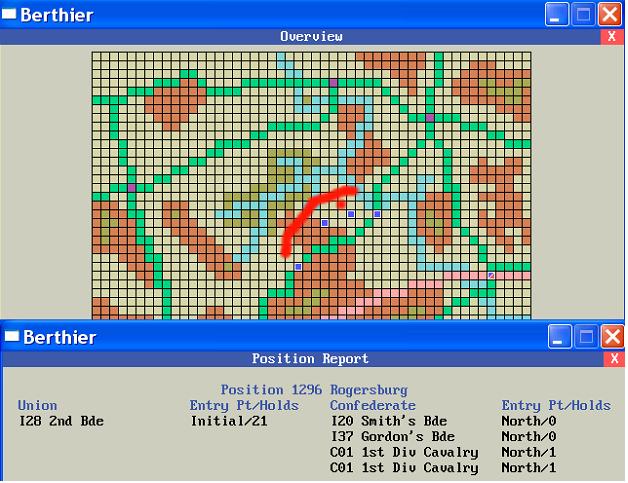
There is still some Union cavalry somewhere in the red clouded area - last move he was in the position marked with the dot - he only has a 2 square (max.) range of movement, my assumption is that he's moved further southwest..
I've advised DG that I wish to contest the engagement at Rogersburg
Back to top...
==========================================================
Battle of Rogersburg
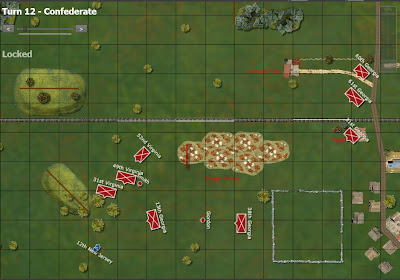
We used Battle Chronicler for handling the movement, as the level of granularity is just phenomenal - we used a table top that was measured in "real" inches, allowing us to represent units in "real" size. The rules were Regimental Fire and Fury, and DG and I tended to exchange move files once per day. In many ways this explains how long it took us to play the game, which only lasted for 12 turns, but took approximately 50 days to complete...! A Regimental Fire and Fury turn comprises 8 phases - so a minimum of 8 days/move - faster if there was no melee or shooting by either side...
 Terrain was as above (click on any of the pictures for a bigger view), and as DG was already present he was allowed a short time to create some quick defences represented by the line of fences and logs just north of the station.
The objective of the game for me was to push DG out of the town whilst not taking too many casualties... (there were other tactical and strategic imperatives, but DG reads this blog so I'll not expound on them here!)
Forces available were one brigade of infantry for DG, two brigades for me - the second of which would not arrive until later in the game. No artillery on either side - I had a half squadron of cavalry....
The following shows the progression of the game, which you can download the first nine moves of here [click here] and the end of the game from here [click here] - all you need is Battle Chronicler, open the file with that and you'll be able to see all the game mechanics, dice throws and everything else DG and I discussed... clicking the move advance button shows the units magically marching across the pixels as if by magic... well electrons anyway...
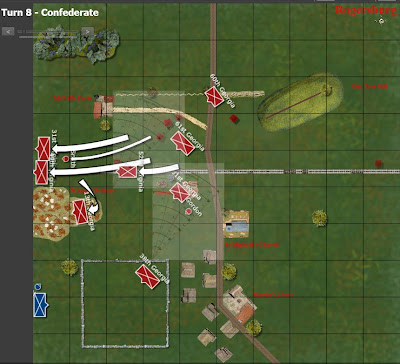
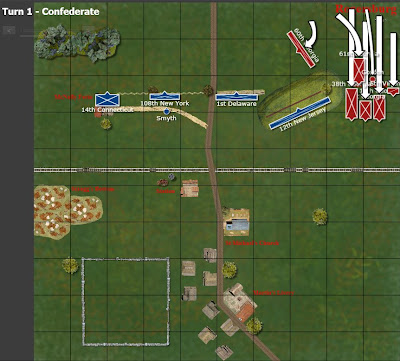 Move 1 (and I'm only showing the Confederate moves) and I enter the table - I made full use of the available room for a daring (for me) flank march, successfully bypassing the fortified walls/logs etc. I like to think DG was worrying at this point!
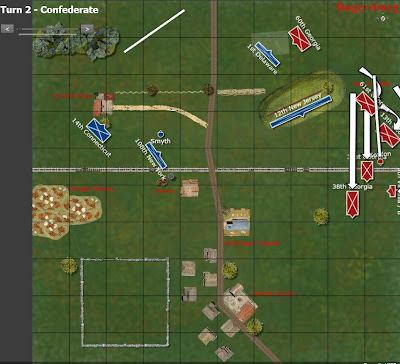 A combination of moves from DG, on balance though I drew from this that he was worried - half of his infantry withdrew while one advanced looking to take me on, and the other (huge!) regiment about turned...
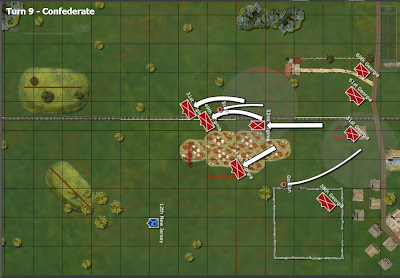
 ...and time to attack - short moves to go from column of march to double lines and away they go - Georgia boys to the fore... in the ensuing melee the Union 12 New Jersey regiment breaks and routs... in the subsequent Union turn they fail morale and retreat again..
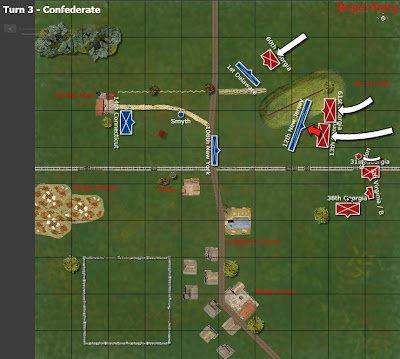
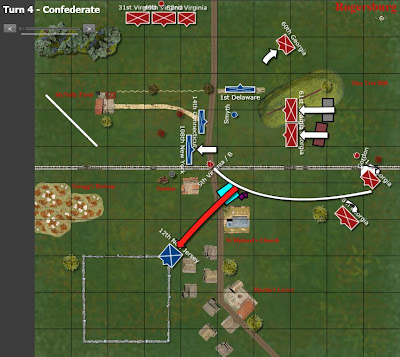 Turn four and it's the turn of the Confederate cavalry to keep the pressure on the 12th New Jersey - a mad dash across the battlefield, they contact and drive the 12th back in such disarray that they carry on and also attack the 108th New York and drive them back as well! They did well, but truth be told I knew they'd overextended themselves... elsewhere you can see that the 60th Georgia are wavering...
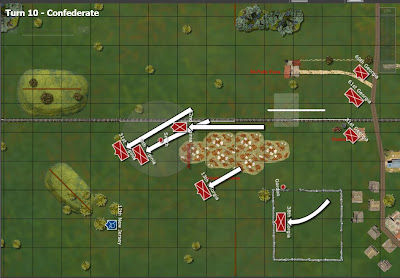
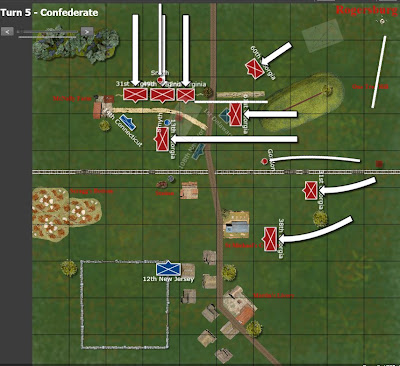 Turn 5 and my reinforcements arrive in the form of my second infantry brigade - with the hurriedly fortified positions now clear, I send them straight into the fray.. their combined shooting is almost enough to finish off the 108th NY, and the subsequent charge by the 13th Georgia sweeps them from the field.. elsewhere the 1st Delaware and contacted and forced to surrender.. to be honest - I could no wrong this turn, and I suspect DG thought he was on the wrong end of a tsunami - the dice went my way, and the arrival of my second brigade was timely..
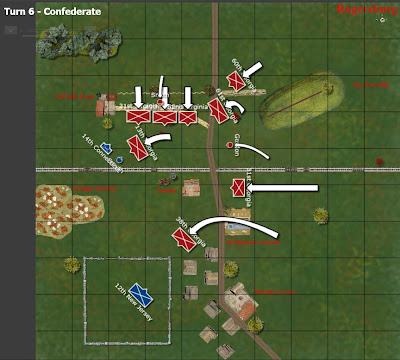
 Closing in... the field is mine... 14th Carolina caught and finished off..
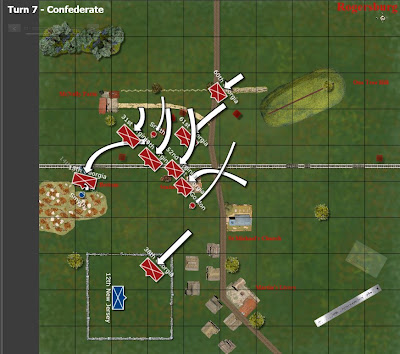
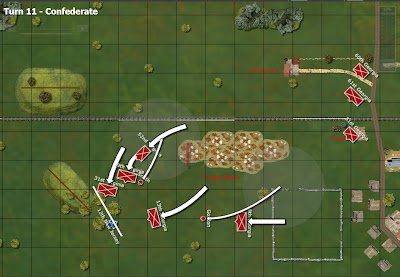
 General pursuit - and at this time we recognised that we needed a bigger table - which with Battle Chronicler is a synch... we just increased the size! Switch to the second file I linked to above for the rest of the game...
 Pursuit..
 More pursuit...
 Caught him... firing...
 End of game just before this turn...
Post Match Analysis:
Back to top...
==========================================================
Day 2 - 16:00:
 I still can't find DG's cavalry north of Waynes Junction and I'm getting worried about the ammunition supply and may well bring one of the cavalry units in behind it…
I wonder if DG has already spotted it, noted it's location and backed off?? I wonder if the only reason he hasn't attacked it is because he doesn't believe anyone would be stupid enough to leave it undefended! I wonder...... stop it..... got to love campaigns!!
In the meanwhile as a result of the battle I now find myself in control of Rogersburg and throw my first dice for train arrival… 9… no good (need 11 or 12 on 2D6) ..not for the first time I'm beginning to wonder whether my brilliant plan isn't a little based on luck!
Back to top...
==========================================================
Day 2 - 17:00:
 Train roll 10! Gah! So close...
Heaven only knows where that cavalry has gone, but I decide that if I can't see him, he can't see me, and it's time I legged it to Waynes Junction though there is little chance of getting there before the main body.
Back to top...
===================================================================
Day 2 - 18:00 - Overnight:
Diced for casualty recovery:
2 [38G] Crack 1 recovered
1[31G] Crack 1 recovered
1[60G] Crack 1 recovered
2[5V] Trained 1 recovered
Which works out as follows:
Confederate Order of Battle
Back to top...
..and the standard progress of the previous day started again at the beginning of the next day; by now though I was only five squares away from Rogersburg.
On the other flank Waynes Junction is 32 squares (miles) away which at the current rate of march is going to take about a day and a half to reach (about 16 moves).
Plan: Start dicing for a train as soon as my force reaches Rogersburg!
Back to top..
Day 2 - 08:00 - 09:00:
As I start to approach closer to Rogersburg I come into contact with some additional cavalry on the left flank!
The intel.dat file below is from Berthier and basically is my intelligence rport on all enemy elements that my forces can see or know about..
C02 1st Div Cavalry are my guys - the one's on the left of the map... 1094 is the map square reference they're in.. so I'm now in contact on both the left and right flanks...!
Back to top...
Day 2 - 10:00:
..and then - if things aren't already complicated enough - they get more complicated!
Intelligence report from Rogersburg:
MOVE: 17 POSITION: 1295 [square reference for Rogersburg]
UNIT: C01 1st Div Cavalry (my cavalry recon screen)
CONTACT (uh oh)
1295 In contact with 1 enemy unit(s) of total size 1.
SIGHTINGS
1296 Sighted 1 enemy unit(s) of total size 4.
1295 Sighted 1 enemy unit(s) of total size 1.
TYPES SEEN
Cavalry Infantry (Ah!)
Back to top...
Day 2 - 11:00-13:00:
Hmmm.. a few more present than I would have wished… clearly the Berthier fog of war is at play - I got two separate recon reports (as I'd split my cavalry into two separate units) one showed 3 units and the other 4!
When I actually made contact I've met up with an ACW infantry brigade of 3 regiments (size 3) comprising 28 bases (I28) - against them I have a half regiment of cavalry and two brigades of infantry comprising 8 regiments and 57 bases… neither of us has artillery, however.
On the assumption DG's force is roughly the same size as mine - that would be half his total force…
Back to top...
Day 2 - 14:00:
My brigades have now entered Rogersburg - current sitep as follows:
There is still some Union cavalry somewhere in the red clouded area - last move he was in the position marked with the dot - he only has a 2 square (max.) range of movement, my assumption is that he's moved further southwest..
I've advised DG that I wish to contest the engagement at Rogersburg
Back to top...
Battle of Rogersburg
We used Battle Chronicler for handling the movement, as the level of granularity is just phenomenal - we used a table top that was measured in "real" inches, allowing us to represent units in "real" size. The rules were Regimental Fire and Fury, and DG and I tended to exchange move files once per day. In many ways this explains how long it took us to play the game, which only lasted for 12 turns, but took approximately 50 days to complete...! A Regimental Fire and Fury turn comprises 8 phases - so a minimum of 8 days/move - faster if there was no melee or shooting by either side...
 Terrain was as above (click on any of the pictures for a bigger view), and as DG was already present he was allowed a short time to create some quick defences represented by the line of fences and logs just north of the station.
 The objective of the game for me was to push DG out of the town whilst not taking too many casualties... (there were other tactical and strategic imperatives, but DG reads this blog so I'll not expound on them here!)
Forces available were one brigade of infantry for DG, two brigades for me - the second of which would not arrive until later in the game. No artillery on either side - I had a half squadron of cavalry....
The following shows the progression of the game, which you can download the first nine moves of here [click here] and the end of the game from here [click here] - all you need is Battle Chronicler, open the file with that and you'll be able to see all the game mechanics, dice throws and everything else DG and I discussed... clicking the move advance button shows the units magically marching across the pixels as if by magic... well electrons anyway...
 Move 1 (and I'm only showing the Confederate moves) and I enter the table - I made full use of the available room for a daring (for me) flank march, successfully bypassing the fortified walls/logs etc. I like to think DG was worrying at this point!
  A combination of moves from DG, on balance though I drew from this that he was worried - half of his infantry withdrew while one advanced looking to take me on, and the other (huge!) regiment about turned...
  ...and time to attack - short moves to go from column of march to double lines and away they go - Georgia boys to the fore... in the ensuing melee the Union 12 New Jersey regiment breaks and routs... in the subsequent Union turn they fail morale and retreat again..
  Turn four and it's the turn of the Confederate cavalry to keep the pressure on the 12th New Jersey - a mad dash across the battlefield, they contact and drive the 12th back in such disarray that they carry on and also attack the 108th New York and drive them back as well! They did well, but truth be told I knew they'd overextended themselves... elsewhere you can see that the 60th Georgia are wavering...
  Turn 5 and my reinforcements arrive in the form of my second infantry brigade - with the hurriedly fortified positions now clear, I send them straight into the fray.. their combined shooting is almost enough to finish off the 108th NY, and the subsequent charge by the 13th Georgia sweeps them from the field.. elsewhere the 1st Delaware and contacted and forced to surrender.. to be honest - I could no wrong this turn, and I suspect DG thought he was on the wrong end of a tsunami - the dice went my way, and the arrival of my second brigade was timely..
 Closing in... the field is mine... 14th Carolina caught and finished off..
  General pursuit - and at this time we recognised that we needed a bigger table - which with Battle Chronicler is a synch... we just increased the size! Switch to the second file I linked to above for the rest of the game...
  Pursuit..
  More pursuit...
  Caught him... firing...
  End of game just before this turn...
 Post Match Analysis:
- A good game for me - it was one of those games where certainly in the middle phase I could do no wrong - the dice were definitely rolling my way
- Having said that, I think my tactics were sound, and I outnumbered DG so I really should have won - I wasn't expecting to do it quite so resoundingly though..
- Casualty recovery occurred overnight and was diced for - results below - I of course have no idea how DG did, but I hope it was worse then me!
- This was I something like our third game with these rules I think, but the first time with the published full set (we've been using the beta up until now) and again no real issues... surprisingly few differences between the beta and full versions - obviously we had a late beta version or the rules were just good in the first place!
Back to top...
Day 2 - 16:00:
 I still can't find DG's cavalry north of Waynes Junction and I'm getting worried about the ammunition supply and may well bring one of the cavalry units in behind it…
 I wonder if DG has already spotted it, noted it's location and backed off?? I wonder if the only reason he hasn't attacked it is because he doesn't believe anyone would be stupid enough to leave it undefended! I wonder...... stop it..... got to love campaigns!!
In the meanwhile as a result of the battle I now find myself in control of Rogersburg and throw my first dice for train arrival… 9… no good (need 11 or 12 on 2D6) ..not for the first time I'm beginning to wonder whether my brilliant plan isn't a little based on luck!
Back to top...
Day 2 - 17:00:
 Train roll 10! Gah! So close...
 Heaven only knows where that cavalry has gone, but I decide that if I can't see him, he can't see me, and it's time I legged it to Waynes Junction though there is little chance of getting there before the main body.
Back to top...
Day 2 - 18:00 - Overnight:
Diced for casualty recovery:
2 [38G] Crack 1 recovered
1[31G] Crack 1 recovered
1[60G] Crack 1 recovered
2[5V] Trained 1 recovered
Which works out as follows:
Confederate Order of Battle
| Brigade Smith | |||||
| Commander | Ability | Objective | |||
| Smith | Poor | ||||
| Unit | Experience | Weapon | Status | Effectiveness | Comments |
| 31st Virginia | Trained | Rifle Musket | 7 / 6 / 4 | ||
| 49th Virginia | Trained | Rifle Musket | 7 / 6 / 4 | ||
| 52nd Virginia | Trained | Rifle Musket | 6 / 5 / 3 | 2 casualties - 1 recovered - worn | |
| Brigade Gordon | |||||
| Commander | Ability | Objective | |||
| Gordon | Able | ||||
| Unit | Experience | Weapon | Status | Effectiveness | Comments |
| 13th Georgia | Crack | Rifle Musket | 8 / 6 / 4 | ||
| 31st Georgia | Crack | Rifle Musket | 6 / 5 / 3 | 1 casualty - 1 recovered - worn | |
| 38th Georgia | Crack | Rifle Musket | 9 / 7 / 5 | 2 casualties - 1 recovered | |
| 60th Georgia | Crack | Rifle Musket | 7 / 6 / 4 | 1 casualty - 1 recovered - worn | |
| 61st Georgia | Crack | Rifle Musket | 7 / 6 / 4 |
Back to top...
Day 3 - 06:00:
Start of the third day.
Train roll 7.
 Interesting!
 My cavalry report that the Union sighting is infantry strength 1.. so one unit of infantry:
MOVE: 26 POSITION: 1296
UNIT: C01 1st Div Cavalry
CONTACT
1296 No contact.
SIGHTINGS
1245 Sighted 1 enemy unit(s) of total size 1.
TYPES SEEN
Infantry
I order all units in Rogerbsurg vicinity to hold… the march on Waynes Junction continues
Back to top...
Day 3 - 07:00:
Train roll 5

Back to top...
Day 3 - 09:00:
Train roll 7

Back to top...
Day 3 - 10:00:
Train roll 5 (this is getting tedious!)
 The good news is that DG looks to be pulling his infantry back at Rogersburg.. things are going to get interesting at Waynes Junction though - I'm getting close!
 Back to top...
Day 3 - 11:00:
Train roll 8

Aha - now is that the same cavalry as before I wonder... somewhat foolishly I didn't take a note at the time - time to check my archives.. they aren't - this is 6th NY E, the previous guys were 6th NY C. One to bear in mind for the "return trip".
 Meanwhile the first recon reports are coming in as to what I can expect when I get to Waynes Junction... I have no choice anyway as this is point of the whole campaign, but the numbers look ..... "interesting"...
 The sighting in 1916 is the cavalry above - but this is telling me that there are either four of five units of infantry and artillery (and possibly more cvalry) in Waynes Junction.


The advance continues - looks like we're due a second set-to..!
Back to top...
Day 3 - 12:00:
Train roll 9 (close!)
The Union cavalry has backed off - but look at those numbers rack up as I get closer to Waynes Junction! I'm guessing the cavalry withdrew on Waynes Junction (?? I'm not convinced - I suspect they're loitering in the hills), I'll know for sure when I get to the town.


Rogersburg all quiet...
Back to top...
Day 3 - 13:00:
Train roll 7 - battle is started at Waynes Junction.


Back to top...
Day 3 - Battle of Waynes Junction:
Battle of Waynes Junction.. Part 1
Battle of Waynes Junction.. Part 2
Battle of Waynes Junction.. Part 3
Back to top...
Day 3 - 14:00 - 15:00:
Train roll 9 - all quiet elsewhere while the battle rages..

Back to top...
Day 3 - 16:00 - 17:00:
Train roll 11!! A train has arrived and as the Battle at Waynes Junction comes to a close I embark Smith's brigade at Rogersburg. I order Gordon's to march down the rails to my mid-country rendevous point - they take wagons with them.. I'll use the cavalry as a screen when I leave...
Train leaves for Waynes Junction..
Back to top...
Day 3 - 18:00:
The battle at Waynes Junctions ends a Confederate victory!
The campaign of disinformation, smoke and mirrors starts.....
Back to top...
==========================================================
Day 4 - 06:00:
Start of the fourth day.

Start of the fourth day and DG’s main force has withdrawn south of Waynes Junction to rest and re-group, while I do the same in Waynes Junction – overnight I have moved all the supplies to the station in expectation of the train arriving...
I’m using my cavalry to push DG’s single cavalry scouting unit away from the railway...
DG is already wondering why I have no wagons defined.. he is clearly not aware of the train – should come as something of a surprise..
Back to top...
==========================================================
Day 4 - 07:00:
The train arrives and causes much consternation..
North of Rogersburg the cavalry is moving northwards – infantry and wagons have departed Rogersburg for the rendezvous..
Back to top...
==========================================================
Day 4 - 08:00:
To allow me time to embark/disembark I move my main force south and confront DG’s main force
Back to top...
==========================================================
Day 4 - 09:00:
The train disembarks Smith’s Brigade and they join the main force – further consternation – fresh brigade is added to the mix just like that... my reading would indicate this is very typical of the ACW experience – transporting bodies of troops quickly across big distances...
DG has moved his main force to the east...
Supplies are loaded – still no wagons..
Back to top...
==========================================================
Day 4 - 10:00 to 12:00:
Train departs...... time for a more detailed map update...

Gordon’s and the wagons are hot footing to their rendezvous; my main force with some craftily created “wagons” are heading north (smoke and mirrors!) with cavalry front and behind...
Back to top...
==========================================================
Day 4 - 13:00:
The cavalry I sent north from Rogersburg has arrived just south of Laddsville – there are Union cavalry there... just a single scouting unit – I order them to stay in place and keep an eye... (This unit of cavalry caused DG a bit of confusion as he assumed they were some of the cavalry from Waynes Junction!)

Back to top...
==========================================================
Day 4 - 14:00:
Continues - all recon reports of the main Union forces have now gone - I can't see DG, hopefully he can't see me...
Back to top...
==========================================================
Day 4 - 15:00 to end of day:
...and so the day proceeds, gradually moving northwards, keeping pace with the horribly slow moving wagons..

...and so at the end of the day the position is as above..
a thought... the last time we saw them DG seemed to be moving his troops north east – what if the wagons from the train happen to reach the road just as that force gets there??! Plan for day 5 is to find DG’s main force – I need to shadow it so as to know what I need to do... if necessary I’ll do a crafty shimmy and go back to Waynes Junction!!
Back to top...
Day 4 - 06:00:
Start of the fourth day.

Start of the fourth day and DG’s main force has withdrawn south of Waynes Junction to rest and re-group, while I do the same in Waynes Junction – overnight I have moved all the supplies to the station in expectation of the train arriving...
I’m using my cavalry to push DG’s single cavalry scouting unit away from the railway...
DG is already wondering why I have no wagons defined.. he is clearly not aware of the train – should come as something of a surprise..
Back to top...
Day 4 - 07:00:
The train arrives and causes much consternation..
North of Rogersburg the cavalry is moving northwards – infantry and wagons have departed Rogersburg for the rendezvous..
Back to top...
Day 4 - 08:00:
To allow me time to embark/disembark I move my main force south and confront DG’s main force
Back to top...
Day 4 - 09:00:
The train disembarks Smith’s Brigade and they join the main force – further consternation – fresh brigade is added to the mix just like that... my reading would indicate this is very typical of the ACW experience – transporting bodies of troops quickly across big distances...
DG has moved his main force to the east...
Supplies are loaded – still no wagons..
Back to top...
Day 4 - 10:00 to 12:00:
Train departs...... time for a more detailed map update...

Gordon’s and the wagons are hot footing to their rendezvous; my main force with some craftily created “wagons” are heading north (smoke and mirrors!) with cavalry front and behind...
Back to top...
Day 4 - 13:00:
The cavalry I sent north from Rogersburg has arrived just south of Laddsville – there are Union cavalry there... just a single scouting unit – I order them to stay in place and keep an eye... (This unit of cavalry caused DG a bit of confusion as he assumed they were some of the cavalry from Waynes Junction!)

Back to top...
Day 4 - 14:00:
Continues - all recon reports of the main Union forces have now gone - I can't see DG, hopefully he can't see me...
Back to top...
Day 4 - 15:00 to end of day:
...and so the day proceeds, gradually moving northwards, keeping pace with the horribly slow moving wagons..

...and so at the end of the day the position is as above..
a thought... the last time we saw them DG seemed to be moving his troops north east – what if the wagons from the train happen to reach the road just as that force gets there??! Plan for day 5 is to find DG’s main force – I need to shadow it so as to know what I need to do... if necessary I’ll do a crafty shimmy and go back to Waynes Junction!!
Back to top...
Day 5 - 06:00:
Start of the fifth day and out of the dawn something wicked comes...... Union cavalry!

Using their superior reconnaissance range they must have sat there watching for the opportunity yesterday...
Back to top...
Day 5 - 08:00:

Back to top...
Day 5 - 11:00:

Back to top...
Day 5 - 12:00:

Back to top...
Day 5 - 14:00:

Back to top...
No comments:
Post a Comment