Showing posts with label Campaign. Show all posts

Friday, February 11

"Firing into the Brown" #6 - The Chattanooga is Hunted, and stuff..

"So Carnehan weeds out the pick of his men, and sets the two of the Army to show them drill and at the end of two weeks the men can manoeuvre about as well as Volunteers. So he marches with the Chief to a great big plain on the top of a mountain, and the Chiefs men rushes into a village and takes it; we three Martinis firing into the brown of the enemy".

Kipling "The Man Who Would Be King"

Time for another update...

~~~~~~~~~~~~~~~~~~~~~~~~~~~~~~~~~~~~~

"Regiments of renown"...   an occasional series...    also known as tricorne porn... 😄  

Longer ago than I can ever remember this was the picture that resulted in me painting the same regiment - the Royal Italien Regiment - for my Marlburian project ...

It may very well be, that I saw it in Wargames Illustrated but I honestly can't remember..   I think they are Front Rank figures, but whoever painted them, they were/are stunning (well done whoever it was), and provided the impetus to do the same for my little corner of the wargame world.. those brown coats with the red linings/turn backs really appealed...

The regiment (one of 52 raised by Louis in the period up to 1684!) was raised on April 27 1671, following a commission issued by Louis in the same year, by the Count Magalotti a naturalised Frenchman originally from the Florence area of Italy and formerly a captain in the Gardes Françaises. Recruitment was in Italy and the Piedmont region..

The regiment initially consisted of 27 companies, each of 204 men (that is huge!!) and Louis XIV was so satisfied when he inspected the regiment that he immediately decided to name it “Royal-Italien”. On the same occasion, he decided to dress the regiment with brown uniforms which was the same colour as the justaucorps - or coat - that he was wearing on the day of the review.

In 1672, during the Franco-Dutch War (1672-78), the newly raised regiment joined the Army of Flanders and took part in numerous operations and sieges, and also the battles of  Seneffe, Cassel and Saint-Denis. The regiment was reduced to 12 companies immediately after the war ended
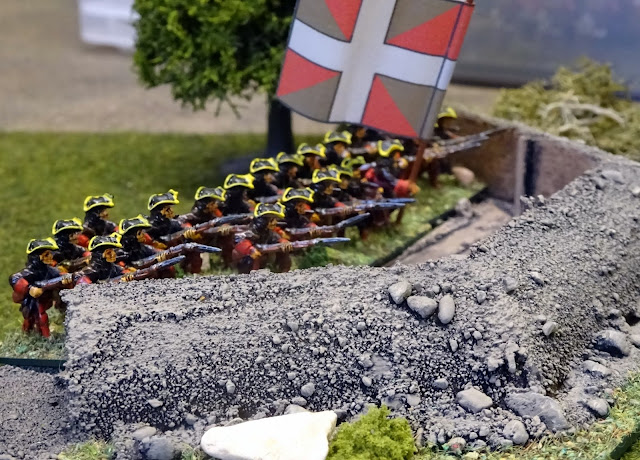
My feeble copy...

In 1689, during the Nine Years' War (1688-97), the regiment was again busy, being at numerous skirmishes, sieges and offensives, and the battles of Fleurus, Steenkerque (where it distinguished itself) and Landen.

In 1701, at the outbreak of the War of the Spanish Succession, the regiment counted only one battalion and was still serving with the Army of Flanders. In 1702, the regiment were at Nijmegen; in 1703, at the sieges of Alt-Breisach and Landau and in the victorious skirmish at Speyerbach; in 1706, at Ramillies and the defence of Menin; in 1708, at Oudenarde; in 1709  at Malplaquet; and they served to 1713 in numerous other skirmishes, battles and sieges.

These guys deserve a new flag and I think I know just where to go for it [clicky]. They were completed back in March 2007, and are Warrior Miniatures figures

Bit more here:

~~~~~~~~~~~~~~~~~~~~~~~~~~~~~~~~~~~~~ 

Hunt the Chattanooga

In a triumphant conclusion to the mini naval campaign that I have featured over the previous weeks, I can confirm that the Confederate ironclad Chattanooga has been located and sunk..   but that kind of gets us ahead of the curve..

So as a reminder the Union fleet was as follows, comprising a Monitor, and two heavy woodenclads. The ships were at almost full strength (minor damage was accrued during the previous days of the campaign due to enemy action), but the most significant impact was to the firepower of the Monitor that had lost one of their two heavy guns due to equipment failure in a previous engagement..

...and then there is the Chattanooga, a "standard" (if there is such a thing) Confederate Casemate ironclad - strongly armoured and, for the Confederacy, well armed..

A few shots of the action follow - but in summary the Union ships sort to divide and conquer - splitting their attack so as to come at the ironclad from three different sides...

The woodenclads, being armed with light and medium guns were always going to struggle putting in damage on the ironclad, but in the end sheer weight of numbers began to have an effect, and in one lucky shot the ironclads steering was damaged and she ran aground - happily for her with enough arc of fire to keep up her bombardment..

The ironcald managed to get afloat a few turns later and but with mounting damage decided to try and make a break for the river..

Taking damage as she went..

Until the inevitable happened, and with one mighty broadside her guns were silenced and she struck to the triumphant Union commander, but not before she had done the same to one of the Union woodenclads - but Union mission complete!

The butchers bill..  two ships all but destroyed, but the Monitor only with light damage, and with a replacement gun would soon be back in action. All in all a good outcome, especially in light of the other successful actions over the previous days...

That was good fun, but that's enough Ironclad action for the time being - on to other things..... 😁

~~~~~~~~~~~~~~~~~~~~~~~~~~~~~~~~~~~~~ 

"Laters", as the young people are want to say...

Friday, January 28

"Firing into the Brown" #4 - rebasing, books, campaigns, profits..

"So Carnehan weeds out the pick of his men, and sets the two of the Army to show them drill and at the end of two weeks the men can manoeuvre about as well as Volunteers. So he marches with the Chief to a great big plain on the top of a mountain, and the Chiefs men rushes into a village and takes it; we three Martinis firing into the brown of the enemy".

Kipling "The Man Who Would Be King"

~~~~~~~~~~~~~~~~~~~~~~~~~~~~~~~~~~~~~

Time for another update...

Getting slowly into the swing of things..  first off the WW2 French rebasing may be complete, but it's now time for the Germans, who are currently based on a variety of base sizes, and with a variety of basing styles..  

I'll be standardising on the same basing I used for the allied contingent...  pennies for the grunts, 2p's for the officers/command, and standardised (as much as possible) basing for the vehicles..

As you can see - three of the bases are done already - the anti tank guns at bottom in the following were the last items added to the project back in 2018..

Quick/cheap basing tip - get a bag of pennies from the bank - did you know you can get a hundred for only a pound - bargain! 😁 

Better get on with it then...

~~~~~~~~~~~~~~~~~~~~~~~~~~~~~~~~~~~~~ 


From the Times last Saturday...  not my cup of tea, but "sci-fi slash fantasy" doesn't offend the modern sensibilities for 'glorifying war', and we've all been locked in for a few years with money to spend and a need for entertainment, so perhaps not so surprising ..

Hornby have seen much the same; "As predicted in a trading update issued in April, Hornby has achieved sales of £48.5m for the year to 31st March 2021, up 28% on the year before. The company said that the company has swung to a pretax profit of £345,000 compared with a loss of £3.4m for fiscal 2020" (source was an industry mag), wonder what their results will be this year?

... interesting, eh?

~~~~~~~~~~~~~~~~~~~~~~~~~~~~~~~~~~~~~ 

Maigret is going about his work in rainy Paris, shadowed by Inspector Pyke who is on secondment from Scotland Yard to study the famous French detective's methods. The routine is disturbed when Maigret receives a telephone call from the island of Porquerolles, and island off the Mediterranean coast of France, just east of Toulon. 

A small-time crook has been murdered, the night after he had fervently declared his friendship with Maigret in front of a large group of the island's inhabitants... 

Maigret and Pyke head to Porquerolles to investigate further and in doing so get to meet an extensive cast of locals, rich (and not so rich) exiles, fishermen, local policemen, waiters and waitresses (since there is always food, and the local white wine)

Stunning book, Maigret is as much about the local atmosphere and scenery, and life, and food, as it is abut the crime, and Porquerolles sounds like the kind of place I would very much like to go to..   9/10

~~~~~~~~~~~~~~~~~~~~~~~~~~~~~~~~~~~~ 

Click to embigen as they say...
I am being stupidly entertained at the moment by the item to the left that was recommended to me by my reader in a comment on the last post (cheers, Jim!)..

It's available on the Wargames Vault [clicky] for a stupidly small amount of money, and while I suspect that most people will buy it for the myriad ship details/data in support of the rules (and has anyone played them by the way? I am intrigued as to whether they are worth a punt) what was specifically recommended to me was the included solitaire campaign..

I was playing around with this at the weekend, with no intention of starting it in earnest, and here we are several (real) days later and I am at the end of the 3rd day of the campaign! 😁

My campaign is called "Hunt the Chattanooga" but in essence the campaign is about hunting down a Confederate ironclad, on a stretch of river nominally in Confederate hands. 

You play the Union commander with a fleet of 5 ships (3 warships, 2 supply ships) looking to find the aforesaid ironclad which intelligence says is being built/prepared, and which needs to be stopped before it wreaks havoc on Union shipping..

The campaign documentation has an entertaining mechanism to randomly build the course of your river, with river bank terrain, a random effects chart for the Union ships (mechanical defects, rudder issues, etc.) and also what in D&D terms would have been called a "wandering monster" roll for any Confederate forces encountered as you advance up the river...including aforesaid ironclad..

Generating the river as you move along it is proving more entertaining than you would expect and the map following/right shows my progress to the end of Day 3 which as been eventful for the Union to say the least, despite them not yet finding the Confederate ironclad.

"Hunt the Chattanooga" - Click to embigen...

As my Union force I chose a monitor and two good timber-clads (ie. biggish ships, but with light armour although a decent armament), because as David says, where's the fun in a fleet comprised entirely of ironclads, and I wanted a bit of a challenge..

So how is it going?

There have been a number of small skirmishes (too small to put on the table, but easy enough to work out with paper, pen and dice) with battles against gunboats large and small, and also Confederate batteries on the banks of the river armed with random numbers/types/weights of gun. 

I would say that while the Union fleet have been successful to date, their progress has not been without incident..

On day 3, when the force was taking on a Confederate hidden battery, that had surprised them by suddenly opening fire, the return fire from the Union ships resulted in one of the two guns on the monitor exploding - a fairly major setback as the two guns on the monitor are the largest the Union have, and will be critical when taking on the Confederate ironclad

As well as that, other engagements have also seen ships being damaged, but as of the end of day 3, the Union fleet is still complete, and I would calculate about 75-80% effective - supplies are good (one of my supply ships is carrying fuel, one ammunition) and there's no need to withdraw yet. 

Next step for the Union commander is to push on round the bend of the river to see what awaits..  

As a campaign resource very much recommended, and for not much more than a pint in cost - stay tuned for further campaign updates...

~~~~~~~~~~~~~~~~~~~~~~~~~~~~~~~~~~~~~ 

 Laters, as the young people are want to say...

Sunday, August 14

Maps, maps...

..glorious maps...

It is a well known fact that show any average wargamer a map and he automatically goes into campaign mode..  imagining his armies sweeping, Stonewall'like, round the flank of the enemy..  marching through mountain passes, transported on railways/river, and the like.. and that's just when they see a London tube map.. 😏

Imagine what they'd do if they saw this little lot then [clicky]...  of which the following is just one example..
Fill yer boots... my thanks Paul/Thistlebarrow [clicky] for the lead, and for the web owner (Malcolm McCallum) for making them available for free use to one and all..

Thursday, February 9

Battle of Waynes Junction... Part 3

...following on from the two previous parts of this elephantine report (here and here), the battle has now ended with a Confederate win.... you might argue that this was somewhat of a Pyrrhic victory, but given that Waynes Junction is the primary Confederate objective of the campaign [click here] that DG and I are playing I can't see that I had much choice as to whether to attack it or not, so first part of the job done - all I need to do now is get those supplies home....

Either way - here's how the battle ended.... at the end of move 18 you'll remember that I was beginning to get a little worried as there were still ten game moves to complete before I would say I had officially won the game, and precious few fresh Confederate units to do it with... the next ten moves then were dominated by the tactical doctrine "hold on with your fingernails"..

Move 19 (next picture) and the 126th NY are making their (very slow, and therefore menacing) approach but I'm hoping a flank approach by the 21st NC (top of picture) will worry DG enough to make him stop, even if the regiment in question is down to the bare nub.. (for the Fire and Fury players among my readers, both DG and I were now on heavy casualties modifiers)

It didn't, and by move 20 (next picture) he'd seen off the 8th Louisiana to his front.. the damn supply buildings are blocking the line of sight from my 6th NC, and all I can get off is a few desultory volleys..

Slightly to the south my artillery continues firing at the 7th WV without much success - simply put, all our forces were worn out...


Turn 21 (next picture) and faint heart never won fair maid and all that... the rebel yell is heard again as I throw in a last ditch charge to clear the New York boys away from my objective... success!


Turn 22 (next picture) back to my original positions while the Union 126th NY lick their wounds...


Turn 23 (next picture) and DG decides to see off the the flank threat so that he can have another go - the New York regiment were "green" but they didn't act like it... a sterling effort. To the south DG moves the 7th WV into cover...


Turn 24 and stalemate...


Turn 25 (next picture) and DG advances on the 21st NC and brings the 7th WV out to open fire on my artillery - you'll note a number of piecemeal units being manoeuvred to the south...


Turn 26 (next picture) and it's all too much for the 21st NC - they rout north (off the picture)


Turn 27 and the primary question in my mind is has DG left it to late??!

He has, he has! Talk about skin of your teeth....


Around about now one of my staff officers was wounded and killed during an exchange of gunfire.. I don't care, I still hold the supply buildings and, in terms of my objectives, I'm winning but the charge of the 7th West Virginia on my artillery has seen for them... the last gasp of the Union though...


End of game...


Post Match Analysis:

  • Another good game for me - I enjoyed this game even more as the plan went exactly as I'd hoped - can't even say it was the dice that won it for me this time, it was purely down to the quality of the regiments I had.... in stand losses though the Confederates lost 86% (!) against the Union 75%. The battle lasted 6 hours in real time, but at the end of the I hold Wayne's Junction and the supplies it holds.
  • During the night the Union forces withdraw to the south and the Rebs consolidate on the battlefield. Lost troop stands will return to the colours according to experience (we're dicing for stands to return with a positive modifier based on unit training - I can only hope I recover more than I did after the last battle as these are good guys!)... damaged gun stands are repaired according to experience... wrecked gun stands are permanently lost (that'll be that artillery I lost at the end of the game gone then!)
  • Something like our fourth game with these rules, perhaps the second with this version (which are the full set as sold) but I have to admit I struggled a bit with them - in the end DG was correcting so many of my errors I just asked him to do the calculations for me so that all I had to do was throw the dice and move the units! I need to do something about this - I'm thinking at the moment I prefer the old beta version of the rules simply because they were... simpler.... I may post separately on the issues I'm having - see what other folks have to say, but I may not!
  • My final objective is now to get those supplies home to Stewart Springs.... I have a few surprises for DG up my sleeve, but that story will continue on the Campaign Diary blog..
  • Still not happy about the random die/dice rolls but you lot already know about that..  thanks for some excellent feedback that DG and I will be discussing prior to the next game...
  • DG's come up with a few other things to also sort out:
    • Firing dice modifiers based on experience - it seems strange that all other elements of the game include modifiers based on experience, but not shooting??
    • Provisional commanders; should we allow them at brigade level or just divisional?? Seems a bit of a kludge to us...
    • Spent unit capabilities - there doesn't seem to be anything that penalises a unit that has taken a significant number of casualties.....
    • End of battle criteria - campaign battles seem to throw Fire and Fury!
    • Town/village as cover ie tactically significant structures - it seems strange to us that in a regimental level set of rules buildings are so unimportant - maybe it means that there weren't so many buildings that they would be considered, but it needs some thought..
    • Buildings blocking line of sight and stuff; how much of a stand must be in the arc of fire, line of sight and range?
    • Command Radius; same thing, how much of a stand must be in the radius to be considered in command?

In the meanwhile the campaign rolls on...

Thursday, November 17

Battle of Waynes Junction... Part 2

Continuing the account of the battle which I left at move 11.

=====================================

Move 12: Last efforts - I need to defend what I've taken, and the objectives/features that are key to my plan - that's the left of the battlefield.

The Louisiana Regiments have done their work and it's time for them to rest, but not before I send the 6th Louisiana to attempt a little naughtiness on the exposed US artillery...


Move 13: ..which works! Go the 6th!

On the left of the battle I continue to make (small) gains...


Move 14: The 6th are on fire.... Battle honours are deserved by all the Louisiana regiments, but especially the 6th - who have now charged the flank of the US artillery and sent them packing!

On the right of the battlefield DG attempts a little of his own "shut the door" with the 126th New York - I move one of the two now rested Louisiana regiments to cover, with the 21st North Carolina as support


Move 15: That's it as far as I'm concerned - no immediate threats and it's time to dig in and wait for DG to retreat... Famous last words...

Two of my regiments are sent packing - not through any action by DG just casualties and poor dice throws results in them withdrawing... on the right that New York regiment is beginning to be a bit of a pain...


Turn 16: The 21st North Carolina have halted...  the 57th have "retreated" themselves into a position where they are no longer a viable unit... time to "hunker down" as my US colleagues would say


Turn 17: The Confederates are  a spent force - only the 6th North Carolina and the artillery are still a cohesive force, and as a campaign game there are a lot of hours until night time..

In the face of a slow advance by the Union 126th New York I cover with the 21st NC and 8th L - elsewhere I fall back on the supply sheds...

Throughout all of this the Confederate artillery maintain a healthy fire and cause some discomfort to the 7th West Virginia..


Turn 18: "Come and get it if you think you're hard enough".. those New York boys seem a little hesitant...


...end of this post - I hadn't realised when I said 'game over' that as a campaign game there were no victory conditions - I have another 7 turns to hold out - I leave it to you to imagine how I felt about that...!

Tuesday, August 30

Battle of Waynes Junction.. Part 1

So here we go as promised, the first part of a run through of the most recent battle that DG and I have been fighting in our ongoing American Civil War campaign [click here].. we started this battle on February 22nd - further evidence if any were needed of how slow virtual games across the ether can be.... don't get me wrong, any game is better than no game, but they aren't quick...! The game is not yet finished...

As per the last battle [click here] we also used Battle Chronicler for handling the movement on this game. There's been several upgrades and new releases of this brilliant (and free!) tool and I'd recommend it to anyone for either recording their own games, or using it as we do as a means to play a real game across email.

The rules were Regimental Fire and Fury, and the Battle Chronicler set up is "real" so that we can use movement rates direct from the rule book.

DG and I tend to exchange files once per day, but with three, possibly four phases per move, that's potentially 8 move files to complete a turn...

Terrain was as above (click on any of the pictures in the post for a bigger and hopefully clearer view), and as DG was already present he was allowed field works - hence the breastworks and redoubts on the hill! This was clearly going to be a tough nut to crack..

The objective of the game for me was to push DG out of the town whilst not taking too many casualties... (there were other tactical and strategic imperatives, but DG reads this blog so I'll not expound on them here!)

My forces were as follows:

Basically, a couple of brigades of infantry (all good, but small regiments with very little gap between good condition and spent) and this time some artillery. DG also had a couple of brigades of infantry but although they were more numerical his infantry tended to be poorer ('green' or 'trained' c/w my 'crack' and 'veteran' guys) my he was heavy on artillery though!

Deployment was as follows - me in grey - DG as Union largely in blue:

Only one of my brigades present at the beginning - the second brigade will enter from the top of the screen.. DG had his guys behind the breastworks on top of the hill - but look at that artillery dominating the battlefield...

As a campaign game the outcomes from this battle were more important for me than the more usual stand alone game - for those who haven't checked the campaign page (link at top left) I am playing the Confederates with the goal of entering Waynes Junction so as to gain the vital war supplies stored there - I then have to get those supplies back to my own territory but that's somewhere in the future...

You should also be aware that in campaign terms I have a clever plan (so clever that if you put a tail on it you could call it Reynard etc etc innocent smileys) to get me and the supplies away before DG knows what's up - full details on the campaign page, but it involves trains, and the station in Waynes Junction is key...

Move 1 (and I'm only showing the Confederate moves) - I need to find the supplies, the majority of the buildings are to the left of the hill, there's no way I can just wander up to them so I decide to repeat my previous tactics and attack from the right (my left) and roll him off the hill unit by unit, right to left... or that's the idea. Meanwhile I have the artillery providing enfilade fire..


Move 2: Give him the old "one two" - pin with my right, flank with my left - the flank attack starts. Second brigade (and you can just see 6th NC arriving top right of the picture) will be the reinforcement for the flank attack... 6th, 7th and 8th Louisiana have the honour of leading the attack. Was surprised how quickly I managed to close the hill...


Move 3: BANG! In goes the assault - all of the Louisiana regiments charge, and successfully push back their respective targets - gratifyingly the US artillery is gone! On the left of the battle DG has not stood still and has pushed forward two regiments to clear off the Confederate artillery...


Move 4: Union fightback on the hill, but the 7th and 8th Louisiana complete the 'swinging door' and ready themselves to take the 8th Ohio in the flank. To the north I've stopped the big flank move by the North Carolina brigade and directed them toward the main battle - doesn't look like I'm going to need them for the outflanking exercise, so decided to get them into the main battle as soon as possible...

You'll note that I've also secured the left of the battlefield and sent DG's 4th Ohio back where the came from..


Move 5: Consolidation and preparation for further advance


Move 6: BIG BANG - "at my signal unleash hell" [click here] - the door swings shut on top of the hill, and sends the 8th Ohio & 7th West Virginia reeling... at the same time the pinning regiments let out the rebel yell and surge forward.

You'll note that as I breasted the ridge of the hill further Union troops have appeared.. by this time I was so confidant I was just thinking "bring them on"!


Move 7: Keep on pushing - I have the momentum, time to keep up the pressure though DG is bringing up the New York regiments fast to stem the rushing tide of grey...


Move 8: Next big push (I don't remember it at the time but I'm clearly riding my luck) and the class of the Confederate regiments is driving all before them..


Move 9: There go the new York regiments - although I didn't know it the supplies are in those two blue roofed buildings between the road and the hill.

The 57th North Carolina are about to occupy the station - the plan seems to be working!


Move 10 & 11: All stop - the Confederate regiments are drained - time for more rest and consolidation but I have the objective.


========================================


Stay tuned for part 2....