Thursday, May 24

York and Lancaster Regiment in the Sudan..

A Royal Marine Light Infantry at the Battle
 of Tamai. Illustration by Charles Stadden.
Nothing specifically to do with this figure
but you can't pass up an opportunity
of a Stadden illustration!
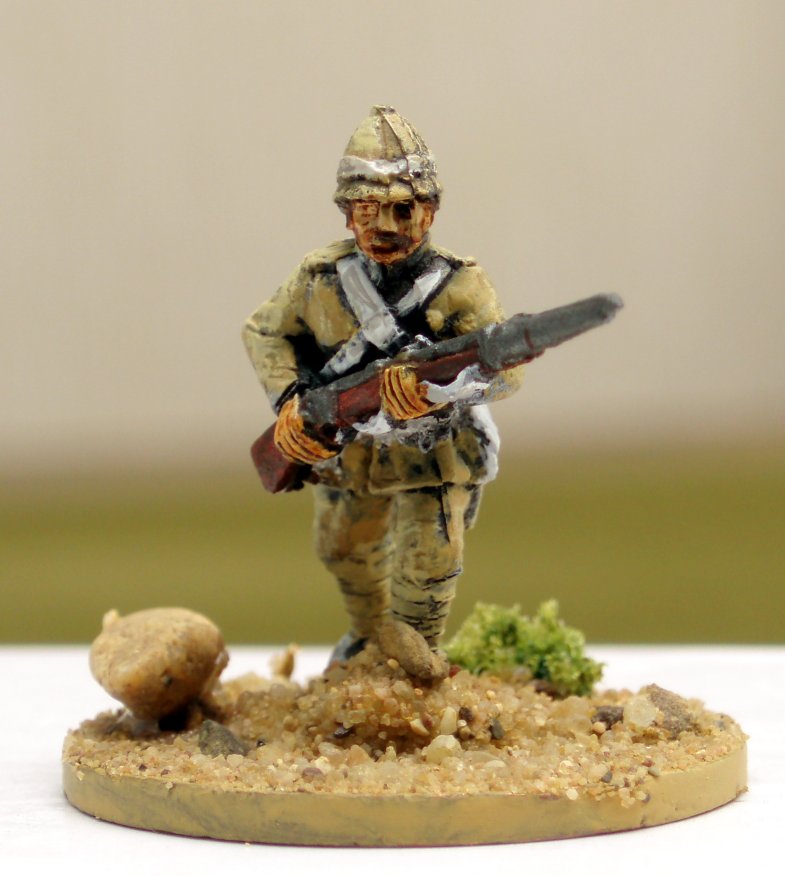
Fourth figure from that pack of Newline Designs Sudan British figures (SUD05 - British Foot Advancing) I bought at Salute - I've had a lot of fun with them considering they only cost me half a fiver.. for this figure I decided to represent one of the typical home counties type regiments, in this case the York & Lancaster Regiment...

The regiment was formed on 1st July 1881, from the amalgamation of two regiments of foot, and a militia regiment:

  • 65th (2nd Yorkshire North Riding) Regiment
  • 84th (York and Lancaster) Regiment
  • 3rd West York Light Infantry Militia (two battalions)

The title of the new regiment was going to be "The Hallamshire Regiment", but this was universally disliked by rank and file (but would make a fine name for an Imagination regiment!), and following a vote the title "York and Lancaster Regiment" was chosen as being most representative of the separate battalions that had made it up....


The 65th Foot became the 1st Battalion, the York and Lancaster Regiment, they were serving in India & Aden at the time and whilst returning home in 1882 were diverted to Suakin; the battalion finally arrived home in 1884.

The 84th became the 2nd Battalion the York and Lancaster Regiment, and served in the Egyptian Expedition of 1882.

As we know, from the previous posts, in January 1884 Gordon was appointed to oversee the evacuation of the Egyptian forces from the Sudan. At the same time a British army, including the 1st Battalion, commanded by Major General Graham, landed at Suakin to relieve the Egyptian garrison at Tokar, 50 miles to the south. Once assembled, this force moved down the coast to the relief of Tokar.

On 22nd February while still en route Graham received news of the surrender of Tokar. The British force pushed on anyway, and occupied Fort Baker. On the 29th the infantry brigade (including the York and Lancaster's) formed a square and began the advance on El Teb, where a force under the Mhadi's second in command Osman Digna, was in position.

The left of the square, commanded by Buller, was formed by the 1st York and Lancaster and the RMLI (ok, so there was a reason for the picture other than the link to Stadden!)

The Dervish opened fire with rifles and Krupps artillery captured from the Egyptian forces they had defeated in the course of the revolt.

The British square halted and the infantry were ordered to lie down while the guns and machine guns fired on the Dervish silencing the Krupps. The square stood up and continued its advance under rifle fire.

When the square was within two hundred yards or so of the earthworks, the Dervish charged the square with spears and swords. Large numbers of the tribesmen were shot down by the infantry with rifle fire and by the Gardiner and Gatling guns of the Naval Brigade.

The tribesmen fell back, the square reformed, and the British resumed the advance. The cavalry charged the massed Dervish tribesmen, but suffered heavy casualties. As the British infantry reached the earthworks, the battalions moved out of square formation and, forming line, stormed the tribesmen’s positions at the point of the bayonet, winning the battle...... superb!

=====================

At Tamai a month later the British advanced to attack Osman Digna’s camp, two brigade squares were formed with the 2nd Brigade leading. The York and Lancaster were again involved as a part of 2nd Brigade commanded by General Graham.

"The 2nd Brigade came into contact with the Mahdists and fire was opened as the brigade square continued to advance. The brigade then found itself on the edge of a wide deep gully. The sides of the square were being subjected to repeated and increasingly threatening rushes by the Mahdists. The fire discipline of the troops began to deteriorate. Smoke from the rifle fire with the dust from the dry plain, stirred up by the numbers of men rushing about, made visibility difficult. The front face of the brigade square moved down into the ravine, but the men forming the sides of the square failed to conform fully to the movement so that the continuity of the square was broken and it began to disintegrate.

The Mahdists launched an attack on the right face of the square, comprising 2nd York and Lancaster, which halted to give fire, while the front face of the square continued to advance. The York and Lancaster fell back on the RMLI and the two battalions became intertwined and disordered. The Black Watch, now thrown into confusion, fell back into the square and the brigade was forced to retreat, pressed hard by the attacking tribesmen. 3 Royal Navy guns had to be abandoned and casualties were mounting. The tribesmen took some of the Gatling and Gardiner guns".

You can almost smell the heat, the dust, and the acrid smoke of the Martini Henry fire....!
 
The 2nd Brigade was eventually reformed by General Graham and again attacked the Dervish, and the British won the battle but not before the Dervish had broken a British square... 

The 1st Battalion Black Watch and 1st Battalion York and Lancaster Regiment
The 1st Battalion Black Watch and 1st Battalion York and Lancaster Regiment in the 2nd Brigade square at the Battle of Tamai. Painting by Douglas Giles.

This figure represents a soldier from the 1st Battalion who had just arrived at Suakin from India wearing Indian khaki drill uniforms.


According to the Perry's uniform guide:

"It fought with fairly outdated equipment, cartridge pouch and belt from 1854 and 1857 expense pouch. The greatcoat had to be carried over the shoulder. According to Bennet Burleigh of the Telegraph all troops passing through Suakin were issued with Oliver pattern water bottles".

In my case the soldier has decided it's too hot to have the greatcoat draped, or he is just about to go into action, and has rolled the coat in the small of his back..


 ...and here's all of them...  like I said - I enjoyed that little diversion!

Saturday, May 12

Camel Corps in the Sudan

Third figure from that pack of Newline Designs Sudan British figures (SUD05 - British Foot Advancing) I bought at Salute .. for this figure I decided to revisit a unit I've painted already in 15mm..  the Camel Corps..  


There's a fair amount of content - and some shots of the 15mm versions in this post [click here]


From http://www.victorianwars.com/viewtopic.php?f=16&t=3550

In summary though:
  • the Sudan was the first time a camel corps was used by the British army - all the men were volunteers.
  • the camel corps was part of, but not all of, a force called the Desert Column which included elements of all 3 arms; cavalry, artillery and infantry. Its objective was to cross the desert to Khartoum while the majority of the relieving force came up the longer Nile route...
  • The first contingent of the desert Column was composed of the Royal Sussex Regiment (the Orange Lillies!) and some mounted infantry. In October 1884 though, the Camel Corps was officially divided into four regiments. They were:
    • Guards Camel Regiment from the 1st, 2nd 3rd Grenadier Guards, 1st and 2nd Coldstream Guards, 1st and 2nd Scots Guard, and also from the Royal Marine Light Infantry (RMLI).
    • "Heavy" Camel Regiment from the 1st and 2nd Life Guards, Royal Horse Guards, 2nd, 4th, 5th Dragoon Guards, 1st, 2nd (Scots Greys) Dragoons, 5th and 16th Lancers.
    • "Light" Camel Regiment from the 3rd 4th, 7th, 10th, 11th, 15th, 18th, 20th, 21st Hussars.The Lights never went with the Desert Column but were left behind to guard supplies.
    • Mounted Infantry Camel Regiment from the 1st South Staffordshire (38th), 1st Royal West Kent's (50th), 1st Black Watch Highlanders (42nd), 1st Gordon Highlanders (75th), 2nd Essex (56th), 1st Sussex (35th), 2nd Duke of Cornwall's Light Infantry (46th), 3rd King's Royal Rifle Corps, Rifle Brigade, Somerset Light Infantry, Connaught Rangers, Royal Scots Fusiliers.
 
  • The Desert Column eventually comprised:
    • 2 squadrons 19th Hussar
    • Guards Camel Regiment
    • Heavy Camel Regiment
    • Mtd. Inf. Camel Regiment
    • 1st Royal Sussex
    • Naval Brigade (they had a Gardner gun carried by four camels - how brilliant would that be to model!?)
    • Artillery/Engineers
    ..with each of the camel regiments comprising about 360-400 men... 
  • The Corps was disbanded after the campaign and all the men were returned to their home units, thought the British army did field further camel mounted units on an ad hoc basis (there was one at Ginnis apparently.....)
  • The uniform was as follows: White helmet with white pagri, grey tunic, yellow-ochre cord breeches, blue puttees, boots, waist kit, bandolier of 50 rounds, rifle, sword bayonet and scabbard, water bottle, and haversack. There were lots of variations though (and my guy has already deposited his bandolier somewhere safe..) I especially enjoyed the review in Savage and Soldier of what the Corps looked like when they returned to Egypt after the failed campaign - "Many patched their pants with red saddle leather or with sacking. Few had boots, and some wore red Arab slippers"

Full article here if you have an interest - it is a superb read and a primary source for me:

  1. Savage and Soldier article: http://www.savageandsoldier.com/sudan/DesertColumn.html
  2. This is fascinating - and what the 'interweb' is all about in my eyes: http://www.victorianwars.com/viewtopic.php?f=16&t=3550 


Wednesday, May 9

American Civil War Signalling Edifice..

I have Matt over at Waterloo to Mons to thank for my seeming obsession over this particular edifice...


His excellent Airfix American Civil War project often throws up interesting posts, and a photograph of a camp scene with signal tower (which I now can't find unfortunately), lead me to start a search for my own model...

Originally I'd planned to scratch build it, but the primary issue was finding figures suitable to man the tower as I needed signal men - then I discovered that SHQ had a signal tower listed in their 20mm American Civil War range...  no pictures (why oh why oh why do on-line sellers not realise how important a photo is????!), but at only £5.50 I felt I could take a bit of a gamble and how pleased I was that I did...  eventually..!


It was an interesting transaction (and one I would repeat any time despite the number of emails - they're nice people, just stupidly busy!)..
  • So first off I get an envelope (late) that contains a resin terrain piece looking similar to the picture right at the bottom - no figures.....
  • Speaking to Matt he tells me "that's not right" he remembers a ladder, and a flag dude etc. so I get in touch with SHQ
  • Weeks, and a fair few exchanges of email later, a second envelope arrives, this time containing the figures - the officer with binoculars, the "flag dude", and a couple of horse holders - but also a metal version of the tower, with platform....!

Apparently SHQ had had to recast the tower especially for me... service above and beyond I think...

Anyway - the normal thing to have done would probably be to use either of the towers on their own - but in a rush of blood to the head (there's that cycle ride to work to blame again) I decided to combine them - with the second on top of the first....  figures are as delivered by SHQ, the horses are Newline Designs from my spares pile, all figures 20mm.....


Both sides used much the same equipment for these towers, albeit with different signalling books/codes. The towers were used for passing battlefield commands, directing artillery etc..

The flags most often used were 4-foot (in order to be seen) mounted on 12 foot poles, but 2-foot flags were also used when the flagman wanted to avoid enemy attention (as is the case here!).


 ...apart from being an interesting scenic feature, I have an idea that this would make an excellent objective for a scenario..

...and this is a real one.. I think they did a good job modelling it..

http://en.wikipedia.org/wiki/File:Signal_station_Elk_Mountain.jpg
Loads more information here: http://www.civilwarsignals.org/pages/signal/signal.html

Monday, May 7

Les camion militaire est arrivee...

... excuses pour mon terrible français... 

..with a somewhat hirsute poilu for scale..

In the recent WWII skirmish campaign it was noted that the French army had had to go to war in Opel Blitz trucks..  clearly this couldn't continue so at Salute I stopped by the Skytrex stand and picked up a couple of trucks more suitable for the task...


These are from QRF and are 30cwt Chevrolet trucks which, despite much reading, I can't find any reference to with regard to French army transport! Poetic licence perhaps....


...anyway, they are probably best know for being used by the the Long Range Desert Group in the Western desert which gives me an excuse to post this... about the only thing that is recognisable is that great big Chevy radiator grill...!

http://www.lrdg.de/v_wb2.jpg
So, 15mm, and made by QRF - they went together reasonably well but required a fair amount of cleaning up before I could start to put them together, and even then there are a few mould/flash lines... I got the impression that these are fairly old models... they have a very pleasing heft when finished, though - a fair old chunk of lead - and I love the look...

Saturday, May 5

Yorkshire Regiment in the Sudan - Battle of Ginnis

Pray silence please, ....    for my 500th post!  

I thank you ...  I now return you to your normal programming.....

Second figure from that pack of Newline Designs Sudan British figures (SUD05 - British Foot Advancing) .. for this figure I decided I'd go a bit traditional and get out the scarlet...


Increasingly, after the initial battles that followed the landings in Egypt (Alexandria and Tel el Kebir especially), the Imperial troops in the Sudan wore uniforms made from a polyglot collection of khaki shades (where the shade was dependant on where the cloth came from, local or India), or grey....  occasionally though, there were instances when the red serge was brought out...  Right or wrong (and increasingly the British command came to realise that their initial assumptions had been wrong), there was a view that the Dervish were more afraid of British troops, and that to make sure they knew they were facing British troops they had to wear the scarlet....  there was also an inherent conservativeness of the British general staff to overcome before the troops could move wholly into khaki.... and there was a perceived morale benefit..
..so fresh the glue is still wet...!

It is generally accepted (wrongly as I found out) that the last time British troops wore their red coats in battle was in the Sudan, at the Battle of Ginnis (December 30th,1885). It turns out that the occasion was actually at the Battle of Firka in 1896 where a maxim battery from the Connaught Rangers elected to fight the battle in their full dress, red coats...  they must have roasted!

Anyway... background to Ginnis...between June and December 1885 the border war consisted of only a series of attacks by the Dervish on the Anglo-Egyptian forts, followed by counter-raids. A large Dervish force gathered at the village of Ginnis near Fort Kosheh on the Nile in November. For over a month they made a nuisance of themselves by taking pot shots at the garrison etc., which consisted of the Cameron Highlanders and the IXth Sudanese. To bring this frontier war to a conclusion, an Anglo-Egyptian force was sent to Kosheh and on 30th December routed the Mahdist Army at Ginnis.

The Battle of Ginnis - from http://fr.wikipedia.org/wiki/Bataille_de_Ginnis
The figure here represents one of the British battalions at Ginnis, in this case the Yorkshire Regiment, who were part of Colonel Huyshe's Second Brigade. He could just as easily have represented any one of the other Home Counties regiments present (1st Berkshire, the West Kent Regiment, 2nd Durham Light Infantry),as all of the British troops were dressed in scarlet coats..

According to the Perry's excellent painting guide the regiments probably would have retained their khaki  trousers and/or puttee's - this sounds fun to paint - though this guy is wearing his blue home service trousers albeit with the khaki puttee's.....


Battle of Ginnis (From Duncan´s 20mm Colonial Modelling)

Thursday, May 3

The New South Wales Contingent to the Sudan

You may remember that I visited the Newline Designs stand  at Salute to pick up a pack of the new Sudan British figures (SUD05 - British Foot Advancing as it happens )... 

Just for fun I decided to paint each of the four figures in the pack as being from a different unit, and this guy is the first; he represents a soldier of the New South Wales Contingent that served in the Sudan between March & June 1885... 


A bit of background....  you may remember from your history that the British government had sent Gordon in 1884 to help the Egyptians extricate their troops from their failed attempt/expedition to finish the Dervish "menace". 

Moon struck, mystic or genius (choose your own descriptive) Gordon almost immediately started disregarding and exceeding his orders and found himself besieged in Khartoum. A massive wave of popular opinion both at home and abroad resulted in the British government authorising a relief expedition which sadly did not arrive in time and Gordon was killed in late January the following year.

From: http://www.awm.gov.au/atwar/sudan.asp "Sydney, NSW, 1885: infantrymen of the NSW Contingent to the Sudan, after their return to Australia. They are wearing khaki uniform issued for active service, and are equipped with Martini-Henry rifles."
Gordon's exploits were very well known throughout the whole Empire, and when the news of his death arrived in New South Wales (in Australia), the response was pretty much the same as everywhere else, and the British government of the day was roundly condemned for not having acted in time. The government of Canada offered troops for the Sudan, and shortly after the New South Wales government cabled London with its own offer (the other Australian states also offered but were turned down - it would be interesting to do some research to understand why at some time). The New South Wales government also offered to pay all costs. Not surprisingly Britain accepted but stipulated that the contingent would be under British command.


The contingent comprised a full infantry battalion of 522 men and 24 officers, with an attached artillery battery of 212 men.

It sailed on 3rd March 1885 and anchored at Suakin (the Sudan's Red Sea port) on the 29th. When the New South Wales contingent disembarked at Suakin they wore red coats and were apparently met with great cheers, but although their red coats were admired and commented on by soldiers and press alike (it was believed the Dervish were more frightened when they faced red coated British troops, as the khaki uniform looked very similar to the Egyptian troops) they were issued with khaki on the same day they arrived.


Once ashore they were attached to the brigade comprising the Scots, Grenadiers and Coldstream Guards (an indication of their fighting ability or just politics?? )

Shortly after their arrival they marched as part of a large "square" formation – made up of 10,000 men – for Tamai, the scene of the battle of the same name just 11 days before. The march was marked only by minor skirmishing, and the Australians sustained just three casualties, none fatal. The infantry reached Tamai, burned whatever huts were standing and returned to Suakin. After Tamai, the greater part of the contingent worked on the Berber railway; when a camel corps was raised, fifty men volunteered immediately but they saw little action.The artillery saw even less action than the infantry.


By May 1885 the British government had decided to abandon the campaign and leave only a garrison in Suakin. The Australian contingent sailed for home on the 17th May 1885.

A shame really, but irrespective of the military contribution - which was out of their hands - this did mark a significant step, and was the first time Australian troops had served abroad.

Figure is 20mm - and Newline Designs...  when (if??) I decide to go 20mm with the Sudan project, I'll be painting up the rest of his compatriots in order to represent the infantry of the Contingent in total...

Stay tuned - Yorkshire Regiment next...