Showing posts with label St Michel. Show all posts

Friday, December 21

Raid on St. Michel - Game 5 - "Heading Home" - the battle (Part 2).. End of Campaign

So after a period of intense family activity, and a trip with the current Mrs Steve the Wargamer to Bath for our annual extended period of pre-Christmas gluttony and drunkenness away from the sprogs, I finally managed to free up some time to return to the wargame table to complete the game DG and I started just before Warfare four weeks ago! (Thank goodness for the space for a permanent table..)

So in the last game (which you can read here [clicky]) you may remember that the tussle had been a truly gargantuan one, and had swung to and fro with first DG in the lead and then myself and so forth, at least three times (it really has been one of the best games I can remember in some time! ), but when we finished for the evening on move 19 (see next picture) I like to think that I had some kind of ascendancy.....  fear naught however, there was still time to snatch defeat from the jaws of victory!

So - in the following, from the right - you can see my cavalry (present but weakened) holding that flank - DG's cavalry had routed and he was somewhat wary (rightly I think) of charging formed cavalry with his infantry...

In the centre DG's infantry have crossed the wheat field and are lining the hedge albeit they are in a shaken state (as a result of artillery fire from my gun to their front) and will soon fail their morale test. I still occupy the cottage to the left (by the bridge) - in the mid-distance however, you can see what turned out to be the battle winning manoeuvre as my cuirassiers enter from the left of the wheat field....

On the left - a fresh battalion sits in reserve on the bridge, waiting either for a moment of glory, or a hole to plug.....!

Move 19
...and so the game re-commenced...  I apologise in advance for the picture quality by the way - I didn't have the use of my tripod for this game so I was taking pictures (without flash - I hate flash) by hand, and however hard you try, they're never as sharp...

By move 22 those cuirassiers had captured the wagons and were shepherding them back to the river and safety - job half done..  what worried the hell out of me was the way those two units had managed to reform just behind me!   You'll also note that I couldn't help myself and had charged with my cavalry (just right of the dice).. typical cavalryman..... charge at everything and anything.... either way, a plethora of "shaken" (yellow) markers shows nothing was about to happen and the Swiss on my flank were about to handle me roughly to boot!

Move 22
Just a few moves later  (below) and clearly my worries about the cuirassiers were well founded, though the wagons are well on their way to safety...   (interesting discussion at this point by the way... DG was of the view that as my cuirassiers had routed the wagons should automatically revert to British control.... an argument not without some merit but errrrm...  I wasn't so sure! In the end like all good opponents, we diced for it I think )

You'll note the reserve have advanced to cover their retreat...

Move 25
...three moves later (below) and on the right flank (bottom of picture for this view) DG was pushing hard up the road - a concerted attack by his infantry has pushed the cavalry away (they've routed off screen to the left) - the good news however,is that the wagon are safe in my camp and  I'm now well into a fighting withdrawal over the bridge...

Now it hadn't escaped me that in effect I'd done the British job for them - since the scenario objective was to get the wagons to "home"...  which was over the bridge and up the road....(!) I took the view that DG had no reserves, and it was a damn sight safer to defend them by holding the bridge..  nonetheless I advised DG that his troops had advised him that they could see men unloading the wagons and piling the booty on the side of the river....  if they got across I was going to throw it in, on the grounds I had plenty of time to recover it later and he didn't!

Move 28
End of game (following) at move 30...  I play the Will McNally Seven Years War rules (with modifications for the WSS) and the turn represents approximately 10 minutes so the action translated to about 5 hours of real time -  a brisk little action....  DG conceded at this point recognising that he simply didn't have the strength to carry the bridge....

Move 30

DG's forces were, of course, given the honours of war and were allowed to march home with standards flying but weapons reversed...

..piling the booty back into the wagons!
...and so to the butchers bill....

First the French - 20 points out of a total of 45...  roughly 44% casualties....


..but it pales in comparison with the British - they fought hard.. 34 points lost out of 65..  52%  casualties!


By general agreement battle honours were awarded to the cuirassiers in both armies who did sterling service ....

=========================================

DG and I enjoyed this one and as a first, we played it via Skype in a little over 3 and a half hours... For anyone remote from a regular opponent I recommend it thoroughly, clearly not as good as an across the table set to in person, but a very good second...  my set up was as follows...  my netbook has a built in camera but I spent a mighty £7 on an external camera which I drilled to allow it to be deployed on my camera tripod as it meant I could move it around more easily, to focus on specific parts of the action... sound was good, picture was good, and no technical issues in the entire call..

Skype  set  up...

Saturday, December 1

Raid on St. Michel - Game 5 - "Heading Home" - the battle (Part 1)..

I'm way overdue posting this as the game mostly took place the night before Warfare (which is a few weeks ago now). I say mostly because we never managed to finish it on the night and I wanted to do that before I put up the game report...

So to start the set up was described here [clicky] - yikes - that was January!

Suffice to say that this was the forgotten game of the five that make up the mini campaign (see left) and I still have no idea how we managed to do that.. If you select the "St. Michel" label to the left (just under the picture of the Hanomag's), or click here, you'll get taken to the series as whole (in reverse order so start at the bottom) where, if you wish, you can refresh your memory on events leading to this final game... game four was 2 years ago - yee gods where does the time go?!!

Orders of Battle:

My calculations were slightly off in the set up post and I also made some changes to allow the French a slightly better chance at making a good game in the face of what looks like a fairly significant British force, so the orders of battle ended up as follows:


Summary of changes from set up post:
  • I added a militia regiment (ie. reduced morale) just to add a little bulk to the French force which was quite small in comparison to the British force
  • There was a half squadron of heavy cavalry - I disbanded them and spread the strength points among the other cavalry units to bring them up to full strength... 
Next the British:


Summary of changes from set up post:
  • I disbanded Rechteren and Ingoldsby's and distributed the strength points among the other infantry regiments - I took the decision to make two of them 6 strength as that would make them considerably more "sticky" in morale terms - important for assaults which tend to be bloody
  • There was a half squadron of heavy cavalry -  I bought them up to full strength on an arbitrary whim as DG was very low on cavalry.. and to be honest still was even after I'd done that!
...and so on to..

The Game

So the objective of the game is for the British to get their loot (carried in 3 carts) over the bridge on the left, and off the table edge...  the French in the meanwhile, heavily outnumbered are going to do their damnedest to stop them - and being in defence have something of an advantage..

As the French I had no plans to assault or go offensive, except to support my primary aim which was a defensive one....  OK.. if I saw a chance to finish off a damaged unit I would attack but otherwise the name of the game was "wait and see"...

Move 1

Start of game (picture above - click any of the pictures for a bigger view) and the French (me) have deployed conservatively - two regiments of foot in camp, with the remaining two in the village...  like bee's to honey the artillery had deployed on the high ground..

I deployed my cavalry on the far right flank as that would be where my cavalry shadowing force would arrive giving them an opportunity to act in unison...  it was also a fairly open terrain, the corn fields block line of sight but there is no terrain/firing modifier. In the far distance behind the yellow tape, the British vanguard has entered...

Also move 1

Same turn but a different view (picture above) - this time from the camp to the right of the river in the first picture - my other artillery piece is limbered far left - both regiments in camp are regulars...  in the village the regiment in the second line are those militia...

Move 5

Move 5 things have started to develop - on the right the first of my cavalry shadowing force have started to arrive - one of my regiments from the camp is crossing the bridge, the second artillery piece is about to deploy on a low hill to help with line of sight - lots of British arrivals in what was to be a bit of a headache for DG; loads of troops and nowhere to deploy them outside of artillery range (which in my case was to about that lone fir tree by the church hill....)

Move 12

Move 12 (note the use of the dice in the picture to tell me the turn number so I don't forget when I'm looking at the pictures after the game! )

The cavalry have deployed and two of the squadrons have advanced across the central corn field, as that regiment to their front has taken some significant damage from my artillery in the centre, and I saw a chance of seeing them off for good...  no such luck - damaged as they were they still saw off both squadrons - an expensive mistake...

In the village - the single base by the house indicates that the house is occupied by the regiment previously seen crossing the bridge - I intend to make it a strong point ......

Move 17

Move 17

At approx 10 minutes real time per game move this is the position roughly 3 hours into the battle,  and we are really going hammer and tongs now....
  • My medium cavalry has been roughly handled; centre right you can see two separate squadrons in disaray either because of failed formation change or failed morale. 
  • In the centre I have limbered the artillery and am in the process of moving them to the left flank of the infantry manning the hedge to provide some close support for what I know is coming...
  • My cuirrasiers can be seen in column heading between house and bridge where they subsequently covered themselves in glory...
  • DG's infantry are getting pounded by two sources - the artillery on the left in particular had relocated due to the arrival of  DG's own artillery, but had found itself in an ideal position to pound anything moving down the open side of the corn field  in this case the Scots of Orkney's Regiment. They are also taking damage from the "strong point"....
In the next move Orkney's failed their morale check and routed, but where then charged by those cuirrasiers - in the subsequent test they surrender!

....and there we left it on the night - we're hoping to finish this via Skype if we can get our acts together!

Sunday, January 29

Raid on St. Michel - Game 5 - "Heading Home" - set up..

..and here's another bunch heading home after
a bank raid
...as I was reading through my old campaign diary for the "Raid on St Michel" mini campaign (5 linked "teasers" by Charles Grant and Phil Olley...) I suddenly noticed that there was no game report for the final battle of the campaign... Smiley

I hoiked out my ancient and now slightly battered copy of the campaign book and read through it; for some reason, lost deep in the midsts of time, we never fought it - so the campaign conclusion remains undecided...!

For those with an interest the previous campaign battles (four of them) can all be found at the top of this page on the War of the Spanish Succession blog [click here] but in summary a British raiding force (who represent the forces of the Vereinigte Freie Stadte or VFS in the campaign) has marched deep into French territory (representing the forces of Lorraine), captured the treasury from the town of St Michel, and are now heading back to the border and safety just as fast as their feet will carry them..

In the previous game (no.4 - a hideously lopsided affair) the British failed to halt the French flanking force from re-taking the bridgehead so effectively the route home is now closed..  the British will have to fight through if they are to get the treasury across the river and home safe..

The first complication is to make head and tail of my previous casualty returns so I can figure out what the orders of battle are...

First the British then:

All the forces left over from the battle of St Michel (teaser no.3) which as the write up showed, was the death of the British cavalry - DG is very light on horse..  just a half squadron of cuirassiers..

I'm going to make one change, and that is to allow the British an extra transport piece - they will start with 3 wagons..

I'll also allow DG to consolidate his regiments, to make them more effective..


Next the French...  these comprise the forces left over after the previous battle, and in addition the French cavalry from the Battle of St Michel are shadowing the returning British force so can also expect to make an appearance:


Hmmmm...  much more evenly balanced!

Battlefield is as follows..  the French main force deploys this side of the road, the British columns arrives on the table in the far corner - behind the church. The French cavalry shadowing force arrives on the road to the right (theoretically on move 4, but I may make it dependant on a dice roll after move 4)..


Victory conditions; the British have to get two thirds of the treasure across the bridge, the French must stop this. Both sides need to ensure that their forces are not completely destroyed - so no sacrificial blocking by the British.. 

Promises to be good fun...  not sure when we'll fight it but I'm already looking forward to it!

Wednesday, April 28

Raid on St. Michel - Game 4 - "Counter Attack at the Bridgehead"..

While DG was down for the Salute weekend he and I took the opportunity to play the next game in the "Raid on St Michel" linked series of games..

This one is called "Counter Attack at the Bridgehead" and is one of the smaller games in the series without a doubt... All things going to plan the French (as attackers) will have the most troops with 3 battalions of foot, a squadron of horse, and a battery of guns. The defenders (in our case the British) have whoever was left as a rear guard at the end of game 1 [which you can read about by clicking here] which in DG's case was a half strength squadron of horse, and a battalion of foot...

You may remember that one of the concerns I had at the end of the game was the lack of guidance on what kind of threat you should prepare yourself for, and so it proved.. DG found himself trying to hold the river bridge with vastly outnumbered forces and no artillery, and in the end it was the artillery that won this game...

Before we launch into all that however, first the orders of battle for the two sides... click on the following and any other picture for a larger, more agreeable, view...

The French:


The British:


It was clear that this was a one sided scenario - the offer of some artillery to DG then was a way of balancing up the scenario a little - DG being the "complet'ist" he is, of course turned them down so as to play the campaign as designed. A true player...

Next the table... Two views of the table - the French entry point is bottom right - the British (as defenders) deploy anywhere within two feet of the town..

The river is impassible along it's whole length with the exception of the bridge... all hills were classed as "gentle", all woods "open". The majority of the table was therefore open ground (even area's covered by darker green, cornfield etc..)

The Game:

DG opted to place his foot in the middle of town, with his cavalry squadron split into four bases so as to act as a screen...

In the following he is pulling his cavalry back to the village in the face of my cavalry advance guard...

Here comes my main force - cavalry leading - you can see that DG's cavalry has now almost completed re-combining..

DG's plan was, perforce, simple - he moved his infantry over the bridge to where they couldn't be outflanked, and then guarded the bridge with his cavalry (see following)...

Hoping for a quick and bloodless win I of course attacked immediately with my cavalry and eventually managed to push his cavalry back over the bridge in rout...

In the following, the British cavalry have routed from the field - probably best as this gives them the chance of recovering - the French cavalry meanwhile mill in confusion as a result of a failed change of formation die roll (blue pin = disorganised), you'll note that the standard of drill in the French army is not good!

Having eventually managed to change formation, my follow up charge (only one base frontage wide because of the width of the bridge) was repulsed quickly and bloodily by the well timed volleys of the British infantry....

I pulled back, made room for my infantry, and sent the Bourbonnais across the bridge - with the same results!

At which point common sense prevailed and I waited for the artillery to turn up and deploy and then just blasted him out of the way before taking the bridge and the game...

Post Match Analysis:
  • A poor scenario if you haven't put a decent rear guard in place in the first scenario - the problem is that it's kind of difficult to know what travails you have to face in the rest of the campaign when you haven't had a chance to review the campaign book in detail (and the book advises the non-referee'ing player not to). As a result, your planning in the dark (very realistic I suspect, but you would have had some idea surely??) and the obvious thing to do in such a situation is to take as many troops with you to St Michel as possible!
  • Far better I think would have been to do for the British what this scenario did for the French - in this scenario the French are an "extra" they weren't part of the original defence force. You could call the British force "reinforcements" if you wanted to..
  • Battle honours in this game went to the French cavalry and British infantry - both of whom had significant success..

The Butchers Bill:
The coloured boxes indicate a casualty on the unit - the red or the green indicates whether there was then a successful saving throw or not...

Mixed fortunes for the British..

..and finally the French - a more balanced recovery..

All in all then, although pleasant to push some lead, not a particularly satisfying scenario and over quite quickly. Given I don't get to game with DG that often, some more lead was quickly pulled from the boxes and we had a quick encounter game on the same terrain. I have no pictures but this was one of those excellent games where the fortunes of war swing both ways and after a very enjoyable tussle we ended up with a bloody draw... not a wasted evening at all!!

Tuesday, March 2

Raid on St. Michel - Game 3 - "The Battle of St Michel" - the butchers bill..

DG regards the loss of his cavalry with
some equanimity..
As I mentioned to DG earlier today “nothing except a battle lost can be half as melancholy as a battle won” (ascribed to the Duke of Wellington but just as apt to the last battle!)

Being a campaign I rolled saving throws for the casualties in the last game this lunchtime (well the alternative was the rather limp cheese and onion sandwiches in the canteen - no contest!).

I’m working on the tried and trusted campaign casualty rule of 33% killed outright/33% heavily wounded/33% light or no wounds – what is different to normal is that for this campaign given the short time span of the campaign, heavily wounded are also removed from play. So in other words anything on, or under, 33% was a save.

DG and I should really have played to the point where he got his men off the but we chose to end it where we did (we'd run out of time!) so I only rolled for casualties inflicted during the battle. Given my cavalry were chasing his gunners so hard that bystanders were heard to ask whether there was an engagement in the offing we did at least agree that he had lost that gun…

Herewith the butchers bill:

British:

DG had lost a total of 28 SP's in the battle - after saving throws he had lost 22SP’s – a saving of 6… In many ways this battle was the death march of the British cavalry – he lost 3 complete squadrons - very unlucky on saving throws and heavy casualties during the game… there'll be some consolidation of infantry before game 4!

French:

I on the other hand got away with quite astonishingly low casualties - only 11 which I then had the great good luck of saving 6 of! So a total loss of 5SP’s after the saving throws were rolled – I also saved 6…

Roll on game 4!

Friday, February 26

Raid on St. Michel - Game 3 - "The Battle of St Michel"

...so did it remain peaceful??? Of course, it didn't.... read on for an account of the ensuing struggle!

This game is the third in the linked series of five games that make up the "Raid on St Michel" mini-campaign, so casualties and effects from the first two games have been carried over... rules used for the game were Will McNally's Seven Year War rules, modified for the War of the Spanish Succession (details of those changes are on my project blog).

So, once DG and I had worked out casualties and the saving throws from game two ( "Rear Guard" which you read by clicking here), I then added in the additional forces that come into play in this scenario (no extraneous details - you need to pay the purely nominal amount this excellent little booklet costs to get those!)

Having done that we ended up with the following - in this campaign the British fill the role of the Vereinigte Freie Stadte (VFS) and are the "invaders" - you'll note that some of the British units are carrying casualties from the action described in "Rear Guard"... We agreed between us before the game that DG could combine units if he wished, so he decided to move the remainders of Regiment Goor (who were badly mauled in the last game) into the Beinheim Regiment in order to build them up into a meaningful force.. as a reminder full strength units in my games are 5 points (6 for over strength), once you start getting less than 4 then it starts to affect firing, and of course morale, so overall it was a good move.. please click on any of the graphics for a more pleasing, and bigger, view:
The forces of Lorraine were played by the French, who for this campaign are the "invaded"... again - casualties are notable (though in both cases are casualties were slightly less than those suggested for the one of game in the book). As my last action I threw a dice and received a length of timber breastwork as additional defensive strength..
All in all then fairly evenly balanced in terms of points, but the British are right bu**ers when it comes to melee and shooting... I'm an adherent of national characteristics, so in a balanced fight, I would always expect the British to have a slight advantage - but that's based on my reading into the history of the time rather than rampant jingoism...!

Here then we have the starting positions for the game... the French forces are nearest us, table was 8' x 4'. Deployment area's were as per the book....
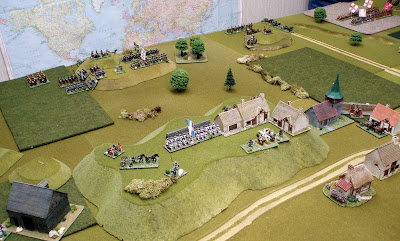
In the distance DG had organised his troops into two brigades of infantry, with the cavalry split between the two.

On his left, so further away from us in the picture, is the British brigade comprising all the regiments of British foot except Derring's, with two regiments of British cavalry in support. On his right was an Allied brigade comprising Dutch (2) Swiss (1) and British (1) regiments, most of his artillery, and the remaining regiment of British cavalry. In the centre, however, was not very much at all - one gun, a regiment of cuirassiers, and the wagons to (hopefully) take away the loot...
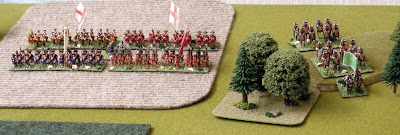
The British Brigade in all it's glory... Ingoldsby's and Howe's in the front, Meredith's and the Guards in the second rank..

I had the advantage of hidden deployment, as there were at least two hilly area's to shield my preparations from prying eyes... I'll be the first to admit that I had made my preparations primarily to protect St. Michel itself so all my artillery was either on the hill (left and right front edges), or guarding the entrance to the town (behind that timber breastwork). Of my foot, other than one regiment (Bourbonnais) on the hill top, along with one regiment (Agenois) protecting my left flank (you can just see them behind the barn in the next picture) there was just one regiment on the smaller hill to my right (Toulouse - just out of picture) the rest were hidden - five regiments of surprises was my ardent hope...

The cavalry were split equally between the two flanks as I figured those could be usable to protect both due to their manoeuvrability, again though, three of these were hidden - two squadrons of cuirassiers in St. Michel, another squadron of French horse hidden in the gullet behind the small hill to my right.. His deployment of the large British brigade opposite my right flank came as a bit of a surprise then!

So how did the game turn out - well it was a bit of a game of two halves as our soccer pundits are want to say... with a little bit of artillery naughtiness at the beginning.

The artillery naughtiness was over fairly quickly to be honest, with both my guns on the hill silenced after some typically accurate firing from DG! I have to admit to being a little downhearted at this point, as I'd just lost most pf my ability to hit at distance.. ah well, I ordered the Bourbonnais to lie down behind the wall, so that they got complete cover from the artillery (but couldn't fire back), and waited for events too unfold....

Right Flank - First Half

The first part of the game then started out with a strong advance by DG on his left flank with the British Brigade and accompanying cavalry.

Sensing things were going to get out of hand, and with only two regiments of foot to DG's four, I decided to pull them back towards St. Michel. I sent out my two French cavalry squadrons to cover the retreat - in the picture above the first of them has trotted out to face the British squadrons...

Cover the retreat?? How wrong could a man be.....!

So the first regiment (de Montreval) faces up to the British squadron and charges, while the second squadron lines up behind - and whammo... the first British squadron is sent reeling! The French squadron then halts, gives fire, causes the second British squadron to halt shaken, and in the subsequent morale check they rout and flee... two down and none to go!

Leaving the other squadron to pin the British infantry, I sent de Montreval round to the rear - a target rich environment if ever there was one - while in the meanwhile the two infantry regiments I'd sent to St. Michel were wheeled to face the other British regiments of foot. From a position of strength the situation had changed completely, and following some exchanges of volleys, further British retirements led to a collapse on this flank.

Left Flank - Second Half
On the left flank, after an initial advance, DG had been happy happy to halt while he focussed on the British advance.. in the picture following my artillery has been neutralised, he has halted his infantry and is pushing forward with his cavalry to try and hook around the barn, and my flank..
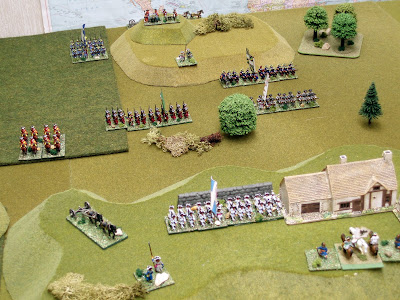
A quick volley from the Agenois regiment in the barn, and an advance from one of the foot regiments I had behind the hill saw off the British cavalry..
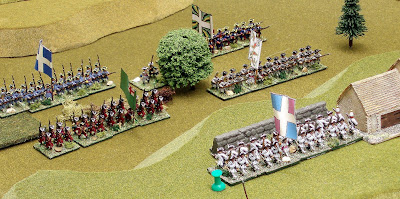
DG then unleashed his attack up the hill; lead by Beinheim's and Derring's they came storming up the hill - in the next picture Derring's face up Bourbonnais, Beinheim are about to enter the farm..
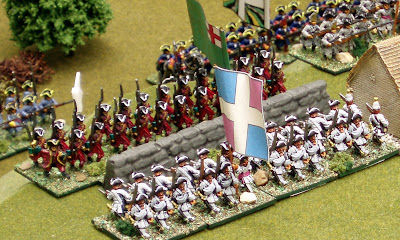
At which point the second astonishing event of the night occurred - not only did Bourbonnais hold, but with the Beinheim regiment having taken the farm house, Nivernaise threw all caution to the wind, attacked, and threw them straight out and down the hill..!


...and that was largely it for the Allies - de Montreval had routed the wagons, and got the central British artillery on the run, I'd unleashed my cuirassiers against the shaken British Brigade, and DG decided enough was enough and departed the field...


Post Match Analysis:
  • DG's plan was good, I'll be the first to admit that in this game the dice turned my way (for a change!) but everything hinged on the dramatic first successful charge of the French de Montreval cavalry - the rest was like a domino effect...

  • Next step is to roll some safety throws to see how many troops return to the colours - I'll do this is in the next few days
  • No glaring inconsistencies in the rules this game - we've been playing them long enough now that they play pretty much as we want them to... I will add an update to the rules to allow men to lie down for improved cover (I'd read somewhere in the week before of an account of Marlborough letting his men do this at Blenheim to spare them the worst of the enemy artillery barrage)
  • Tea on this occasion was PG Tips decaffeinated, of which two or three breaks were taken to consume, whilst friendly banter was exchanged, the loft ladder rebuilt (don't ask - at one point I thought we'd be stranded!), and Border Strawberry & Cream Shortbread eaten (very nice!!).