Showing posts with label Game. Show all posts

Saturday, August 9

Rebel gold - Game ♥◆♣♠

Time for another update and some gaming has been going on.. 😏

~~~~~~~~~~~~~~~~~~~~~~~~~~~~~~~~~~~~~

As promised in the previous post, Corp*, Zeke and Robbie have made their attempt to rescue the Confederate gold.. 😁

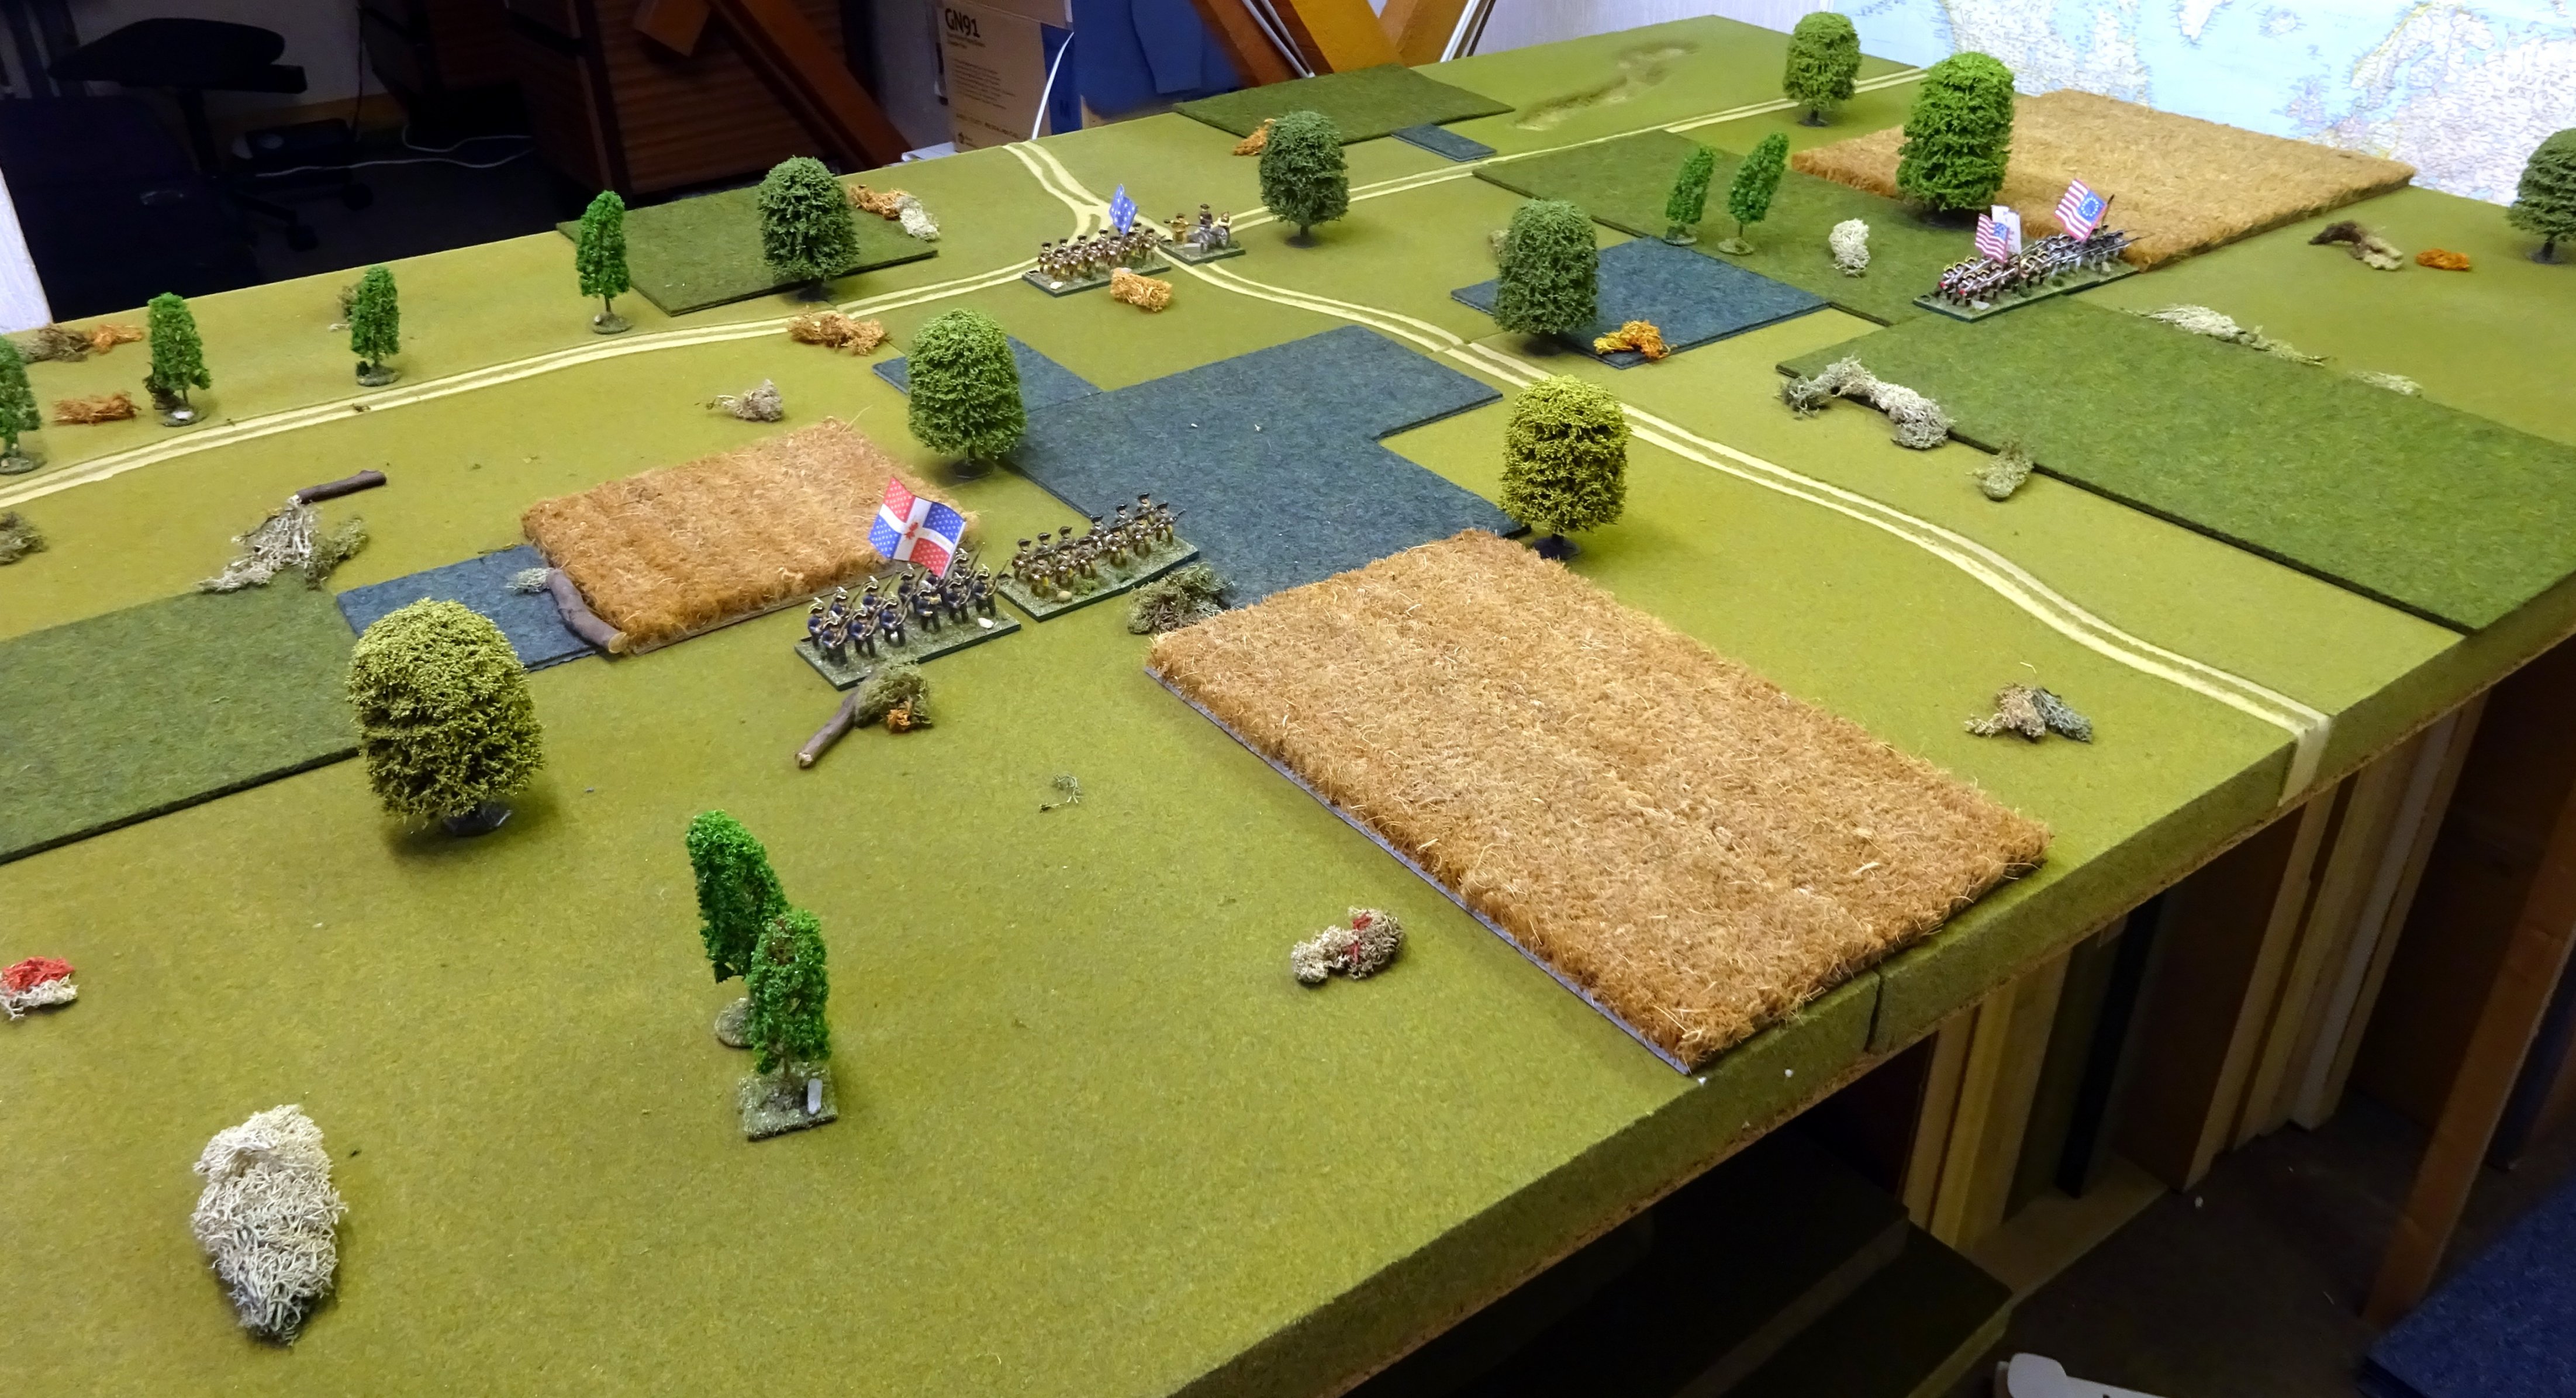
As a reminder - the table at start was as follows:

Jones Gang (bottom left) - l to r - Dave then Frank then Eddie;  Jolly Boys (top) l to r - Zeke, Corp then Robbie - Zeb is next to the horse outside the shack

Corp and Robbie, fully aware on the story of the the abandoned gold, meet at Zeke's place as agreed - it's time to go and get the goods. First though they drag out their old uniforms, "we're not thieves or outlaws, this is government business so it's right we wear the uniform" grunts Corp..

Mounting their horses they make off for their destination..

Move 1:

All pictures following are at start of move unless otherwise stated..  the cards are for initiation - high goes first, Aces low, and then standard Bridge rules to sort out ties..

Both sides advance to recce the shack - they spot each other, and also Zeb out front, as he does them. 

Spotting the old uniforms the Jones gang immediately realise these guys are there to deprive them of the gold.. it doesn't take much for Zeb, Robbie and Corp to also realise the same.

Move 2:


...and then the bullets start to fly... 😁

Zeke (J♥) pulls his revolver and takes a shot at Dave (2◆) but only grazes him, Corp (10♥) reaches round for his Sharps and also takes a shot at him but misses anything vital. 

Robbie (6♣) is confused at the sight of Zeb (5♠) outside the shack, and shouts to him that they "mean no harm but he needs to get under cover", before then sprinting to the front corner of the shack - looking indeed confused, Zeb none the less stumbles into the shack looking for his shotgun. 

Frank (5◆), can just see Zeke out in the open, pulls his revolver, and shoots but misses. 

The sudden fusillade of shots has clearly taken Dave by surprise - he finally reaches for his revolver and returns fire at Zeke but misses - Eddie (A◆) meanwhile runs to the side window of the shack, pulling both his revolvers as he goes.

Move 3:

No picture..  apologies.. but

Corp reloads the Sharps and fires again hitting Dave in the leg (who passes his toughness test). Robbie runs across the front of the shack, stops, and beats Eddie to the draw hitting him twice (he also passes his toughness test)! 

Eddie aims, fires back, but perhaps not surprisingly still misses before dodging backwards round the edge of the shack. 

Zeke covers ground and runs up to the corner of the shack closest to him for some cover and snaps off another shot off at Dave but misses. Dave returns fire and also misses.

Frank fires twice hitting once but for little effect. 

In the shack Zeb fumbles to load his shotgun.

Move 4:


Zeke (10♠) gets the draw and fires twice at Dave (10◆) hitting him in the leg (again) and in the chest - Dave is looking a bit shell shocked, but he's one tough hombre and passes his toughness test to return fire. He snaps off a shot, but misses, and then turns and runs for cover on the hill - enough's enough... 

On the hill, Frank (9♥) fires twice at Robbie(8♣), as he's the better target, but misses - he's almost out of ammo! Eddie (9♣) meanwhile is between a rock and a hard place, or rather a Robbie and a Zeke - with no windows or door on the back of the shack to escape through, whichever way he runs he's going to be a target - he steps out and takes aim at Robbie who gets the drop on him (Robbie wins the dice off), shoots, hits, and sees Eddie drop to the floor unconscious! 

Between a rock and a hard place...

Across the way Corp (8♥) reloads the trusty Sharps and takes another shot at Dave, hits him, and kills him outright..

In the cabin Zeb decides these guys must be after his still (😁) and decides that he needs to defend it - he runs across to the door steps on to the walkway outside, and literally comes face to face with Robbie -  who's just fired, so can't get the drop - and hits him under the jaw with the butt of the shotgun  knocking Robbie off his feet unconscious...!

[Fantastic passage of play - all Zeb's actions were diced for - I gave him only a 30% chance of attacking as I figured with all that lead floating round he'd be more inclined to keep his head down, but he passed that and went rogue, then I gave him three options to move to/fire from (either side windows or the front) and he diced for the front - after that with one action left and a decision he was already going to attack, the target was almost immaterial in his sozzled state! I further assumed Robbie was too close to get the barrel of the gun up, so it was easier for him just to swing the butt up under Robbie's chin..  bang..]

Move 5:


None of the Jolly Boys have an option to help Robbie (no cards were dealt which would allow recovery from unconsciousness and he failed his die roll recovery attempt) so he remains lying in the dirt - out to the world.. 

Zeb (Q♣) meanwhile looks on in shocked horror at what he's done, comes to his senses [this time he failed the 30% throw] and runs back into the shack. 

With his boss dead, and his comrade out for the count, or dead for all he can tell, Frank (J♣) decides valour is the better part etc., fires off a shot at Zeke (7◆), misses, and then runs for his horse..

Corp (3♠) and Zeke move to the cabin and persuade Zeb they really don't mean him any harm - and besides if they did, there's two of them and then he'd be a dead man already... 

Zeb may be drunk but he isn't stupid and drops his weapon and comes out with his hands up. 

Pausing only to tie Eddie up, and to throw a bucket over Robbie who has now recovered but with a very sore jaw, Corp and Zeke search the shack and right at the back, behind a huge pile of rubbish that Zeb has never bothered to clear in the years he's lived there, they find a bag that clinks when it's lifted... πŸ’°

Post match analysis:
  • First the butcher's bill..


  • Robbie was very lucky.. if there'd been a bit more distance then it would have been a short range shotgun blast..  nasty..
  • The Jones Boys were very unlucky in their dice throws - Dave particularly - and even when they did get hits they seemed to get more grazes/no effects on their targets than the Jolly Boys..
  • Love the mental narrative these rules give - that passage of play when a slightly drunk Zeb came out of the door face to face with Robbie had me sniggering like a school boy..  😁
  • * The more eagle eyed of you (that's you Jim) may have noticed that Corp has changed sides from those long gone days of Bute Farm - yeah, I know he was/is the leader of the Union trio but I like the name better! 😁 
~~~~~~~~~~~~~~~~~~~~~~~~~~~~~~~~~~~~~

Back at Zeke's place, the three of them collapse into chairs round his table, exhausted..  Zeke reaches behind him and pulls out a bottle of whisky and some glasses from the cupboard and without a word pours them all a slug..

Each of them downs it in one, and after a pause Corp reaches down for the bag..

"'spose we'd better be looking and see what the hell we risked our lives for"

He picks up the bag and pours the contents on the table.. a glittering stream.. turns out most of it is captured Union $2.50 coins, there's a few $1's, but a good number of them..  in fact when they count it there's over $2000 worth...

The three of them sit their stunned..  that's more money than any of them have seen in a lifetime.. Zeke fills the glasses again...

Corp clears his throat.. "Gawd...", and after a pause.. "boys I think we need to be doing something proper with this money, it's government money, and I still ain't no outlaw"

Both Zeke and Robbie grunt agreement, but continue to look stunned...

"The war left a lot of widders and fatherless children..  going to suggest we may want to start distributing some of this coinage where it can do some good - there ain't much, God knows, but it may help a few better than it will us in our pockets.."

Zeke pours another round, and the three raise their glasses to each other in agreement..  they got a plan.. 

..."errr... just one last thing.... what're we going to do with Eddie??" (😁)

~~~~~~~~~~~~~~~~~~~~~~~~~~~~~~~~~~~~~

Back at the shack, Zeb is sat in his old rocking chair out on to the verandah...  the sun is going down, and the crickets are making a racket... his favourite time of the day... he's usually tired from feeding fuel and ingredients into the still all day, but this time he's feeling tired and old for a totally different reason...  them Reb soldiers had turned out to be alright..  though the one he cracked on the jaw had eyed him a bit ugly...  they'd even bought some of his moonshine...  reaching down he picks up his jar and takes a big slug...  yeah..  definitely the best time of the day...  

~~~~~~~~~~~~~~~~~~~~~~~~~~~~~~~~~~~~~

...the Jolly Boys will ride again..

Saturday, July 12

Incursion at Spencer's Farm..

Time for another update..  and a game for a change!

~~~~~~~~~~~~~~~~~~~~~~~~~~~~~~~~~~~~~

Preamble..

The Union have sent a couple of ships to try and force their way up a river past Spencer's Farm in order to, firstly, do a recon of the upper reaches of the river, and secondly, cause the Confederates to divert some forces that might be used elsewhere more profitably.. the Confederates in the face of the incursion, pull together a scratch force to oppose them.

Rules used were the venerable Bill Gilchrist ones from way back (I first got them in about 2017 I think) as used by the Edinburgh Wargames Society before they seemed to die a death with the migration of Angus Konstam to the outer Scottish isles (well Orkney anyway 😏)! I think Bill hoped that they might get published by Osprey, so I won't post them here as they still might be, but some background posts on them can be found here [clicky]..  

To my mind they give a playable game with just enough level of period detail to require some thought, but without the mind numbing detail of figuring out which stage of reloading each gun on a ship is at, etc etc... if they do ever get published I for one will buy a copy the day they're released.

OOB

Confederates

"CSS Mississippi" - (I diced for command level) Experienced

NB. M - Medium;  L - Light; SB - Smooth Bore; MLR - Muzzle Loaded Rifled

"CSS Robert E Lee" - Experienced


Union

"USS Ulysses" - Inexperienced


"USS Grant" - Experienced


So a foursome of lightly armoured ships - all with mostly light guns - but the Mediums will do some serious damage if they can hit and penetrate

Move 1

Start of move.. the island with Spencer's Farm at top.. Union bottom right..

Confederates win the initiative and so will move first - and both sides get 4 actions (plus one movement action/turn is always free)

Both Confederate ships advance into range (maximum range is 36") and open fire - but the firing is ineffectual although CSS Lee causes first damage.

Both Union ships also advance, but the Ulysses makes a turn so that it can bring its broadside to bear - all four guns fire but only one hits. The Grant moves further so as to bring the range down, fires it's fore gun at the same target but misses - the Union have clearly decided to focus on just one of the two ships opposite..

End of turn.. black pompom represents a single hit on the ship

Move 2

Union wins the initiative - both sides get 2 actions

Ulysses moves ahead, slowing down, and fires a full broadside hitting Mississippi twice and also causing her to become "confused" (two hits, but then throw again for special hits and get one result; ship cannot shoot or undertake any action other than a straight ahead move and testing to recover Confusion). Grant turns so as to bring it's broadside to bear, moves forward (also slowing down) and fires a full broadside at Mississippi causing one hit but no additional damage. Mississippi is hurt badly and down to half damage.

A disastrous turn for the Confederates - the Mississippi fails to clear its "Confusion" status with a command roll, so trundles forward but with no firing. The Robert E Lee meanwhile turns so as to also brings it's rear gun to bear - fires both and misses badly (snake eyes!)

End of turn.. Mississippi with three hits is badly damaged

Move 3

Confederates win the initiative - both sides get 2 actions

In what may be one of her final actions of the battle, Mississippi finally manages to recover from the Confused condition, turns to bring all guns to bear, and fires hitting Ulysses twice (and also causing her to become Confused!). The Robert E Lee also fires again at Ulysses, hitting once.

In one turn the Confederates have almost evened the score!

The Ulysses fails it's command test to recover from Confusion so can do nothing, but the Grants guns thunder out causing three further hits on the Mississippi causing her to take three 'break off' tests which she passes with flying colours! (Once a ship gets to half strength any further hits result in what is effectively a morale test - - the break off test - if it passes it can carry on, otherwise it will start making for it's own baseline)

End of turn.. high hitting turn.. Mississippi and Ulysses bear the brunt..

Move 4

Confederates win the initiative - both sides get 3 actions

Both Confederate ships are now moving dead slow - Mississippi clearly fully recovered though badly damaged fires a full broadside, again hitting Ulysses three times. The Robert E Lee also fires but misses. It matters not, Ulysses is now almost dead in the water.

The Union ships are also moving dead slow - the Ulysses recovers from being Confused and fires a further broadside at Mississippi hitting once, but this time she fails her command roll causing her to break off the action, threat removed Grants guns change targets and thunder out at Robert E Lee causing three hits!

End of Turn - heaviest damage of the game so far - seven separate hits..

Move 5

Union wins the initiative - both sides get 1 action.

Both Union ships are also moving dead slow but the Ulysses needs to start turning to avoid hitting the island so uses it's action to do a turn; behind her Grants guns thunder out at Robert E Lee causing a further two hits.

Mississippi turns to make a break for home (as a result of the failed morale/command test in the previous move) so cannot fire - the Robert E Lee continues to demonstrate its fire effectiveness missing twice! 😏

End of Turn 

Move 6

Union wins the initiative - both sides get 3 action.

Both Union ships are moving dead slow, range is good and this is a hard smashing battle, having turned though Ulysses fires, delivering the coup de grace to Mississippi with three further hits - Mississippi can be seen to be pulling down her ensign - she's out of the battle. 

Grants guns thunder out at Robert E Lee causing a further three hits and also taking her below half strength.

Robert E Lee fires at Ulysses hitting once and reducing Ulysses to zero strength - she fails her command roll and is forced to break off the action; although still in the battle her role is largely finished.

End of turn - Mississippi can be seen to have surrendered (yellow pin) on the right the fit on Ulysses results in her also needing to break off the action...  despite that, the Union ships have poured on massive amounts of damage

Move 7

Union wins the initiative - both sides get 4 actions.

Ulysses needs to break off so starts turning to head for home - Grant moves forward to clear her stern and unleashes another broadside on Robert E Lee, causing another three hits and Robert E Lee also fails her command test and has to break off the action... to make matters worse she also fails a command test to be able to fire her guns (a requirement when the ship has had a break off action condition)...

End of turn

Move 8

Confederates win the initiative - both sides get 4 actions.

Robert E Lee finally passes a command test and gets off a broadside at Ulysses, hoping to make her strike - she hits, but the following command/morale test is passed and Ulysses uses her actions to steam hard for home - she escapes..

Her compatriot, Grant, still (remarkably) damage free fires off another broadside at Robert E Lee, hitting once and causing her to take a command/morale test which is also passed.

End of turn

Move 9

Union wins the initiative - both sides get 2 actions.

Robert E Lee again fails a command test to fire and continues to turn for home - Grant turns so cannot bring a full broadside to bear but fires once, hitting, and causing another command/morale test which she passes.

End of turn

Move 10

Union wins the initiative - both sides get 4 actions.

Grant, amazingly, still damage free, moves twice to bring her broadside to bear, fires at Robert E Lee, hitting three times, and causing her to take a command/morale test which this time she fails.

Game over for the Confederates

Post Match Analysis:

  • A hard fought Union victory but a disaster for the Confederacy if the Union can get those damaged ships away - unluckily for them, smoke can be seen beyond the island, looks like the Confederacy has rustled up a relieving force, it's time for the Grant to follow her compatriot.. 😏
  • Concentrating fire on a single vessel was a tactic worth remembering...  damaged vessels can still fire, so better to get them out of the equation rather than spreading your fire..
  • Light guns against light armour means damage can be done, but penetrating shots (the ones that can cause engine/gun/funnel damage, or Confusion results) are less effective - it was the Mediums doing the bigger penetrating damage
  • Time I reformatted the rules for easier play I think - everything's there but I want to lay it out a little better, and also fill in some rule interpretations I was using..  (example - the rules say every hit after half damage means the ship has to take a Break off/Morale check - I played it to mean one test per hit, rather than just saying the ship had been 'damaged' and therefore needed a single test)

~~~~~~~~~~~~~~~~~~~~~~~~~~~~~~~~~~~~~ 

 Laters, as the young people are want to say...

Saturday, May 31

Shootout at the Sierra Corral - Preamble, Setup and Game

Time for another update..  a game report for a change..

~~~~~~~~~~~~~~~~~~~~~~~~~~~~~~~~~~~~~

Preamble..

As the sun rose over a sleepy Cedar Gulch and gradually lit the Sierra Corral and its sales office, the inhabitants of the (normally) sleepy town little knew what a rude awakening they were about to experience..

Wes Alsop, the owner of the Sierra (which was situated just outside the town), had taken delivery the day before of some new horses for the local ranch, the "Lazy C". Chaz Bishop, senior hand on the ranch, had taken the opportunity to ride over to pick the horses up, and at the same time have a coffee and a yarn with his old friend. 

As they sat there in the office, the rich smell of coffee filling the air, neither of them knew that they were to be the cause of their local citizens rude awakening, for unbeknownst to them, the horses had also attracted the attention of some of the local bad men.

'Deadeye' Cooper and Fred Early had been in town the day before drinking in the 'Silver Dollar' ("Whiskey, Beer and Rooms") when someone had happened to mention the arrival of the horses. Looking out the window at their own beaten up old nags, the victims of one too many escapes and hard rides, the looked at each other and words unspoken, lifted their glasses to each other in salute. As the evening went on they got into conversation with Gus Farley, a saddle tramp, who also invited himself in on the "party". One more gun would never go amiss...

Dramatis Personae

The number is the characters toughness rating - the lower the number the tougher the hombre..

Table and Scenario Specific Rules:
  • I'm using Ruthless [clicky] again - Ruthless-Fastest-Rules-in-the-West-3.pdf (fireballforward.com) [clicky] ..they're free gratis, but more importantly they drive a fantastic narrative 
  • Top of the picture following is North
    • Deadeye enters at 2/.
    • Fred and Gus at 1/.
    • Wes and Chaz are in the front of the office come bunk house at 3/.
  • Neither Wes or Chas can react until one movement in view of any of the bad guys, and even then Wes is cursed with a sense of fairness and won't open fire until shot upon
  • The horses are unsaddled and in the Corral, and for any of the bad guys to get them away they need to expend 4 actions/two complete turns doing absolutely nothing else - after that they move at foot rate in any direction the bad guys wishes to take them (there are gates in the fence so I'm not going to make it any more difficult for them than it already is 😏)
  • Winner is the side that either has the horses in (the good guys) or out (the bad guys) of the Corral
  • The "Skeddadle" dice is a D6 rather than a D10 due to the small size of each group 
  • Any move that includes shooting will result in the horses moving D6" in a direction decided by a direction dice
  • All ground is good going except rocks, hills, fences, scrub/inside building which counts as rough. Scrub/fences count soft cover, building/logs/rocks hard cover. Hills/rocks/building block line of sight

The Game

[Move 1] 

Start of move..

As the sun slowly rose over the horizon, and a new day burned its way into the retinas, at the  far end of town Wes and Chaz, breakfast over and coffee in hand, are chatting, laughing and reminiscing about previous misdeeds, narrow escapes, ladies loved and lost, the best brands of sipping whiskey and the favourite horses of their respective youths [their cards are discarded as they require one full move to react to any sighting]. 

Across the way Fred gets the drop on his compadres and runs across the open ground to join up with Deadeye who moves into the cover of the fallen logs closer to the office. Gus, the most trepidous of the three, moves to the cover of bushes north of the corral.

The horses snicker and move nervously [no shooting so no movement].

Skeddadle dice not required (no casualties/unconscious or lily livered...  yet... 😏)

[Move 2]  Wes spots Fred running across the clearing the other side of the Corral and something about his furtive manner makes him drop his coffee cup, pull his iron and drop down to get the full cover of the window shouting a warning to Chaz.

Deadeye, cursing the stupidity of his partner at being seen so soon, sprints to the side of the cabin nearest him coming to a rest next to the window, back to the wall while Fred runs to the fence line, using the horses to cover him from the cabin. Gus, screwing up his courage, runs to the scrub at the north east corner of the Corral.

Chaz is slow but pulls his iron drops down to the other side of the window and snaps off a shot at Gus. [One shot only to allow for the other actions - not aimed - can ignore long range - target in soft cover - but not surprisingly perhaps he misses]

Sitrep End Move 2 before horses move

The horses snicker and move nervously towards the cabin [dice(s) give 3" to the East]

Skeddadle dice again not required (yet.. 😏)

[Move 3]  Gun still in hand, and Gus still visible, Chaz takes advantage aims and squeezes off another shot at him across the way [long range but that be ignored because of his character trait, soft cover but the aimed shot counters that] and is rewarded with the sound of a shout of pain from  Gus - "hit 'im" he grunts to Wes.. better.. he's fairly sure Gus is going nowhere soon [he was right - Gus failed his subsequent morale test and becomes "lily livered"..  'shaken' in other words] but his optimism is rudely rewarded with a couple of shots in return from the wounded Gus, splintering the wood work around the window but doing no other harm..

Across the corral, Fred jumps the fence and moves towards the horses, still keeping them between him and the office. At the side of the office Deadeye turns and jumps to the side window intending to fire off a shot at Wes in the room. out of the corner of his eye Wes sees him and quickly snaps off a shot at him before he can fire. Deadeye grunts in pain and drops out of sight - shot untaken.[Interesting passage of play from a rule perspective and shows their flexibility - so Deadeye had the initiative, but the rules allow a character who is about to be fired at, but who hasn't activated yet this turn, to "get the draw" - overwatch if you like. Wes tested (at -1 as I allowed Deadeye his "stealth" bonus), but won, and managed to get a successful shot off  before Deadeye could shoot - Deadeye then failed his subsequent morale test so I adjudged that the wound - which was serious - plus the failed morale test would have meant him dropping out of sight pronto]

End Turn 3 - just prior to the failed "Skedaddle" test - yellow pins indicate "lily livered"/shaken

Fred shouts "I'm getting out of here!" and runs for cover (and the town), and is swiftly followed by both Deadeye and Gus..  looks like the beaten up old nags are going to have to suffer yet another hard ride.. [with two characters now on failed morale the bad guys needed to get over 2 on a D6 or fail the skedaddle test - needless to say they threw a 2 😏]

Post Match Analysis:
  • Short, sharp and sweet - like a good Tequila (or so I understand... πŸ˜€) - but another fantastic short story delivered by this set of rules..  you can just smell the heat, the dust, the sweat and the cordite when you play...
  • Not a lot of lead thrown, but Wes and Chaz were very accurate, both hitting and hitting hard with their few shots..             

~~~~~~~~~~~~~~~~~~~~~~~~~~~~~~~~~~~~~ 

 "Laters", as the young people are want to say...

Saturday, May 10

One Hour Wargames Scenario 27 "Disordered Defence" - Setup and Game

Time for the little metal men to march across the table in slightly more numbers than has been usual recently, and as there's no beating One Hour Wargames for scenario ideas, and as I also wanted an opportunity to play this years John Corrigan Memorial Game [clicky]) I opted for the next one in the series, which is #27, "Disordered Defence"..

In summary, a small attacking army has launched a surprise attack on a (potentially) bigger defending army positioned to protect a cross roads..  the question is can the attacker beat enough of the defending enemy to win the battle before the defenders reinforcements arrive.. 😏

As mentioned this is the Memorial Game so our battle will be set in the American War of Independence using those glorious little metal men that John painted and gifted to me all those years ago. I just have this feeling that this is one of those games where the smaller attacker screams out to be British/Hessian, so they will be the attacker. 

Setup:

  • Each side was diced for as per the tables in the book, but as the table is 6' x 4' I will roll twice for each side doubling up the numbers..  the only change being to ignore the skirmisher column and substitute regular foot, all artillery will be light. 
  • All units for both sides get maximum Strength Points/SP's (ie. 6) and are classed as regular with no morale modifiers - there are also no national modifiers, so both sides units are equal in fire/melee...
  • The scenario in the book is 15 turns and American reinforcements arrive on turn 8.
  • The side occupying the crossroads at the end of the game is the victor.

OOB Blue/Anglo Hessian Attacker:

For the sake of organisation they are divided into two brigades of equal size - each with a Brigadier, and under the overall command of a C-in-C

Unit/Base No.

Notes/
Type

MP's

SP’s

New York Loyalist Artillery #22

Light Art

0

6

5

4

3

2

1

πŸ’€

Brunswick Jaegers #3 & 4

 Infantry 

0

6

5

4

3

2

1

πŸ’€

Brunswick Jaegers #5 & 6

Infantry 

0

6

5

4

3

2

1

πŸ’€

Battalion von Barner #8 & 9

Infantry 

0

6

5

4

3

2

1

πŸ’€

New York Loyalist Artillery #2

Light Art

0

6

5

4

3

2

1

πŸ’€

17th Foot #36 & 37

Infantry 

0

6

5

4

3

2

1

πŸ’€

23rd Foot (Royal Welsh Fusiliers) #38 & 39

Infantry 

0

6

5

4

3

2

1

πŸ’€

71st (Frasers) Foot #40 & 41

Infantry 

0

6

5

4

3

2

1

πŸ’€


Red/American Defender:

The American's have the greater force, but the tactical problem of deciding which half of their units to deploy first, and which half to hold back as their reserve. Given they are a defender though, and given they have to hold until the reserves arrive I decided to deploy the artillery and five of the foot regiments first.
  • Holding Force:
Three separate commands - one per each deployment point as defined in the scenario but under the overall command of a C-in-C assisted by a Brigadier.
 

Unit/Base No.

Notes/
Type

MP's

SP’s

Connecticut Artillery #28

Light Art

0

6

5

4

3

2

1

πŸ’€

Green Mountain Boys - 1st Battalion #1 & 2

Infantry 

0

6

5

4

3

2

1

πŸ’€

Green Mountain Boys - 2nd Batt #3 & 4

Infantry 

0

6

5

4

3

2

1

πŸ’€

New York Regiment #9& 10

Infantry 

0

6

5

4

3

2

1

πŸ’€

9th Pennsylvania Regiment #11 & 12

Infantry 

0

6

5

4

3

2

1

πŸ’€

1st New York #39 & 40

Infantry 

0

6

5

4

3

2

1

πŸ’€


 Americans start deployed in three isolated positions - I opted to put the American gun where it could cover both flanks - it's light but it it has the range..
  • Reinforcements:
Organised as one Brigade..

Unit/Base No.

Notes/
Type

MP's

SP’s

4th Dragoons #37 & 38

Cavalry

0

6

5

4

3

2

1

πŸ’€

Lauzun's Legion #43 & 44

Cavalry

0

6

5

4

3

2

1

πŸ’€

2nd New York #41 & 42

Infantry

0

6

5

4

3

2

1

πŸ’€

Maryland State Marines #24 & 25

Infantry

0

6

5

4

3

2

1

πŸ’€

Bourbonnais Regiment (1st. Batt.) #31 & 32

Infantry

0

6

5

4

3

2

1

πŸ’€

Saintonge Regiment #47 & 48

Infantry

0

6

5

4

3

2

1

πŸ’€


The American reserves wait patiently..

Table:

A crossroads - American reserves enter from top - forward positions in place.. British deploy within 4" of the bottom table edge.. the table is flat - no hills and the fields are purely for visual effect - no impact on movement/visibility..

The Game:

The British plan (hah! "Plan" indeed.. 😏) was to pile drive one of the two forward positions with everything they had - looking to defeat them in detail before the other American units (and indeed the reserves) could spoil the party..

An Anglo Hessian "piledriver" (a pfahlramme apparently) - as you can see I opted to go for the American forward position on the right 

The British advance was on a very concentrated front - each brigade with two battalions up and one in reserve (to protect them from small arms/cannon fire), each brigade giving enough room for the artillery to pound the Americans,,


The American response was three fold, 
  • the brigade under attack retiring on the crossroads
  • the brigade at the crossroads moving to support them directly, while
  • the second of the two forward brigades pivoted with the aim of launching a flank/delaying attack on the exposed Anglo Hessian right 
End turn 4 and under the watchful eye of  Lofty C the American flank attack is forming to the left while the first American position has been driven in.. the British reserve battalions are moving to cover the flank

It took the Allies a while as every time they got within charge range American fire either caused them to delay or they retired out of range again, but as you can see following - turn 5 was a  bit of a game changer for the Allies - both American regiments in the flank attack have taken damage, and both regiments from the primary forward position are routing (note red dice) towards the American edge. 

It hasn't gone all the Allied way however - they are leaking valuable SP's they need to save for when the American reserves turn up..  in my heart of hearts I knew they were never going to pull this off

End turn 5

...and so it transpired - as one Hessian regiment bravely charged the gun in order to take it out of the equation before the imminent arrival of the American reserves - and was handled badly - one of the two routing American battalions recovered and poured in a withering volley on the 17th Foot.. both Allied Battalions now shaken, and also on worrying strength levels...

...and then the reserves arrived...  😏

End Turn 8 and look at the massed horde of reserves... 

..and then to rub dirt into the wound, both those Allied battalions fail morale checks and rout, allied firing is ineffective, and with a whoop that could clearly be heard across the table the American 4th Dragoons put spur to flank and charge into the side of one of the two routing regiments causing them to surrender, and then (almost unheard of) the other routing Allied Battalion is found to be within their second charge reach - it throws successfully to not surrender (brave boys!) but fails a test to stand (unsurprisingly) and dies to a man were they stand - the Dragoons triumphant.

End Turn 9 - very, very, messy for the Allies

With another Allied Battalion already routing, the Fusiliers exposed, shaken and about to go the same way - the British General orders 'sauve qui peut' ('rettet euch', perhaps 😏?) and withdraws from the field..  

Post Match Analysis:
  • a crushing victory for the Americans, but to be honest that is a very difficult scenario to win for the Blue/Attacker - the size of the battlefield is such that the three outposts can fairly easily reinforce each other, which gives them a strength of 6 to 8 fairly quickly - more than enough to fight a delaying action until their other 6 units arrive on turn 8. Even if none of the defenders survive, when the reinforcements arrive it will be 6 fresh against whatever is left of the attackers 8
  • alternative tactics? 
    • The attacker could consolidate and 'defend' - it's 8 vs 12 but it's always difficult to press home an attack on a stationary defender, but the scenario calls for you to take the crossroads to win, and the defenders already have it, so at some point you will need to attack/advance
    • attack both forward positions at the same time so no flank defence is possible?
  • I think the Allied plan was good but one of the other unintended problems with doubling up units is being able to concentrate or focus the "pfahlramme" (😏) of a large force on a comparatively smaller one - put simply, only a third of the piledriver could get close enough to do any damage the others were either too far away or blocked by their compatriots! πŸ˜€ The second of those two "alternative tactics" would address this problem?
  • The Allies were badly in need of some cavalry - but that's the luck of the dice
  • Scenario modifiers? 
    • at the risk of going on about it (but I will 😁), the forces in the book are 6 vs 4 (initially 3 vs 4), so doubling up does give the attacker an extra (unfair ?) advantage (instead of two they have four extra units in hand), I suspect I have badly skewed it in their favour by doing this, and what I should have done is prorated the increase in each side in some way, so as to maintain a narrower advantage. Perhaps maintain the two unit advantage so give the Allies/defender another couple of units making it 12 v 10 (rather than 8)
    • there is no benefit of surprise for the attacker - it might be worth considering giving them a one or two move benefit before the Americans can move but with firing allowed
Either way it was good to get the guys out again for a run out - before I remove the terrain I may well play this one again but this time with 12 vs 10...