Showing posts with label AWI. Show all posts

Saturday, May 10

One Hour Wargames Scenario 27 "Disordered Defence" - Setup and Game

Time for the little metal men to march across the table in slightly more numbers than has been usual recently, and as there's no beating One Hour Wargames for scenario ideas, and as I also wanted an opportunity to play this years John Corrigan Memorial Game [clicky]) I opted for the next one in the series, which is #27, "Disordered Defence"..

In summary, a small attacking army has launched a surprise attack on a (potentially) bigger defending army positioned to protect a cross roads..  the question is can the attacker beat enough of the defending enemy to win the battle before the defenders reinforcements arrive.. 😏

As mentioned this is the Memorial Game so our battle will be set in the American War of Independence using those glorious little metal men that John painted and gifted to me all those years ago. I just have this feeling that this is one of those games where the smaller attacker screams out to be British/Hessian, so they will be the attacker. 

Setup:

  • Each side was diced for as per the tables in the book, but as the table is 6' x 4' I will roll twice for each side doubling up the numbers..  the only change being to ignore the skirmisher column and substitute regular foot, all artillery will be light. 
  • All units for both sides get maximum Strength Points/SP's (ie. 6) and are classed as regular with no morale modifiers - there are also no national modifiers, so both sides units are equal in fire/melee...
  • The scenario in the book is 15 turns and American reinforcements arrive on turn 8.
  • The side occupying the crossroads at the end of the game is the victor.

OOB Blue/Anglo Hessian Attacker:

For the sake of organisation they are divided into two brigades of equal size - each with a Brigadier, and under the overall command of a C-in-C

Unit/Base No.

Notes/
Type

MP's

SP’s

New York Loyalist Artillery #22

Light Art

0

6

5

4

3

2

1

💀

Brunswick Jaegers #3 & 4

 Infantry 

0

6

5

4

3

2

1

💀

Brunswick Jaegers #5 & 6

Infantry 

0

6

5

4

3

2

1

💀

Battalion von Barner #8 & 9

Infantry 

0

6

5

4

3

2

1

💀

New York Loyalist Artillery #2

Light Art

0

6

5

4

3

2

1

💀

17th Foot #36 & 37

Infantry 

0

6

5

4

3

2

1

💀

23rd Foot (Royal Welsh Fusiliers) #38 & 39

Infantry 

0

6

5

4

3

2

1

💀

71st (Frasers) Foot #40 & 41

Infantry 

0

6

5

4

3

2

1

💀


Red/American Defender:

The American's have the greater force, but the tactical problem of deciding which half of their units to deploy first, and which half to hold back as their reserve. Given they are a defender though, and given they have to hold until the reserves arrive I decided to deploy the artillery and five of the foot regiments first.
  • Holding Force:
Three separate commands - one per each deployment point as defined in the scenario but under the overall command of a C-in-C assisted by a Brigadier.
 

Unit/Base No.

Notes/
Type

MP's

SP’s

Connecticut Artillery #28

Light Art

0

6

5

4

3

2

1

💀

Green Mountain Boys - 1st Battalion #1 & 2

Infantry 

0

6

5

4

3

2

1

💀

Green Mountain Boys - 2nd Batt #3 & 4

Infantry 

0

6

5

4

3

2

1

💀

New York Regiment #9& 10

Infantry 

0

6

5

4

3

2

1

💀

9th Pennsylvania Regiment #11 & 12

Infantry 

0

6

5

4

3

2

1

💀

1st New York #39 & 40

Infantry 

0

6

5

4

3

2

1

💀


 Americans start deployed in three isolated positions - I opted to put the American gun where it could cover both flanks - it's light but it it has the range..
  • Reinforcements:
Organised as one Brigade..

Unit/Base No.

Notes/
Type

MP's

SP’s

4th Dragoons #37 & 38

Cavalry

0

6

5

4

3

2

1

💀

Lauzun's Legion #43 & 44

Cavalry

0

6

5

4

3

2

1

💀

2nd New York #41 & 42

Infantry

0

6

5

4

3

2

1

💀

Maryland State Marines #24 & 25

Infantry

0

6

5

4

3

2

1

💀

Bourbonnais Regiment (1st. Batt.) #31 & 32

Infantry

0

6

5

4

3

2

1

💀

Saintonge Regiment #47 & 48

Infantry

0

6

5

4

3

2

1

💀


The American reserves wait patiently..

Table:

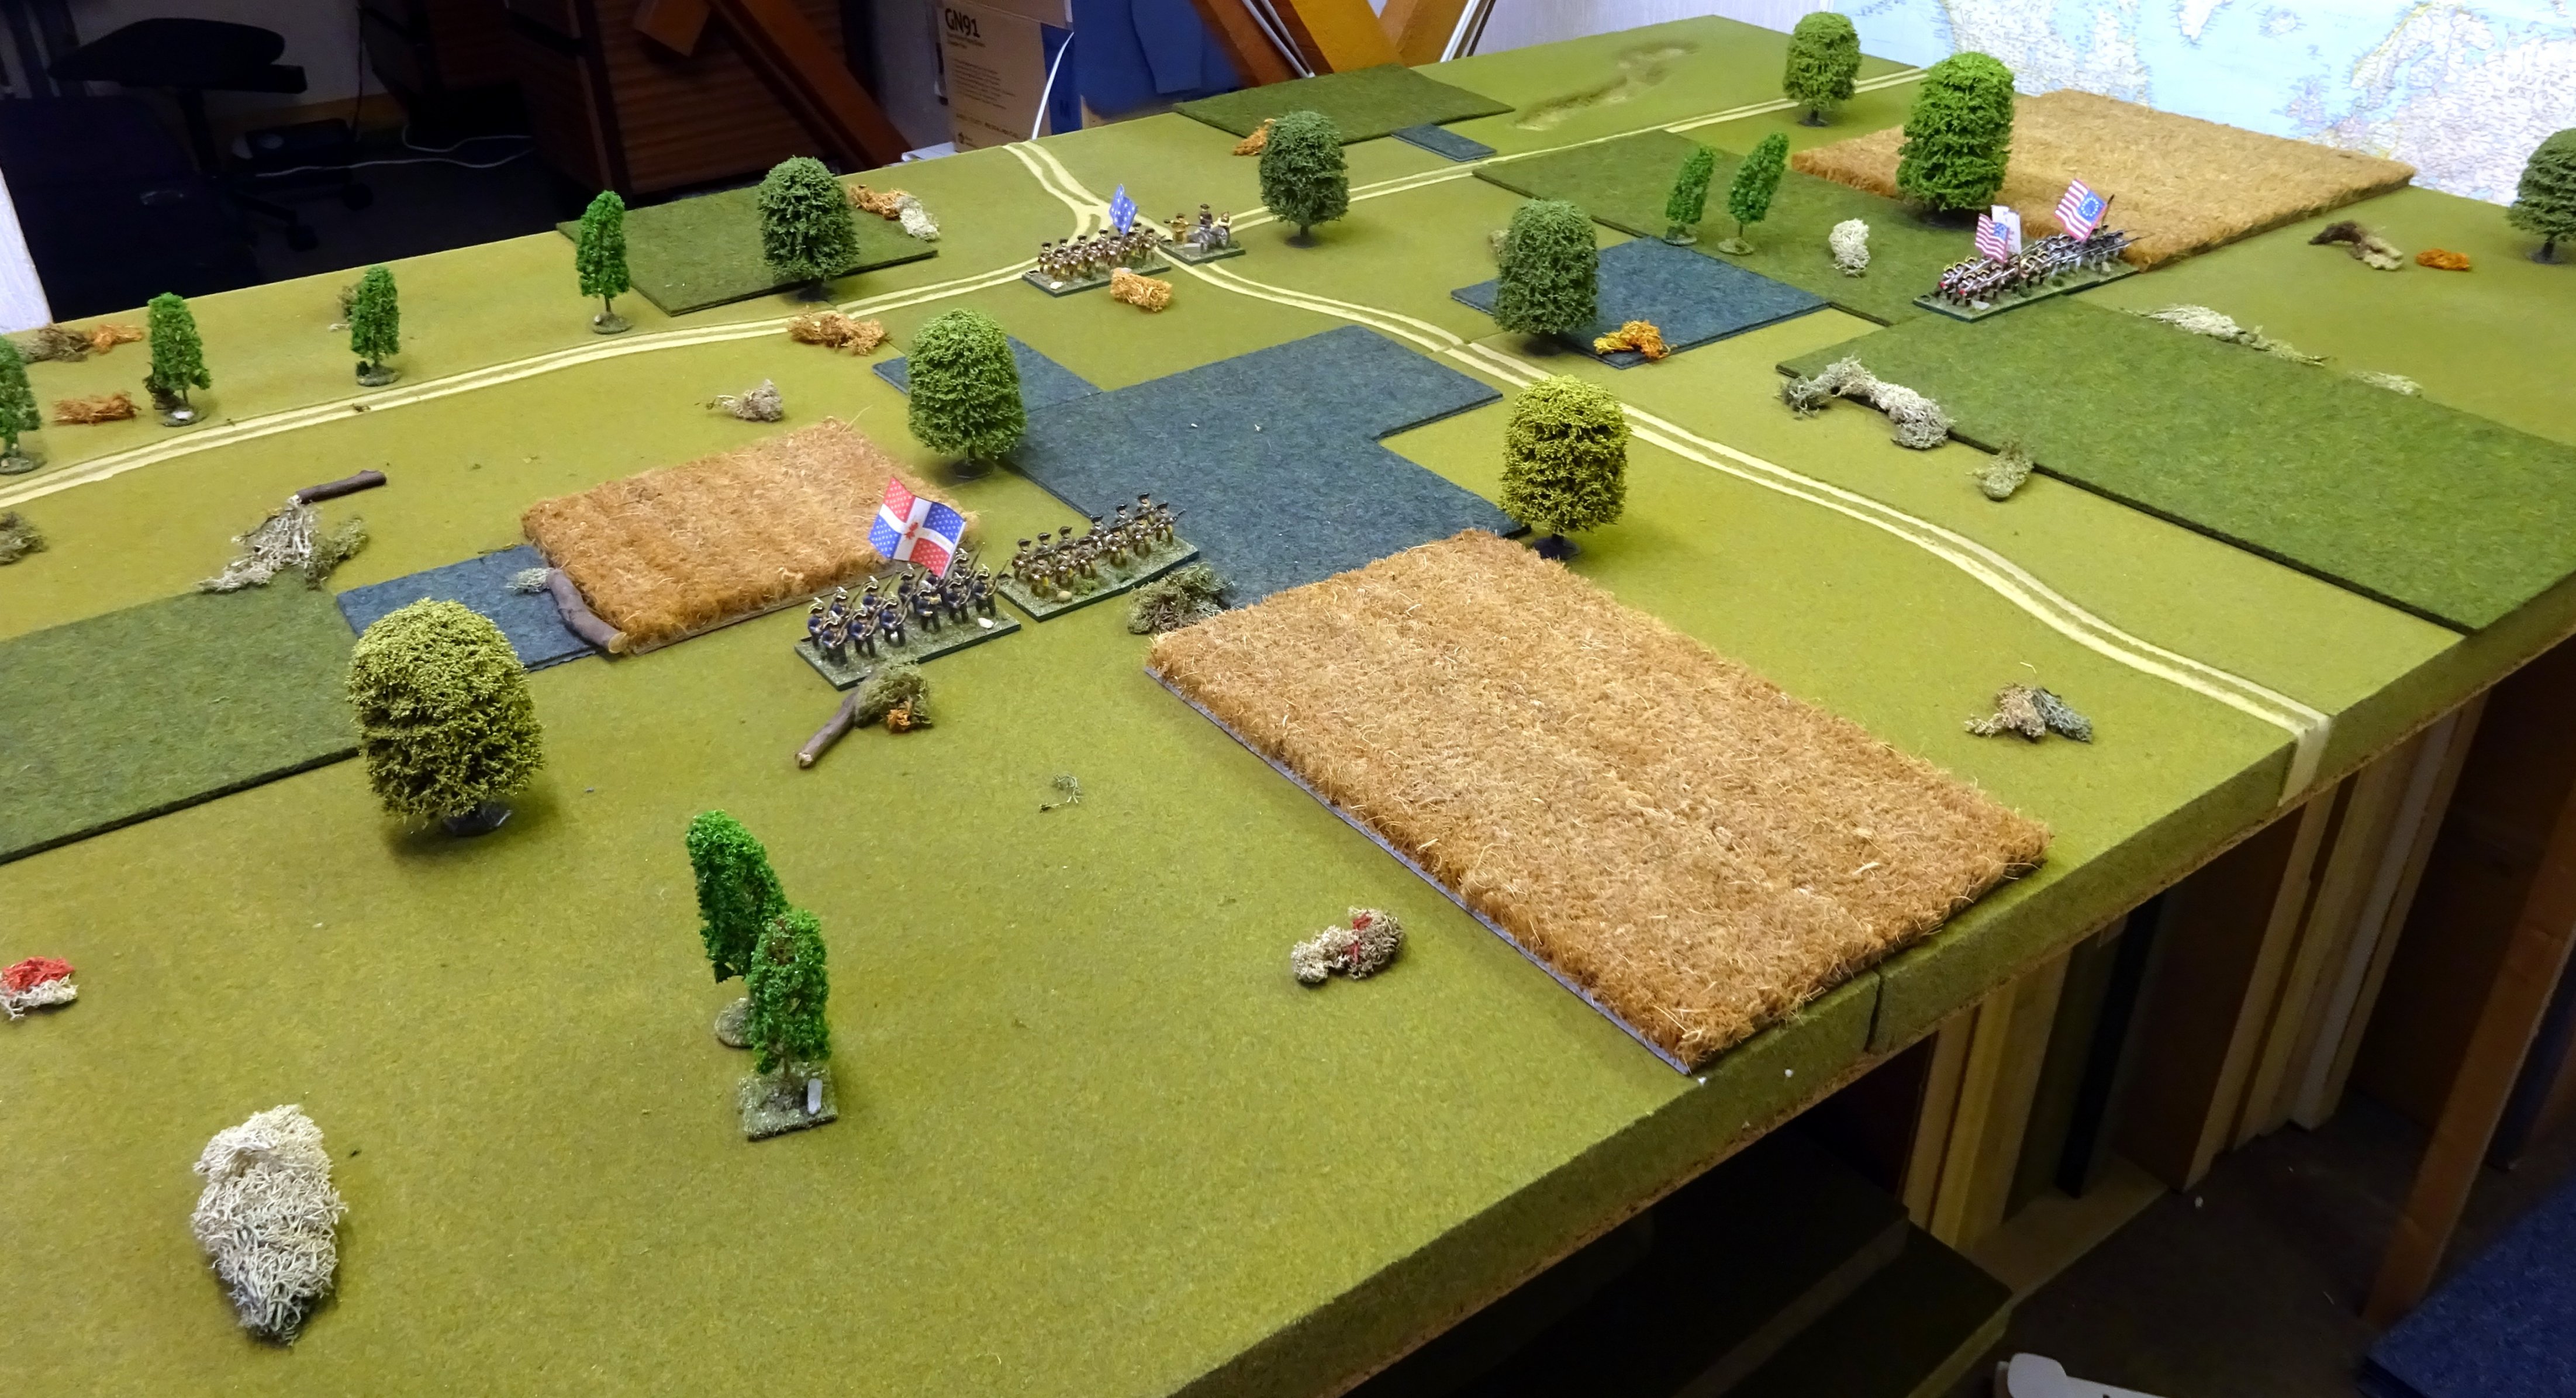
A crossroads - American reserves enter from top - forward positions in place.. British deploy within 4" of the bottom table edge.. the table is flat - no hills and the fields are purely for visual effect - no impact on movement/visibility..

The Game:

The British plan (hah! "Plan" indeed.. 😏) was to pile drive one of the two forward positions with everything they had - looking to defeat them in detail before the other American units (and indeed the reserves) could spoil the party..

An Anglo Hessian "piledriver" (a pfahlramme apparently) - as you can see I opted to go for the American forward position on the right 

The British advance was on a very concentrated front - each brigade with two battalions up and one in reserve (to protect them from small arms/cannon fire), each brigade giving enough room for the artillery to pound the Americans,,


The American response was three fold, 
  • the brigade under attack retiring on the crossroads
  • the brigade at the crossroads moving to support them directly, while
  • the second of the two forward brigades pivoted with the aim of launching a flank/delaying attack on the exposed Anglo Hessian right 
End turn 4 and under the watchful eye of  Lofty C the American flank attack is forming to the left while the first American position has been driven in.. the British reserve battalions are moving to cover the flank

It took the Allies a while as every time they got within charge range American fire either caused them to delay or they retired out of range again, but as you can see following - turn 5 was a  bit of a game changer for the Allies - both American regiments in the flank attack have taken damage, and both regiments from the primary forward position are routing (note red dice) towards the American edge. 

It hasn't gone all the Allied way however - they are leaking valuable SP's they need to save for when the American reserves turn up..  in my heart of hearts I knew they were never going to pull this off

End turn 5

...and so it transpired - as one Hessian regiment bravely charged the gun in order to take it out of the equation before the imminent arrival of the American reserves - and was handled badly - one of the two routing American battalions recovered and poured in a withering volley on the 17th Foot.. both Allied Battalions now shaken, and also on worrying strength levels...

...and then the reserves arrived...  😏

End Turn 8 and look at the massed horde of reserves... 

..and then to rub dirt into the wound, both those Allied battalions fail morale checks and rout, allied firing is ineffective, and with a whoop that could clearly be heard across the table the American 4th Dragoons put spur to flank and charge into the side of one of the two routing regiments causing them to surrender, and then (almost unheard of) the other routing Allied Battalion is found to be within their second charge reach - it throws successfully to not surrender (brave boys!) but fails a test to stand (unsurprisingly) and dies to a man were they stand - the Dragoons triumphant.

End Turn 9 - very, very, messy for the Allies

With another Allied Battalion already routing, the Fusiliers exposed, shaken and about to go the same way - the British General orders 'sauve qui peut' ('rettet euch', perhaps 😏?) and withdraws from the field..  

Post Match Analysis:
  • a crushing victory for the Americans, but to be honest that is a very difficult scenario to win for the Blue/Attacker - the size of the battlefield is such that the three outposts can fairly easily reinforce each other, which gives them a strength of 6 to 8 fairly quickly - more than enough to fight a delaying action until their other 6 units arrive on turn 8. Even if none of the defenders survive, when the reinforcements arrive it will be 6 fresh against whatever is left of the attackers 8
  • alternative tactics? 
    • The attacker could consolidate and 'defend' - it's 8 vs 12 but it's always difficult to press home an attack on a stationary defender, but the scenario calls for you to take the crossroads to win, and the defenders already have it, so at some point you will need to attack/advance
    • attack both forward positions at the same time so no flank defence is possible?
  • I think the Allied plan was good but one of the other unintended problems with doubling up units is being able to concentrate or focus the "pfahlramme" (😏) of a large force on a comparatively smaller one - put simply, only a third of the piledriver could get close enough to do any damage the others were either too far away or blocked by their compatriots! 😀 The second of those two "alternative tactics" would address this problem?
  • The Allies were badly in need of some cavalry - but that's the luck of the dice
  • Scenario modifiers? 
    • at the risk of going on about it (but I will 😁), the forces in the book are 6 vs 4 (initially 3 vs 4), so doubling up does give the attacker an extra (unfair ?) advantage (instead of two they have four extra units in hand), I suspect I have badly skewed it in their favour by doing this, and what I should have done is prorated the increase in each side in some way, so as to maintain a narrower advantage. Perhaps maintain the two unit advantage so give the Allies/defender another couple of units making it 12 v 10 (rather than 8)
    • there is no benefit of surprise for the attacker - it might be worth considering giving them a one or two move benefit before the Americans can move but with firing allowed
Either way it was good to get the guys out again for a run out - before I remove the terrain I may well play this one again but this time with 12 vs 10...

Saturday, March 9

"Firing into the Brown" #42 - Ingoldsby's, Dues and stuff..

"So Carnehan weeds out the pick of his men, and sets the two of the Army to show them drill and at the end of two weeks the men can manoeuvre about as well as Volunteers. So he marches with the Chief to a great big plain on the top of a mountain, and the Chiefs men rushes into a village and takes it; we three Martinis firing into the brown of the enemy".

Kipling "The Man Who Would Be King"

Time for another update..
~~~~~~~~~~~~~~~~~~~~~~~~~~~~~~~~~~~~~

Joseph Sabin - portrait attributed to Edward Byng
Another of those 'regiments of renown' that I missed the unit histories for - this time we get a two'fer, as the regiment in question serves in two separate projects, and therefore exists in two separate instances in my collection of little metal men..  Ingoldsby's (from my Marlburian project), later became The Royal Welch Fusiliers, and then the 23rd Foot (in my American War of Independence project)

Raised in Wales and in the adjacent counties on 17 March 1689 by Henry Lord Herbert, the regiment was intended to assist King William III in his campaign in Ireland. In Ireland they fought in the battles of the Boyne and Aughrim and a number of other sieges. From 1693, they were commanded by, and got their original name from Colonel Richard Ingoldsby (who was promoted to Brigadier on 31 May 1696) but at Blenheim they were already under the command of a new Colonel (brevet), Joseph Sabine. Sabine was confirmed in his promotion, and got the regimental Colonelcy in 1705 (and remained in that role until his death.. in 1739!)

The regiment went on to win battle honours at all four of the great battles of the war; Blenheim, Ramillies, Oudenarde, Malplaquet. 

Timeline (abbreviated - the Kronoskaf site referenced below is far more/better detailed)

  • On 7 June 1701, the regiment embarked at Carrickfergus, arriving on 30 June in Holland and proceeding to Workum and Heusden. 
  • 1702, the regiment went to cover the siege of Kaiserwerth and later formed part of the covering army during the siege of Venlo. Designated a fusilier regiment and became the Welch Regiment of Fusiliers ("Welch" being correct, and the old spelling)
  • 1703, the regiment proceeded to Maastricht, it was at the siege and capture of Huy. 
  • 1704, the regiment marched towards the Rhine and then was part of Marlborough's march to the Danube. The regiment took part in the Battle of the Schellenberg (where Sabine was wounded) and later it fought at the Battle of Blenheim. The regiment then marched through Swabia to cover the siege of Landau.
  • 1705, the regiment was in garrison at Roermond. A detachment of the regiment was employed in recapturing Huy. Later the regiment took part in the passage of the French lines at Helixem and Neerhespen.
  • 1706, the regiment fought in the Battle of Ramillies. It formed part of the army covering the siege of Ostend, it continued to form part of the covering army during the sieges and capture of Menin, Dendermond and Ath. 
  • 1707, no action - the opposing armies passed the campaign in manoeuvring and observing the movements of each other.
  • 1708, the fought in the Battle of Oudenarde as part of Cadogan's Corps. From August, it took part in the siege of Lille. 
  • 1709, the regiment received a body of recruits from England. In June, it formed part of the covering army during the siege of Tournai later in the year the regiment fought in the Battle of Malplaquet. The regiment then formed part of the covering army during the siege and capture of Mons.
  • 1710, the regiment took part in the siege of Douai and later formed part of the covering army during the siege of Béthune, Aire and Saint-Venant.
  • 1711, the regiment was part of the Allied army that passed the Ne Plus Ultra Lines at Arleux. The regiment then took part in the siege of Bouchain.
  • 1712, the regiment formed part of the covering army during the siege of Le Quesnoy soon afterwards a suspension of arms was proclaimed between the British and French, preparatory to a treaty of peace
  • 1713 the prefix "Royal" was added to the regiments name
  • 1714, the regiment returned to England and was subsequently stationed in Ireland. Royal title confirmed when George I named them the Prince of Wales's Own Royal Regiment of Welsh Fusiliers.

At the Schellenberg the regiment was brigaded with the 1st Guards, Orkney's Regiment & Meredith's Regiment under the brigade command of Fergusson, where they were part of the Advance Guard in the division of Lt. General Goor under John Churchill, Duke of Marlborough. They took significant casualties (in addition to the wounding of Sabine mentioned). 

At Battle of Blenheim they'd been re-organised, and comprised about 520 men all told. They were now a part of the column attacking Blenheim village, under the command of Lieutenant General John, 1st Baron Cutts of Gowran (the "Salamander") in Brigadier-General Rowe's Brigade comprising themselves plus the Scots Fusiliers (1 bn, 629 men), Howe's Foot (1 bn, 584 men), Duke of Marlborough's Foot/Derring's (1 bn, 524 men), and Lord North and Grey's Foot (1 bn, 580 men)

In 1689, the uniform consisted of a blue coat faced white; white breeches; and white stockings but by the time the War of the Spanish Succession had broken out they had probably already transitioned to scarlet, but for sheer interest I stuck with blue (weeeellll..  the colonels had to pay out of their own pockets so you wouldn't want good uniforms to go to waste, would you? 😏). No details on colours at that time so I went with a plain cream one..  if anything subsequently comes to light I'll give them a proper one..

My representation of Brigadier General Archibald Rowe's brigade - in the front row Ingoldsby's (Welch Fusiliers) on the right, and Derring's on the left. The brigadier with runner is in the middle and in the second rank we have Howe's on the left. The regiment on the right is a Dutch regiment, Rechteren's who have just photobombed the picture.. 😏

Following the 1751 British army reforms that standardised naming and numbering of regiments, it then  became the 23rd Regiment of Foot (Royal Welsh Fusiliers). Up to 2004 it was one of only five line infantry regiments never to have been amalgamated, but it was announced then that the Royal Welch Fusiliers would merge with the Royal Regiment of Wales to form a new large regiment, the Royal Welsh.

Sources/references:

~~~~~~~~~~~~~~~~~~~~~~~~~~~~~~~~~~~~~ 

Interesting little snippet on the "Ian Visits" blog..  


Next week they will be celebrating the "Ceremony of the Constable’s Dues" at the Tower of London...  an old, old, tradition the origins of which are centuries old, and refer to when ships visiting London would have to make a payment to the Constable of the Tower of London. Over time, as the river became busier and busier, the dues became less and less, and in the end, disappeared all together apart from this one occasional ceremonial offering - usually by a visiting warship - and on an infrequent basis..  

This year though, the Royal Marines are doing it, and the river is being closed as they are using a Merlin helicopter and three ORC's! Should be a quick delivery as I saw one of those ORC's at the boat show a number of years ago [clicky](0 to 30 Knts in 10 seconds 😁!!)

More info..

~~~~~~~~~~~~~~~~~~~~~~~~~~~~~~~~~~~~~ 

 Laters, as the young people are want to say...

Saturday, February 24

"One Hour Wargames" - Scenario 23 - "Defence in Depth" - Set Up and Game

Slight (well massive, actually!) deviation from the usual format this week... 

DG and I are currently playing this scenario (albeit virtually via Battle Chronicler [clicky] and with an extended hiatus currently so DG can replace an ailing PC) but there's no comparison with getting some actual metal men on the table, and for a quick solo game there's no beating One Hour Wargames, and as I was au fait with the scenario, I decided to play it in parallel...... (and if that wasn't enough "ands" I also wanted an opportunity to play this years John Corrigan Memorial Game [clicky]) 

Decision made, the little metal men of the American War of Independence project would march again..

This is an interesting scenario; in essence/summary, a slightly smaller defending force seeks to stop a numerically superior attacking force from exiting the defenders end of the table. Things are complicated for the attacker in that there are only three access methods (bridges) to the defenders end of the table, and of these three bridges one is accessed only via a farm/built up area, one is effectively blocked as it opens into a wood (that for scenario reasons the attacker doesn't have access to), and the third is the furthest away from the exit point - interesting conundrum!

Forces for each side were diced for on the relevant table in the book, the only change being to ignore the skirmisher column and substitute regular foot. As I was playing on a 6' x 4' table, I also doubled the number of units for each side by just throwing twice on each table. 

  • The British/attacker threw a 3 and a 4 giving them 8 Foot, 3 Cavalry and 1 piece of Artillery (which was decided to be of the Light type) - 12 units
...the sharper eyed among you will have noticed that the fog of war has already struck, and I am missing a unit of cavalry - suffice to say I never noticed until.. errrr... about now..  😂
  • The American/defender threw a 5 and a 6 giving them 7 Foot and 1 Cavalry - 8 units..  specific scenario requirements are that the defender needs to swap half of there troops for irregulars, so they chose to  swap 3 Foot and the 1 Cavalry - the replacement troop type were Indians, so they ended up with 4 regiments of Foot, and 4 warbands of Indians.

Rules were my go-to Will McNally ones (details as ever in the AWI Project page in the side bar) - fifteen moves (50% more than the book, due to the size of the table)

Table set up as follows:


Attacker enters from top left table edge..  exit point for attacker is the road on the bottom right edge.. The only significant terrain features (ie. everything else is just table dressing) are:
  1. the road which crosses …
  2. the river, just behind - not crossable anywhere except at ...
  3. the three separate bridges
  4. the built up area/farm
  5. Woods - classed as light - bottom left of the picture, and then two woods top centre, either side of one of ...
The farm dominates the bridge behind it - the only access to that bridge is via the farm - a hard fight, if the defender does what you expect him to. Similarly the woods dominate both entrances to the middle bridge and given there is a specific scenario rule denying the attacker access to any of the woods (due to "lack of local knowledge"), that bridge is of assistance only to the defender; you can understand why the third bridge becomes more and more attractive.😏

American/defenders set up first:


No surprises really:
  1. One regiment of regulars in the farm, with another behind ready to either reinforce them, or defend the road, as required
  2. One regiment of regulars in shelter dead centre - ready to reinforce either flank
  3. One regiment of regulars  in shelter behind the 'middle bridge woods' to give assistance to their gallant Indian allies, or to cover the third bridge
  4. The Indians are placed, one each, in the woods either side of the middle bridge and the other two warbands are covering the third bridge..
On to the game...  following is about move 2 or 3

Ave, John...  Lofty C. overlooks his little metal men still striving away after his passing..

The British "plan" (plan... 😂) was to:
  1. put a holding force in place to stop any incursion from the farm - that job fell to von Donop's (yellow flag bottom left in the picture above) - in effect they were a sacrifice to protect the rear of the army.. it would be unlikely that they could get to the exit point in time
  2. get the cavalry across the third bridge as quickly as possible with a view to discombobulating the enemy by manoeuvring in their rear - this they've done at this stage - you can just see them beyond the wood top right
  3. two regiments and the artillery to drive off the Indians north of the river
  4. the rest to rush the third bridge
Couple of moves later:


The British cavalry are fulfilling their job, but as a result of some quite astonishing American dice throws, the plan to rush the bridge with the rest is not going as well as I had hoped..  in the right conditions, and with the right dice, Indians can be a tough proposition... here, their musketry was effective, and the British morale throws were rubbish. The first two British regiments across the bridge have been sent packing and are reforming behind the next two regiments into the meat grinder. In the meanwhile the Americans are bringing up reinforcements and the war whoops of the Indians are ringing out across the battlefield..

Couple of moves later, and as John looks on in interest (he always did enjoy watching a game rather than  playing in it.. 😊) we see the British disaster unfolding..  von Donop's have been left to their own devices as everyone else streams west to the third bridge - even at this stage of the game I had a pretty good idea the British had already lost..


British morale throws were catastrophic, and my Brigadiers and the CiC are busy helping where they can (see following - yellow dice means shaken, red dice means they're routing)..  thinking back I am fairly sure the Americans didn't do much physical damage - all the main damage was as a result of the British then failing to recover morale..


Next - apologies for the interesting yellow tinge, clearly not enough light..  anyway, three British regiments are across - two still in column of march and one of which is still on the bridge.. they are looking to drive the Indians away so they can turn right with safe flanks...  in the meanwhile the American tactic is to slowly drop back, always keeping themselves between the British and their exit point, but always just out of musket range..  the British cavalry have exited the table


Same move, but further east:


Finally across (following)! All far too late, and in too small numbers, unable to concentrate - one regiment routing (middle left) and one shaken (centre right)

Damn sightseers on the river! 😀

Last throw of the dice (next), as things are desperate - von Donop's try to force the bridge and fail (repeatedly) - brave mensch!!


End game - next - frontally attacked and flanked, the Brunswicker's have been sent packing (top right - red dice = routing)


At least two moves away from the exit point, and on the final turn, the British concede a game that in all truth they had already lost half a dozen moves before - they needed to get six units of the table but had only managed two.

Once again the Neil Thomas book delivers in spades..  best ten'ner I ever spent.. 😀

========================================

Lastly - by way of a bit of fun - what do the following have in common??


Answer next week... 😏

Wednesday, January 18

"Firing into the Brown" #25 - Dickens and stuff..

"So Carnehan weeds out the pick of his men, and sets the two of the Army to show them drill and at the end of two weeks the men can manoeuvre about as well as Volunteers. So he marches with the Chief to a great big plain on the top of a mountain, and the Chiefs men rushes into a village and takes it; we three Martinis firing into the brown of the enemy".

Kipling "The Man Who Would Be King"

Time for the first update of the new year..  at which point it would be rude not to say 'Happy New Year!' to all my reader..
~~~~~~~~~~~~~~~~~~~~~~~~~~~~~~~~~~~~~

This years Christmas Dickens... what an absolute delight - automatically one of my top four Dickens novels (along with Copperfield, Nickleby and Expectations). Mr. Pickwick is an independently wealthy gentlemen with a group of close friends who are all members of a private club of which Mr Pickwick is chairman. The club meets to eat, drink and tell stories, and agree that Pickwick and his friends should travel, gathering stories so that they may enjoy them. We then get 57 chapters of delightful adventures, misadventures, 3rd party stories, marriages, debtor prisons, romances, court actions and everything he and his friends get involved with, along with a cast of friends, enemies, hangers on and incidentals...  favourites? Sam Weller and his Dad of course..  stupendous! 9

~~~~~~~~~~~~~~~~~~~~~~~~~~~~~~~~~~~~~ 


As mentioned in the end of year review - not all is dormant on the wargame front as DG and I are taking a leisurely stroll through one of the scenario's in volume 1 of the Rebels and Recoats game series..  Bunker Hill.

We're up to move 4 and I am playing the British (red)..  my first wave of assault troops are ashore and holding their own, but DG is attacking vigorously...

~~~~~~~~~~~~~~~~~~~~~~~~~~~~~~~~~~~~~ 


My first non-fiction of the year has just been completed...  with a deep and abiding interest in the War for the Spanish Succession, I've always wanted to know a little more about Eugene than the bare basics that you tend to pick up as part of the accounts dealing with the better known Marlborough.

I was aware that Marlborough had a huge amount of respect and trust for him, I was aware of his involvement at Blenheim, I was aware that he was widely accepted to be one of the great generals of his age, but know little more than that really..

So when James Falkner comes along with a book on the man, I bought it as soon as it was published (from memory I think I pre-ordered)..  Falkner is a good read, I particularly recommend his other books "Marlborough's War Machine" and "Great and Glorious Days: Marlborough's Battles, 1704-09" plus the two smaller Battleground books on Blenheim and Ramillies.

So how was it? Well, I have to say I was a little disappointed but I'll start with the good

I know a lot more about the man now than I did before, and in particular about his campaigns in the East against the Ottoman Turks. I understand a whole lot more about how big the Austrian Empire was at this point (they included huge tracts of the Balkans and Italy as part of the Empire) but also how fragile they were, there was never enough money to fully fund the campaigns Eugene undertook in Italy and the Balkans.

His armies seemed to trust and like him - despite almost always being in arrears of pay, poorly clothed and fed, he managed to keep his polyglot armies of Austrian and German troops in the field far longer than you would normally expect.

He was undoubtedly a military genius, having that ability to move troops quickly to the enemies weak point before the enemy even knows they have moved.

What you don't get in the book though is a flavour of the actual man, and what he was like, he's almost an enigma and there are few first person accounts of what kind of a man he actually was, but in Falkners favour I think a lot of that is down to the man himself..   from what you read, he was not the outgoing socialite that Marlborough was - I get the distinct impression that this was a man dedicated to his trade, a bit of a loner socially(?), capable but not comfortable at court, happier with his army on campaign, never married (though there were rumours that he had a long term relationship) and died a bachelor with a large library at a good age.

Recommended though - 8/10

~~~~~~~~~~~~~~~~~~~~~~~~~~~~~~~~~~~~~ 

 Laters, as the young people are want to say...

Saturday, August 27

"Firing into the Brown" #19 - JC memorial game report, Jubilee and stuff..

"So Carnehan weeds out the pick of his men, and sets the two of the Army to show them drill and at the end of two weeks the men can manoeuvre about as well as Volunteers. So he marches with the Chief to a great big plain on the top of a mountain, and the Chiefs men rushes into a village and takes it; we three Martinis firing into the brown of the enemy".

Kipling "The Man Who Would Be King"

Time for another update..
~~~~~~~~~~~~~~~~~~~~~~~~~~~~~~~~~~~~~

As promised - a write up on the game - which was short but sweet, I think it safe to say.. 😊

First the field of Mars:

6' x 4' ..  Hessians enter on the road opposite, Franco-American on the road edge nearest.. by the definitions in the rules I am using (the Will McNally AWI rules [clicky]) woods are "open", farm is classed as a 'large building' - able to hold two units.

Forces (following) - as per the last Blog post - British main force in light blue, British reinforcements in red bottom left. American main force red top right, and their reinforcements in pink..  JC himself in green, watching over all ..  😊

..and so on to the game...

Both sides chose to send one brigade "either way"  from the entry point - the only main difference in tactics being that DG retained his forces in column for longer (to make better distance), and I chose to race my lights (the Indians) forward to occupy the farm complex as soon as possible, and I also deployed my artillery sooner (I took the view long range shooting was better than no shooting)...

Couple of turns in and DG appears to be lambasting his troops for their poor performance to date.. 😁

Couple of turns later and my Indians have now occupied the farm, but on the far side have sallied out to give DG's artillery a bloody nose..  in the distance clear evidence of bloody fighting as two of DG's line regiments have routed to the table edge..

Neither side opted to call up reserves on moves 3 or 5, I think both of us were happy with the progress we were making and didn't want to incur the additional points costs..

As it happened however, when points were tallied on move 7 of 8, DG, with four regiments and one of the artillery units routing tipped over the losing points level, and the game was mine.. just..  I think I was a point and a half behind him.

Four of my units shaken (yellow dice)

View from the opposite side (following)..

An excellent - but short - close fought game..

~~~~~~~~~~~~~~~~~~~~~~~~~~~~~~~~~~~~~ 

"You are so crooked, Dickie, that if you swallowed a nail, you would shit a corkscrew". (Mountbatten according to a quote ascribed to Field Marshal Sir Gerald Templer, the former Chief of the Imperial General Staff 😮)

Just finished Bishop's book on Jubilee, the code name for the Dieppe raid in 1942 - excellent book, well argued, and yet I still remain in slightly mixed minds about what the real purpose of the raid was ..

Bishop's narrative (which is brilliant - well worth a read) would have you believe that Mountbatten was a charismatic but vanity driven commander without any innate military skill who was looking for something he could pin first, his colours to, and secondly the colours of the clandestine organisation he led at that time, to..  He was a man desperately in need of a victory and the approbation that came with it..  along the way there are a cast of characters great and good who weren't going to get in the way of this "mission", until in the end the incredibly 5,000 brave boys of the 2nd Canadian Infantry Division were thrown on to beaches where 3,367 were killed, wounded or taken prisoner, a casualty rate of 68 percent....  

A catalogue of disasters..

  • Montgomery (to my mind) as one of the early generals in charge of planning eventually washed his hands and sloped his shoulders and went off to the desert without a backward glance, despite clearly having misgivings
  • the Canadian commanders were so desperate to get their troops into a fight after years of training and no action, they accepted the plan as given them.
  • The Navy wouldn't commit the capital ships that everyone knew were needed to provide the offensive preparatory barrage (and I don't believe that was a wrong decision given what later transpired)
  • the cloak of secrecy was such no one would take the chance of getting a spy into Dieppe to actually see what was waiting for them, and if they had they would have seen the depth of preparation the Germans had put in place - not because they were expecting this raid in specific, but as art of their general level of preparedness..
What I remain in mixed minds about is whether the raid really was a preparation for a future D-Day, or whether that was just the justification for the bloodshed that had ensued - that everyone told everyone so many times afterwards that was the prime reason for the raid, that in the end even the men who planned it, believed it..

I think I am in less mixed mind that whether that was the actual purpose or not, one thing that did come out of it was some very, very valuable lessons were learned, that were acted on later in the war in both Normandy, and Italy/Tunisia..

Sobering..  "go, Canada!"..   9/10

~~~~~~~~~~~~~~~~~~~~~~~~~~~~~~~~~~~~~ 

 "Laters", as the young people are want to say...