Wednesday, June 25

The Allied army review..

Fresh on the heels of the recent Allied success in the "Advance Guard" Teaser I decided to hold a victory parade under the eyes of their commander along the lines of the recent review of the Franco-Bavarian army...

We'll start first with a view of the army as a whole - starting from the bottom of the picture (and you can click on it, and any of the others, for a larger view) we have English cavalry (3 squadrons), the "British" brigade (I'm wary of using the term "British" as the Act of Union wasn't until 1707... 😁) comprising three English and a Scottish regiment of Foot, the Dutch brigade comprising two Dutch regiments of Foot, and a Swiss regiment in Dutch pay (Sturler's), in addition there is also an Austrian Grenadier battalion comprising converged grenadiers from three Imperial regiments. Lastly, we finish off at the top of the picture with some Dutch cavalry (1 squadron) and a final squadron of English cavalry (Wood's). The field artillery is to the fore, and two of the regiments have those very 'handy' battalion guns:

All of these have been painted since July 2006 when the project officially started... Next some closeups - first off, these are the Dutch cavalry (Nassau-Friesland) and Wood's:


Next a closeup of the Dutch Brigade - Goor and Beinheim behind, Sturler and the Grenadiers in front.. their victorious commander can be seen in front of the church behind, acknowledging the cheers of his men.. :o))


These are the "British" Brigade - the Guards on the left and Ingoldsby's on the right (one of the few English regiments to wear a non-red coat at this time), behind them are Orkney's and Meredith's. These guys were all in Fergusson's Brigade for the assault on the Schellenberg (though Orkney's were two battalions strong, so I have another to add)..


English cavalry - from the front, one of my favourite units, Schomberg's (the Black Horse, named after their usual regimental mount rather than the facings) with Cadogan's and Lumley's behind - these were in Wood's Brigade at the Schellenberg (with Wood's) but I've got a fair amount of painting still to do as most of these regiments had multiple squadrons in the field (Wood's and Schomberg's had 2 & Lumley's had 3!) and I still need to represent Wyndham's. Having said that I've already decided that the next unit(s) of allied cavalry will probably be Austrian Cuirassiers..


Finally an aerial view of the commander himself...
 

...and just because it was fun in the post on the French Army - some more video - took me loads of attempts this time as I think I was being too ambitious... having watched it, it looks like I need to oil the tripod as well as it's a bit jerky!!


=======================================================================

On a separate subject on a recent day off from work I completed the Dutch foot regiment Rechteren (they were brigaded with Goor/Sturler etc.) - I'll post separately once I've based them, but just for once I'm happy with the hat lace on these guys.... I think I may run a poll, "what's your least favourite thing to paint for wargaming figures/pieces?"...

Sunday, June 22

The Advance Guard..

...you may remember that DG was down this weekend, so we grabbed the opportunity for a long awaited game - the campaign is progressing nicely, and I have no doubts that within the next few days we will almost certainly have a major engagement, but not yet, so I took the opportunity to set up a game set in the War of the Spanish Succession using as many of the units I have as possible...

...whilst trying to figure out what the scenario would be though I had a quick flick through the Teasers (link here) and decided that the time was right to try the "Advance Guard" scenario...

..in summary - the scenario is about the advance guards of two separate armies both arriving in the same area at the same time, but with subtly different end goals.. if I start by showing the table top I'll explain further - please click on any of the pictures for a bigger view..


..over on the left in the middle distance is a town, in the bottom right corner there is a substantial bridge.

The advance guards arrive midway along each of the long sides, and have a primary objective of securing one of these features, with a secondary objective of also securing the other - needless to say primary and secondary objectives for each side are different, so in our game the French arrived from the right and had the primary task of securing the bridge, the Allies arrived from the left and had the primary task of securing the town.

..the clever bit of course is that each advance guard also has a secondary objective of securing the other feature - and you can't win the game unless you have both. Truly fiendish, as you are forced to juggle your forces to maximise your chances of winning the game - but there are many alternatives... of which more anon.

..in order to do this then, the Allies had:

~ seven battalions of close order foot (one of which was Guard), two of which had battalion guns - a mix of English, Scottish and Dutch units
~ three squadrons of cavalry (all English)
~ a medium field gun

..and the French had:

~ eight battalions of close order foot (one of which was Guard), two of which had battalion guns - some of these units were slightly under strength so as to balance the forces..
~ three squadrons of cavalry
~ a medium field gun

...the game started at 0900 "real time", and the scenario also allowed for the arrival of reinforcements from the main army from about 14:00 "real" time.. with my rules this would be after 30 moves (in the rules I use each move represents 10 minutes and allows each player to either move or fire, one player being the moving player and one the firing player - we then swap the roles for the next turn).

We used a simple mechanism - I had a roster comprising 3 additional units per side, we then three an 8 sided dice with the following possible results:

1. All three reinforcement units from now.
2. Choice of two reinforcement units in an hour.
3. Choice of one reinforcement unit in an hour.
4. Reinforcements do not arrive.
5. Choice of two reinforcement units from now.
6. All three reinforcement units in an hour.
7. Choice of one reinforcement unit from now.
8. Reinforcements do not arrive.

This would be done in secret so each of us wouldn't know what the other player had managed to get. We also agreed that units arriving “from now” could be deployed whenever the player wished, so it didn't have to be immediately if you wanted to keep your opponent guessing! The reserves would deploy on the table on the centre of the home players edge..

..the game would end after 60 moves - 19:00 "real" time. It sounds like a lot of moves, but I would say that DG and I can whip through the moves in less than half the time the move represents...

So some more pictures - this is the French force detailed to take the primary objective, these comprised DG's best troops, good infantry (3 battalions including the recently painted Lee's) and all his cavalry (3 squadrons)


..and this is the Allied forces ensconced within their primary objective already - DG and I diced for sides and I got lucky that my initial objective was largely within my deployment area.. saved me some time! These were Dutch infantry (3 Battalions & the field gun):


..this however, is the force I put together to try for the secondary objective - a fine body of men comprising all the cavalry and my best infantry - 4 battalions of English/Scottish infantry, one of them Guards, and one of them with a battalion gun..


...and this was DG's assault column - a subtly different approach as he had put his best men on the defence of the bridge, but he had bolstered the assault with a field gun..


..on to the game - if you look at the following it will help to explain where and how we each planned our attacks:


~ The British assault launched reasonably well once I'd managed to wheel my cavalry into line on the right flank of the infantry - the whole force then pushed forward. I have to say that for the whole of the game I never had any doubt about this attack - the sight of four battalions of infantry climbing the hill in the face of DG's cavalry never looked like it was going to be in doubt... in short order the infantry blasted successive cavalry squadrons out of existence with (quite fantastically lucky!) dice throws:


..and Schomberg's (the "black horse") saw off one of the others as seen here - you can see that DG's cavalry are already "shaken" (the yellow pin):


DG had placed Navarre across the bridge to hold it - his best infantry - and the river was impassible except at the bridge, in fact it looked like DG had an almost impregnable position there..

~ meanwhile, I was getting distinctly worried by the way his assault on the town was moving forward with great purpose..! I had moved to quickly occupy two of the buildings, but had left one of the battalions as a reserve in the event they were need to plug holes or support one of the other units. The field gun soon opened up on two of the battalions and scored some much needed casualties, slowing down the attack. To be considered to have taken the town DG had to have no enemy units within a line march distance of any part of the feature, so I thought my position was quite good - nothing like brick walls to break up an attack, but then he started to deploy his field gun, and then occupied part of the village himself! The reserve battalion deployed to attack one of the French battalions coming through the wood (see next picture) - and this soon led to the first melee of the engagement which was successful, but casualties from musketry soon caused a morale check and they routed... this was the low point on this flank.


~ on the other flank the infantry advanced up the hill and cleared away the French cavalry with superior musketry - I deployed one of the battalions to keep an eye on the remaining squadron, the other three battalions and two of my remaining squadrons (Schomberg's had broken following a defeated charge on one of the French battalions) then went to attack the two French battalions 'this side' of the bridge.. a successful charge by one of the cavalry squadrons supported by one of the battalions of foot saw off the Wild Geese and subsequently the other battalion - it was a cavalryman's dream, and you could almost hear the swords clearing the scabbards as two squadrons of England's finest began to salivate....! See following:


..and that was mainly it for that flank - I tried an assault across the bridge with the Guards, but as I was only able to deploy one base wide on the narrow bridge, DG was able to deploy two overlaps and pushed me back... keeping my foot to guard against any incursions or the possible arrival of reinforcements, I sent the cavalry back to the town - I need to finish the battle there, as I needed that field gun!

~ surprisingly, things had turned round here - the routing unit recovered, and firing from the units in the houses was surprisingly effective. Priority targets were DG's assault units in the open, and in the end the cumulative casualties were enough to see those two units off. I then switched targets and with the assistance of the field gun saw off the other two and the gun..

~ things were not looking good for DG, and as midday had arrived we diced for the reinforcements - DG succeeded in getting all three units immediately, but in light of the fact that I had got a "two units now" result, decided to finish the game there and give me the victory...

Post match analysis:
  • First off I think we'd both agree that the game was an enjoyable one - though I suspect DG was less than happy with the monumental dice throwing we saw when some of the Allied units were firing! Having said that DG also had his own way in the melee's..
  • We had a concern afterwards that maybe the Allied musketry was too powerful - I give a +1 to Dutch and English units for the benefits of platoon firing which most of my reading indicates was more effective. Having discussed it though, the effects of the high dice throws would have resulted in the same result whether they'd had the +1 or not. What I think did make a difference was the strength of the allied units - you may remeber that in order to balance the sides the Allies had less units of greater strength - the effect of this (with the +1) was that Allied units remained effective for far longer - this was an error on my part in balancing the scenario..
  • The scenario is quite fiendish - talking about it afterwards both of us came up with a couple of different approaches - I wish I had pushed forward faster with my Dutch troops in order to stop DG's units occupying part of the town, but having said that there were more of his units than mine, so would I have been less succesful in the open?? DG said that one of the options he considered was putting all his units in defence of the bridge and playing for the draw - all things being equal, and me being an aggressive bugger I would have attacked, in such a strong defensive he might have been better able to beat me in detail before then going for the town?? Bottom line - lot of options..
  • For those of you who care about such things - the tea was Twining's Everyday and I pushed the boat out on the biscuits with some Oat Crunch's from the local farm shop..

Wednesday, June 18

French Army review...

As requested by Bluebear Jeff and because I'd reached a natural break following the completion of the Lee's Regiment, I decided to hold a review of the French army to see how my recruits were holding up, and whether there was any gaps that needed plugging..


I'm pleased to say that as you can see above, they are looking pretty good... as a reminder, these guys (and their Allied opponents who will be subject to a separate review) have all been painted since July '06...


...they currently stand at nine battalions of infantry, five squadrons of cavalry, 2 pieces of artillery, and various battalion guns, officers, and transport per side..


...from left - Navarre, Toulouse, and Lee (with battalion gun deployed), Bavarian Cuirassiers at bottom of picture... various command figures, and ammunition wagon also feature...


...closer view of HQ surrounded by his staunchest regiments.. units as before with the addition of Bearn (upper right)

...so, last of all, and pursuant to the topic of conversation on Franks blog recently, about camera manuals, settings, and the need to peruse said volumes - I happened to notice this funny button on my camera and started playing....


Finally, word reaches me that DG is on the road, and we have a game lined up for Sunday - more news on this as the day approaches...

Saturday, June 14

The Wild Geese have landed... Lee's Regiment

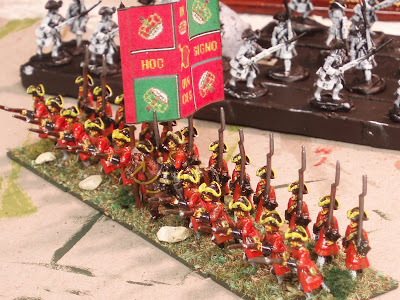
..you may remember a few posts back that I was waxing lyrical about the Irish regiment that Phil Olley featured in his last update. As is often the way with other peoples well painted figures regiments, I'm so enthused that I feel duty bound to go off and have a go myself even where it might not actually fit in with the overall plan for the period or project they feature in... ..for my the War of the Spanish Succession project I'm painting units that were present at the assault on the Schellenberg - purely because there were fewer units there than at Blenheim, so it's a more attainable goal. I've deviated a couple of times though, firstly when I was totally enamoured of a regiment that featured in Wargames Illustrated and felt the need to paint the Royal Italien, and this is the second time. Neither regiment was present at the Schellenberg, but who cares - they're my army... ..anyway back to the latest regiment to join my collection. The "wild geese" was the collective name for the Irish regiments that fought for the French in the various wars of the 18th Century - this regiment represents Lee's. ..according to "The History of Ireland, Ancient and Modern" By James MacGeoghegan (which you can read on Google Books here)
"Louis XIV having sent seven French battalions to Ireland in the beginning of the year 1690 whether that he required the same number of Irish troops in return or that James II who was at that time in the country thought proper to send them three Irish regiments arrived at Brest in the be ginning of May on board French ships under the command of Justin MacCarty viscount Mountcashel a lieutenant general in England and who still retained his rank in France. The regiments composing this brigade were Mountcashel's an old regiment of long standing O’Brien's and Dillon's each consisting of two battalions containing one thousand six hundred men divided into sixteen companies. This corps was sent to Savoy where they distinguished themselves under Marshal de Catinat in the reduction of that province particularly at the battle of Marseilles gained by the French on the 4th of November 1693."
..on the death of Mountcashel his regiment was given to (Andrew) de Lee in 1694, who until then had been colonel of Clare's - and as was usual during this era the regiment took his name.
...I would wholeheartedly recommend a visit to this site (click here)for more detail on the regiments (fantastic website by the way). From this site I found out that Lee's were present at both Hochstadt and Blenheim. Certainly by the time of Blenheim, Andrew Lee was a major-general and there is a reference to the regiment passing to N (Nicholas??) de Lee - presumably a relative?? More research to do there I think... Under Nicholas the regiment went on to serve at Oudenarde, Malplaquet & Denain. Anyway - this is them - all Minifigs with the exception of the officer who is a Dixon - yes I know he has a carbine over his shoulder but I like him because he looks like he means the business... he represents all those Jacobite minor gentry who provided the officers for these regiments, almost certainly in this period of Irish ancestry, a supporter of James but serving Louis XIV, he's been fighting all his life against the British, he was a part of the 'flight of the wild geese' on the 3rd October 1691 when William finally defeated James following the Boyne and 14,000 Irish soldiers went into exile... romantic, but I imagine a hard life.
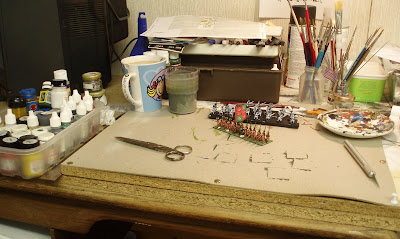
Lat of all - a scene of the crime - this is the painting table.. in the background are the next regiment on the chocks, these have been undercoated black, and have had the damp brush of white. They are destined to become Regiment Rechteren (or Wilcke depending on your references) a Dutch regiment of foot in the service of Marlborough... the tea is Twinings "Everyday" by the way!

Thursday, June 12

Found him!!! Move 29 - 32 (12:00 - 15:00 - Day 2)

12:00 to 15:00 - Day 2..

...usual reminder the campaign map is to the left (click on it and any of the other pictures in this blog for the usual bigger view).

..you may remember if you've been following this extended "paint drying" session (are campaigns the wargaming equivalent of cricket - only interesting if you're actually playing?!) that the decision to put the cavalry "in harms way" reaped some swift rewards in the form of finally finding his vedettes, to the west of Carnine, but that I hadn't yet found his main force...

...with my absence at Disney, I had time to ponder on the difficulty I was facing, but then had a brainwave (I blame it on the third ride on Thunder Mountain which I think must have jangled my synapses). I had the thought that it didn't make much sense to have your army north of a cavalry screen running north-south, it made far more sense if you were west of the screen... so on my first turn on returning I ordered the cavalry to Camsix.. and am pleased to say that I've found him!!

Here's the recon report from that half squadron Lauzun's Hussars that I ordered to Camsix..


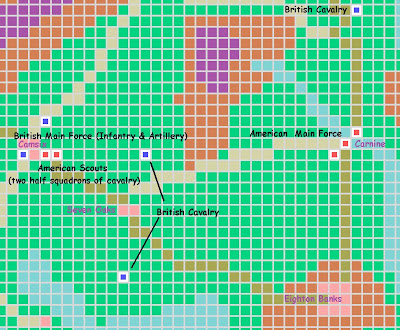
..and that allows me to update my master map to show exactly where the British are..


...I now have (or rather "had" as I've already made my mind up) two decisions to make - what to do with the scouts, and what to do with the main army.

The first one was easy - I'll pull the scouts back towards Carnine gradually - making sure that I continue to shadow the main British force. The second one is slightly more difficult, but only for about 30 seconds - the army stays put - and as soon as the messages arrive, I'll start fortifying that side of the town....

...more anon...

Friday, June 6

Review - "Englands Fragile Genius"

..I have to say that one of the major reasons it's been so quiet round here over the last week is not so much the family trip to Eurodisney, as the fact that I've had my nose stuck deep in the new book on Marlborough by Richard Holmes...

..I guess I need to set my stall out straight away and state up front that this is the best book of his that I've read - it even exceeds "Redcoat" which I thought was inspired. The depth of detail is amazing (seven pages of bibliography!) and Holmes has drawn heavily on Marlborough's private correspondence in addition to all the expected primary (Parker, Merode Westerloo, etc) and secondary sources (Chandler, Tincey, Falkner among many others) to draw up a picture of a very complex "genius"..

..he was married to a nightmare but loved her deeply, showed enormous compassion for his men but never flinched from ordering them into the breach and the bloody assault (Schellenberg for one), was notorious for his ability to gather cash and favours but was never less than wholly supportive of his friends (his relationship to Godolphin was a good case in point)..

..Holmes is best when he's talking at the soldiers eye view and this one is no different - his primary sources are well used to give a good view of what it was like to serve, and fight, with "Corporal John".

..Marlborough waged ten successful campaigns, besieged over thirty towns, and never lost a battle or a skirmish - the book is a fitting tribute and I recommend it wholeheartedly...

Monday, June 2

May totals...

...and there went May - another busy month for yours truly though it wouldn't seem so from the numbers of posts... family life impinges every now and again!

..either way I'm just back from taking my lot to Disneyland Paris - yup - not very wargame related, though I did get some shots of the green army men in the Disney parade which I'll share if you really want to see them! J

..so, like April, May was good too - the highlight was undoubtedly the publication of Richard Holmes's book on Marlborough which I'm about 90% of the way through and will review more completely once I've finished it - suffice to say, if you have an interest in the period, this volume needs to be on your bookshelf next to Chandler, in my view - absolutely un-putdown-able....

...otherwise - not too much painting done - just 24 points this month, but I'm keen to get to the painting table as I'm wholly enthused by the sight of the Wild Geese on Phil Olley's website (which is they in the picture to the left - click on it (immediately) to go to Phil's site to see more of them and other of his regiments - mouthwatering!) so they are next on the painting schedule... once I've done them, I can then turn to some more cavalry, I have it in mind to do some Austrian Cuirassiers to even up the scales that because of the two Bavarian Cuirassier squadrons currently tip in favour of the French at the moment..


So - how did the blogs do this month?


Again, amazing really, and once again many thanks to the people who condescend to read my drivel! J