Thursday, September 27

French castles... and the Black Falcon

...one final post on things of interest from the holiday this year..

..in the second part of the holiday we moved north into the Loire valley for a few days. With the lack of any battlefields to visit with the possible exception of Poitiers which I have as a possibility for a later year, my thoughts turned* to the other thing that the Loire is famous for (apart from wine), and that's chateaus...

(* well leastways they do if you're a wargamer... it's almost a disease... does everything and anything have a wargaming possibility??? I suspect it does!)

...now my wife & spuds are great fans of the picture postcard Chateau's of which there are literally hundreds in the Loire, and while I prefer the more "military ones", there's plenty to choose where both parties are happy... bliss! The following couple of examples were enjoyed by all of us for quite different reasons, but the common link is a gentlemen nicknamed the Faucon Noire, or Black Falcon, Foulques Nerra the Count d'Anjou. Now this guy had an interesting life!

The first castle to feature is Montbarzon (named after the town where the castle is built) This was probably one of the first stone castles ever built in France if not Europe as before this place was built they were mostly wooden, and seasonal - the local warlord would build one at the beginning of the campaign season and take it down at the end.

Montbarzon is one of a number built by the Falcon as part of his dispute with the Counts of Chartres-Blois, and an ongoing campaign to take the city of Tours which they ruled.

The castle was one of the first of a string of castles he built round their lands and was completed in 994. The Counts of Chatres-Blois then promptly captured it in 997, and Nerra didn't re-capture it until 40 years later, before eventually dying shortly after in 1040.

The keep is 28 meters high, and when originally built was just a simple rectangular building.
The keep was then transformed into a much bigger fortress by the Falcons son (Geoffroi Martel) and Henry II, the king of England (Henry Plantagenate, who also happened to have Normandy within his remit at the time - hence the involvement). Henry added the round tower on the left of the picture in 1175

In 1791 the interior floor collapsed and in 1794 part of the 100ft-square tower was torn down by revolutionaries. Three years later, it was hit by lightning - which is the big crack on the front of the keep. Later, between 1823 and 1852 the castle was used as a relay post for a mechanical semaphore system which could - on a clear day - transmit a visual message from Paris to Bordeaux in less than 10 minutes . Following the arrival of the electronic telegraph in the 1850s, the contraption was taken down (you can still see the reamains in the picture to the left, on top of the keep)and the statue mounted in its place. This depicts Mary & Jesus and was paid for by the wife of the Emperor Napoleon III - and very striking it is!

The second castle was not nearly so complete - this is Langeais which most people these days visit for the considerably more modern chateau built int he 16th or 17th Century. Much to my wife's disgust, of course, I was more interested in the remains of the original keep "out back"... J


Once again Langeais this was built by the Falcon as part of his ring of castles round Tours.. same style and type - but considerably less well preserved!

The map following - which you can get a better view of by clicking on it shows the positions of the two castles in relation to Tours - Langeais is to the right (west), and Montbarzon is on the junction of the roads in the circle to the south..


..and that's it for France this year...

..thoughts now turn to the weekend - and I think it's time to start in with the paintbrush again. I've got the second unit of cuirassiers/heavy's to paint for the WSS - I can't find any references to the Danish cavalry wearing the pot, so I'm going to go with another of the Bavarian Cuirassier regiments.. the new figures I bought at Colours (enough to make two regiments) will both join the forces of the Empire so as to even the inequality in numbers! I'll also get some comparison shots of the Freikorps compared to the other makes I've bought.. should be a fun weekend!

Monday, September 24

..."Take These Men"...

..the title of the post comes from a cracking book by a guy called Cyril Jolly, who was a lieutenant in the Royal Tank regiment in the western desert during the second world war. The book documents his experiences as a tank commander first in captured Italian tanks, before he is re-equipped with the Honey (a.k.a the Stuart) and eventually the M3 (Grant variant) - an excellent read as it gives a really good feel for what it was like to be in command of tanks in the heat and sun of the desert, and fighting Rommel's finest... I only mention it as it's a really nice introduction to the game we had on Saturday evening, which as per my last post was using Blitzkreig Commander, and funnily enough was set in the desert (there's the link!)

Being a first game I put together opposing battle groups of only 500 points - basically three sections of infantry (with transport), attached MG and anti-tank gun supports, and a separate troop of tanks to beef up the assault... to do this I used the "battlegroup generator" on the Blitzkrieg- Commander site. I'm not a fan of points systems as I usually like the offbeat, unequal tussles, that an objective based game can give, but what I like about the generator is that it creates a printout that has all the vital statistics and notes, specific to the units you have selected - everything you need on one sheet of paper - it's brilliant!

Table was set up as above - figures are N scale (12mm) so it didn't need to be huge - this is four foot square, but lots of terrain features to break up line of sight - when you don't have the typical hedges, tree's and vegetation of a European battle field you use hills/dips instead as follows.. double height hills were "dense terrain" (soft sand in this instance); all hills, rock features, and palm tree's block line of sight...
Germans set up on the left of the above (red), British on the right (blue) - we used alternate setup, placing command units in sequence - once these were done we then completed deployment of the units.

When this was finished we ended up with a nice asymmetrical line up - always a good sign as it makes life difficult from the start!

DG (playing the British) had his infantry and direct supports in 1., and his tanks (three Matilda II's - see above right) in 2, with his HQ between the two. I had my infantry in 2., and my tanks (2 Panzer II's and a short barrel Panzer 3) in 1.

Having won the initiative I moved first, and on turn one managed to make enough command decisions to get my tanks moving towards the cover of the rocky outcrop to their front (see right), and to get the infantry moving towards the ditch (see left).. DG wasn't quite so lucky an blew his command roll on the first turn whilst trying to get the Matilda's moving...
 
{Blitzkrieg Commander uses a die roll mechanism to issue orders - a command unit has a numerical value based on it's quality, the higher the better, every time the command issues orders it throws dice trying to get under this value - it can issue multiple orders to the same unit, but every set of orders it issues reduces the command value by one... so it gets harder and harder to build up an attack..quite clever...}

The German infantry attack on the left was brought to a screeching halt by the British MG - this caused a radical re-think on the German side and in the end I attacked with the infantry through the major rocky feature in the middle of the table. I sent my transports and supports to the right, around the back of this feature, and ordered the German support MG into the rocky terrain that the tanks were deploying around..
 

On the other side of the table the British infantry deployed their supports almost immediately so as to bring them into action as as possible. The British AT gun ( a 2Pdr) in particular opened up on the Panzers as soon as they came within sight (range was never going to be an issue!) but without any immediate success - though it did manage to shake the tank crews up a bit..!

The major damage to the Germans was caused by the determined advance of the British Matilda's who came over the hill and opened up with their 2 pounders.. fairly soon one of the Panzer 2's (labelled no. 9 in the picture above) was burning merrily...

Not surprisingly, German counter fire against the Matilda's was not good - their massive armour kept them safe, and the remaining Panzer 2 withdrew to get flank cover from the rocky outcrop - the German armour kept up a steady fire on the British ATG, and managed to keep it's crews head down for most of the game..
 

...time for a tea break (literally) as the German commander decided what he needed to do next..

...what turned it for the British (must have been good tea!) was getting their Matilda's to a point where they could concentrate fire - very soon both remaining tanks were burning, but not before the famed Afrika Korps infantry dealt very summarily, firstly with one of the Matilda's {infantry at close quarters are deadly in this game!},

and then with some of the British infantry that had deployed on the hill to their front... when they also managed to get their MG into action, the British infantry began to take serious casualties, but it was at this point the game ended - 

see above for a final view of the battlefield with the German tanks burning in the foreground..

Post match analysis
  • ...first things first - we both agreed it was a good game - and those expectations I spoke about were (largely) met, basically I'm already putting together shopping lists and thinking about the next game - a plus!! J
  • in scenario terms it was a very narrow German victory - which is nice - but I would suggest it was probably more a draw..! Very expensive for the German they lost all their armour...
  • the rules are different, but as it said on the packet, once we got to grip with the mechanics, we fairly whipped along, and played the full eight turns - minimal modifiers, and generic mechanisms made a lot of the rules fairly intuitive - on a couple of occasions we made decisions in the game, that when we went to check were exactly as documented.. a good sign..
  • the only section we had a problem with was the close combat section - having checked the web site today there is an extensive amount of informaiton to explain how it works so I'll print that down and have a careful peruse..
  • we liked the firing which is a simple but effect mechanism of three sets of dice - first to hit, second for saving throw, third for morale effect if any hits remain... brilliant... and only four modifiers which you can easily keep in your head after a couple of run throughs..
  • ..onwards and upwards - the next game will feature some artillery - a major staple of any WWII battle, but left out of this run through to keep things simple..
  • for those who like the detail, the tea was Twining's "Everyday" ("a wonderfully well-rounded tea ... refreshing and full of flavour" - can't argue with that...) the biscuits were Digestives ("The undisputed king of the large diameter biscuits, this is truly an iconic biscuit" - can't argue with that either! J)

Saturday, September 22

Bayonne, and Blitzkrieg Commander beckons..

As promised when I got back from holiday, I have some pictures from Bayonne which was the site of the siege and battle at the end of the peninsula campaign in the Napoleonic wars.

The visit was a bit of a wash-out if I'm quite honest, quite literally in fact, as it poured with rain, and the part of the fortifications I wanted to visit was off limits due to still being in the French armies hands!
 

Bayonne was considerable fortified by Vauban the French fortification expert (see map aove which shows it clearly), and the city is situated either side of the river Adur

I took the family for this trip as the spuds were both cabin weary following 3 or 4 days of rain and had holiday euro's burning a hole in their pocket, and we had a good look around the town to the west of the Nive which divides the main town in half (so bottom half in the map above) before the rain finally drove us indoors.

The scene of most of the fighting was against the fortification on the other side of the river though (marked as the citadelle on the map), and unfortunately, although you can see it, you can't visit it - very definitely off bounds - and I wasn't sure I wanted to be seen taking pictures, so the picture to the left is from the excellent fortified places website (as is the map above)

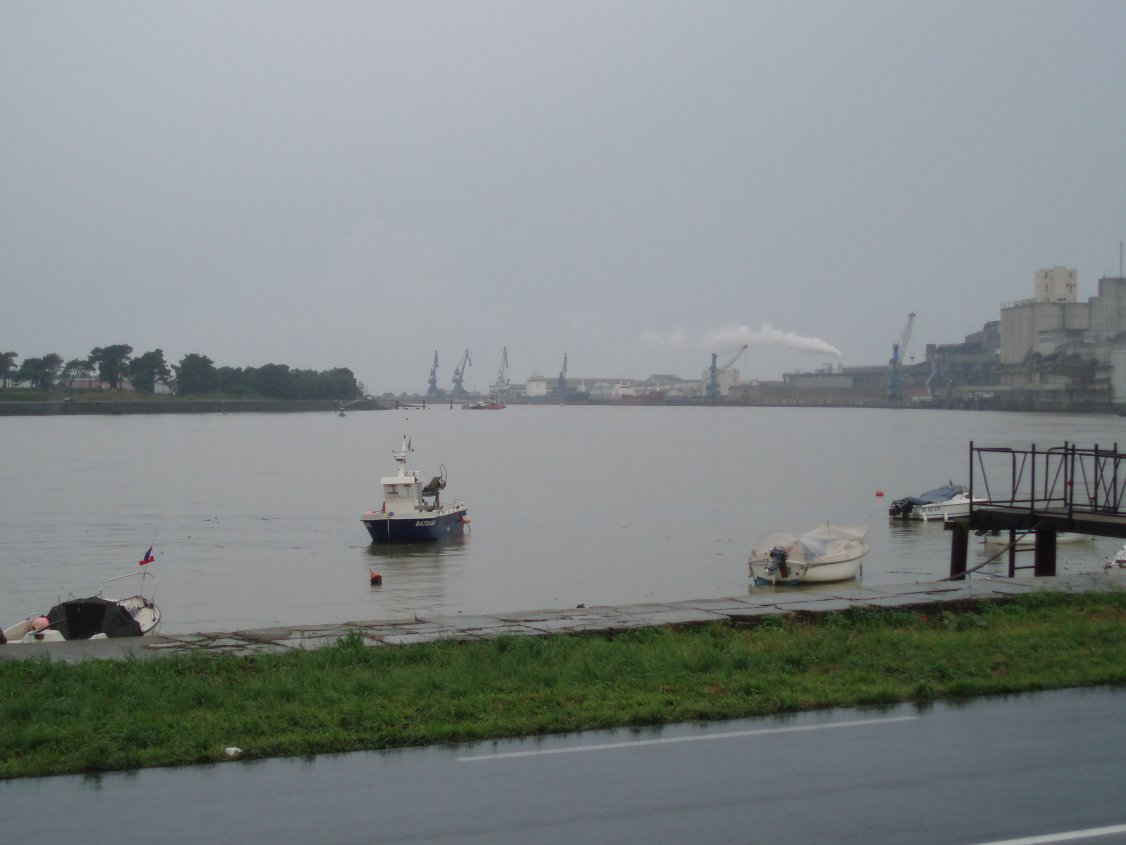
I did manage to locate the crossing place for the bridge of boats that Wellington used to get his army across the river, however, and I was agreeably surprised at how wide the river was as in my minds eye 500 yards wasn't that far. If you look at the pictures though you can see it's quite a distance, and if you assume the water was deep (the size of the ships currently using it are considerable but I guess there's been some dredging in the interim) then it was quite an engineering operation, and hats off to the Royal Navy...!

The shots are taken looking towards the mouth of the river - the remains of what were considerable woods in Napoleonic times are still fairly clear on the other bank...


Hope that was of interest - tonight DG and I embark on our first Blitzkrieg Commander game - it's almost impossible to say before the first play through of a set of rules how the game will turn out, but my initial thoughts following a week of reading the rules fairly closely is that it has high possibilities..

My first WWII gaming was in 20mm using Airfix and set in North Africa, I returned to the North Africa theatre a few years ago, but the scale was changed to the new N scale/12mm Minifigs range - which are absolutely exquisite, but unlike the first time round where I had some glorious free for all games using Featherstone/Grant rules (attack values and defence values anyone?!) I was looking for something a little more complex, but not too complex... I've rejected
  • Rapid Fire (lovely pictures, but abstracted to the nth degree and not enough detail),
  • Command Decision (comes in a box with a million manuals - need I say more!),
  • Firefly (came closest, but just too complex without a computer player assistant program),
  • Crossfire (tanks and armour are an afterthought),
  • Spearhead (can't remember as this was a long time ago, but I think I just didn't like the speed of play)
..and I even wrote my own before I gave them up as not giving the flavour and level of complexity I wanted! So the expectations are not high - more later on how it played...

Monday, September 17

..Colours '07 & Don Featherstone!

...yesterday (Sunday) was COLOURS at Newbury which is one of the major UK shows, and I have to say one of my favourite weekends of the year.

The show is hosted at Newbury race course (ie. for horses), where the show organisers take over the main stand and use all three floors for exhibits/traders and games. It's a huge improvement over the old venue (the Hexagon in Reading) as the stand is covered in glass (being a race course the punters like a good view!) so the lighting is excellent...

There's been a few "so-so" comments on some of the news groups I frequent but I thought it was an OK show this year - definitely not a 'best' year, but certainly as good as previous years. In my view the show has always primarily been a trade fair, they do have competition games and some display/participation games but when push comes to shove people are there to spend money with an excellent array of traders.. so what did I spend my money on, and what caught my eye? Well:
  • unlike usual I dropped £10 off on some rules within a minute of arriving! I'd been reading about them on the Miniatures Page, and they're for a top secret new period that I'm currently thinking about... more posts later as the project (hopefully) develops. I don't know, the more I hang around the guys at the Old School Wargame group the more enthused and open I become to starting up new periods at the drop of the hat - this is a new one, I know the scale I want (15mm/regimental), but unlike my usual approach (buy and paint lots of figures then look for some rules to use) I'm going to find and try the rules first (using cardboard counters to play the games)..

  • I also bought "Blitzkrieg Commander" from the guys at Minifigs I'd been following the various discussions about these rules on the web and they sounded just the job - initial perception is that they do read quite well and I'm more than a little interested in getting some of my sadly under-used WWII hardware out on to the table... more on this anon, but my regular opponent Darrell, is down for a visit this week and having discussed the possibility of a game this weekend, this may be the option... b.t.w, lovely production, lots of good examples, pictures, supporting information...

  • a show wouldn't be a show without some little metal men wending their way to my painting table, and on this occasion it was some cavalry for the War of the Spanish Succession - regular readers will know that my absolute favourite figures are the Dixon one's, but that they cost an arm and a leg. I found some that I have high hopes for from Freikorps 15 (these are sold in the UK by QRF) stand - I'll take some comparison pictures soon and put them on my project page..

  • I also got some additional baggage camels, and another two screw guns from Mr. Pig for the Sudan collection. I plan to load the camels with bits of screw gun to use as a "limbered" version of the gun...

Saving the best to last however, I also got to meet Don Featherstone which was a real pleasure for me... some of you may remember that I missed seeing him at Salute earlier this year which I was really gutted about, but happily, and to my immense gratification, I got to meet him and shake his hand yesterday at Colours. A real honour as he was undoubtedly the source of this interest in military history, and wargaming, which I've now had for the better part of 35 years... trust me, I was very definitely chuffed! J

Not too many good looking display games but the following caught my eye and had me reaching for the camera (the other pictures above by the way, are a couple of units that were in the painting competition - absolutely breath taking, I especially liked the Napoleonics).. this was a 54mm Pacific WWII skirmish game on a GRAND scale put on by the "Skirmish Wargamers" and represents the invasion of a fictitious Pacific island in 1944/45.


..hot dry desert sands.. post match analysis

...so with the game all over bar the shouting (and those questions in the house!) what were my initial thoughts on version 1 of the Sudan rules.... plainly some things went contrary to what one would expect to have happened in the Sudan in this era of warfare, or at least what my limited reading (so far) would have me believe happened, and in essence I will be making two major changes to the rules:

Small arms - all the reading I've done has indicated that the majority of Dervish attacks would be stopped/turned away as a result of concentrated small arms fire up to 200 or 300 yards out. There were some occasions when this didn't happen, but the norm was that it did - what I found in this run through of my rules was that the small arms ranges were far too short, an oversight on my part when I cobbled the rules together from the various sets I used as input, so I'll be increasing mine forthwith...

Reaction tests - the reaction tests in my rules were lifted directly as is from "Pony Wars" set, and thinking about what happened afterwards I think that on the whole they are not 'aggressive' enough - my reading would indicate that the Dervish would come hurtling at you the moment they scented an opportunity to get to close quarters, and in some cases even when there wasn't! On the other hand my assessment is that the average plains Indian, while undoubtedly equally brave, was more a skirmisher than a close quarters fighter.. there are a number of "withdraw to skirmish range"/"withdraw to cover" results in the reaction tests which would seem to bear out this view, so over the next few days I'm going to go through the tests and generally increase the number of 'aggressive' actions.....

All in all then not an unmitigated disaster (though the British commander might think otherwise!) but some clear modifications required, and I'm now looking forward to the next game...

Saturday, September 15

..hot dry desert sands... last part

..and so we come to the final installment of this first colonial adventure - definitely some food for thought in the following as you'll no doubt see!

You may remember that we left the last installment with the British facing a potential threat from Dervish foot to their left, and cavalry to their front (see left..)

To counter this the British commander ordered the Egyptian cavalry to charge home on the Dervish cavalry – there was no reason to assume that this would not be satisfactory given that they were already shaken from the previous small arms fire, and they were a threat to his continued advance.. true enough they withdrew rapidly towards the other Dervish units (rule explanation: the Dervish tested to see if they would stand the charge, but got a "withdraw to nearest friend" result from the relevant reaction test)

The British commander also ordered the mounted infantry to dismount and open up on the Dervish foot on the hill to their front.

In return the Dervish open up some sporadic, but ineffective, small arms fire (rule explanation: the Dervish have a number of modifiers limiting their small arms ability!)

In face of the determined advance by the (now dismounted) infantry - further Dervish units become
revealed (rule explanation: cards turned over in terrain features 5, 6 & 11)
, and some of these Dervish foot (at 5.) immediately start charging towards the Egyptian cavalry.. (rule explanation: all these units test for first sight of the enemy, and the unit in question got a "Charge!!" Result (12 on 2D6 will do that!))


The Egyptian cavalry fired on them and caused enough casualties to stop them in their tracks, but things were looking increasingly fraught (a number of reaction tests for the Dervish units recently revealed lead to them forming together into a far bigger group) and they charged home on one of the units of foot..

In the meanwhile the Imperial infantry deploys into line and covers gap between the two hills – their flanks are covered by hills, but the British commander curses his slow progress..

The mounted infantry fire has caused the Dervish to go to ground in the rocky ground, but are later seen to be moving fast towards the river (failed morale test resulted in a "shaken" going to "suppress")

Things were going from worse to worse for the Egyptians (see left) - their commander was beginning to wish that he'd withdrawn earlier! Three separate Dervish units were now threatening them when all of a sudden they all withdraw (three separate reaction tests – one "withdraw to cover", two "withdraw to small arms range" results!)

Elsewhere, the mass of Dervish foot on the right start to charge towards the imperial infantry. The Dervish cavalry continues to withdraw to friends in 7. in the face of continued aggression from the Egyptian cavalry...

The mounted infantry advance towards the rocky broken ground with the intention of winkling out the Dervish but come under concentrated and accurate fire – causing significant casualties, and causing them them to break, and eventually run (a particularly unlucky set of results lead to them losing 2 strength points from the Dervish rifle fire, and they then failed two successive morale tests causing them to rout) from the
enemy! Questions will be asked in the house....

British infantry charge the massed Dervish foot but only half the assault goes in (the Sudanese infantry were shaken, and therefore unable to advance, by rifle fire from one of the Dervish units) – the Imperial infantry smack into Dervishes but are in turn routed!!
(Another very unlucky set of results - the Dervish tested successfully to charge home, and in the ensuing melee throws 5 to the British 2 on a D6, which with bonuses equates to a delta 5 difference ie., lose 2 strength points and rout in these rules, and probably anyone elses!)

In the face of continued/concentrated fire, and with a number of units routing or shaken, the British commander decides to retire, and leaves the field to the Dervish - at least for now!


In the next post I'll give a post match analysis - but this definitely didn't turn out as I expected it to... J

Friday, September 14

..hot dry desert sands.. part 3

..so we pick up where we left off in the last thrilling installment (it's a bit like having to wait for the next episode of Batman when we were kids, somehow at the time you never knew whether he was going to make it, despite the evidence in every program up until then!)

Anyway - realising that he couldn't totally ignore the Dervish (spot on Jeff - we were thinking as one!) the British commander detailed the Camel Corps company to cover off the Dervish, ordering them to halt just outside of small arms range, these Dervish again showed no sign of movement, but if anything appeared to be edging away from the encroaching British (rule explanation: all fairly straight forward up until now - the Dervish move was a s a result of the next reaction test they had to take which this time resulted in a "withdraw out of small arms range" result)

In the meanwhile while he pushed the Egyptian cavalry forward into the gap between the two hills - in order to get a better view of any enemy who up until then were blocked by the line of low hills. The cavalry troop commander obviously blinded by sweat and dust is unable to see anything (rule explanation: he was beyond the automatic spotting distance so tested to spot enemy in cover - he threw spotting dice for ambush spots 2, 12, 6 & 4 respectively but didn't get the required results) but was somewhat alarmed to hear the drumming of Dervish drums and soon saw Dervish foot appear from the oasis (12.) and the hill (6.) to his front - what was slightly more worrying was that a unit of Dervish cavalry charged out from behind the area of badly broken ground (4.) with every sign of wanting to cause some mischief (see picture)

(A lot went on here - but in summary, we got to the end of the British move, and in the Dervish move, I decided to place any units that were in the terrain features the British had previously unsuccessfully scouted - no reason for this other than it makes it easier to track who is where. Turning over the cards showed nothing in 2, but two units of foot in 12 & 6, and the rifle armed cavalry in 4. I then threw reaction tests for all the Dervish units thus deployed using the same tests as previous - "first sight of an enemy"/"double their strength" - the two foot units ended up on hold orders, the cavalry threw an 11 (on the 2D6) and got a "advance to small arms range" result)

The Egyptian cavalry commander ordered his men to open fire and was gratified to see a number of empty saddles appear amongst the Dervish horse, but is less happy with the fact that this doesn't seem to have stopped them in their tracks.. (small arms fire is pretty straight forward, the Egyptians threw high enough to cause casualties, which also resulted in a one stage drop in the Dervish morale - "good" to "shaken" - and also required them to take a reaction test as a result of the casualties. This they passed..) ..and the Dervish have not been driven off (see picture)


Things are hotting up for the British... more on which anon..

Half time analysis: The rules seem to be OK - I'm very pleased with the way the reaction tests are working which up until now have given extremely believable results.. The thing I like most about them are their flexibility - if I get a problem come up where I need to make a decision I use one of the several reaction tests.. they're kind of a core component of the rules, so for Snickering Corpses who asked for a little more detail on them I'll summarise - there are seven tests and these cover off what the Dervish will do in a number of situations - appearing on the board for the first time, after receiving casualties from shooting, on sighting previously unseen Imperial reinforcements, on losing a melee, on first sighting an enemy, when current order runs out, etc. Often more than one test can apply (ie. whether the enemy you've just spotted is in cover - one test - or not - another). You then throw 2D6 and there are that many possible responses to the situation... I would thoroughly recommend grabbing a copy of "Pony Wars" - they're still in print, not expensive, and worth the money alone for the tests, which I think could be re-used in a number of periods.

Thursday, September 13

..hot dry desert sands.... part 2

...the game has started, but rather than saving up the whole narrative for one large post I think I'll put up separate posts based on each playing session, as I'm playing the game as an when I get little "parcels" of time...

Either way - having diced for their arrival, the British arrived on the board at entry point 2. (shown in blue on the following):


They deploy with the Egyptian cavalry (in line) first, followed by Camel Corps (also in line), and then the two companies of infantry in column (see picture).

Spotting distances in the rules immediately required that anything deployed in 1/. (in red on the map above) should be seen as the British had entered the table almost on top of it, but when the card was turned over it was found that the hill was deserted...


(Rules explanation: I use a set of spotting rules I found in a WWII set - this allows for automatic detection at very low distances as was the case here, and in the open, but a D6 test to see units at longer distances and where units are hidden)


The British commander ordered his cavalry forward towards the empty hill 1/. while at the same time carefully scrutinising hill 3/. through his binoculars (ie. he rolled a dice to see if he could see anything on the hill - the other terrain features, while within range, were blocked line of site)

Here he could see some movement (successful roll) and when he looked more closely he saw Dervish foot hidden in the rocks on the hill (turned the card over and found that it was Dervish foot - unit no. 3 who are rifle armed. These were deployed on the table)


The Dervish were out of firing range, but showed no signs of advancing on the Imperial troops, seeming content to sit and watch (when the Dervish were deployed I decided to do an immediate reaction test for them, as this was the first time they had seen their enemy. The test has a specific set of results for being significantly outnumbered - which they were - and the result of the test was "Stay put and do nothing this move. Test again next move. ")


The Imperial commander now needs to decide what to do - drive off these Dervish, or ignore them, and move on... to be continued, so far, so good..... J

Wednesday, September 12

..hot dry desert sands.... part 1

...after much painting, planning, writing and cogitating I'm about to set forth on my first ever Sudan game - imaginatively titled "Desert Skirmish" this will be the first run out of a subset of my painted output, and is mainly aimed at testing the rules I've been working on for almost 6 months now.

The rules are based on those used by the great Peter Gilder, who used a set of his own which in turn he based on a set called "Pony Wars". "Pony Wars" were a set of Wild West rules that aimed to represent the Hollywood style battles between cavalry and Indian, very definitely 'fun' rather than 'simulation'. Peter spotted a very unique feature of the rules however, that he was able to use for his Sudan games. In essence the rules have a superb set of reaction tables, because in "Pony Wars" all the players are on one side - the Indians are entirely managed by the reaction tables..

Those first rules that Peter used were never published (they may have been used at the famous Wargames Holiday Centre) but I bought "Pony Wars" some time ago and have also 'half inched' the tables for my rules (with a few mods/changes), I also combed the articles that Peter wrote in the first issues of "Wargamers World", and then filled in the blanks with the basics from the Will McNally rules I use for AWI and WSS games. This with a number of discussions on the Old School Wargaming Yahoo group has been enough to put something together...

It promises to be interesting seeing how this works, as I'm not 100% clear in my own mind at the moment whether the Dervish should be fully programmed (a la Gilder) or partially programmed - the play through of the rules should help with some of these questions. Either way - here are the scenario details..

This is the table layout..east is at the bottom of the picture:


Same again - this time recreated with the GameMappr package:

The British will enter somewhere along the eastern edge decided by throwing 1D6 and dividing the edge in 6 segments. Their objective is the village on the western edge as they have received intelligence that there is a high ranking Dervish commander there. They need to get to the village, and then return to the eastern edge of the table (anywhere along the edge) while losing the least number of points/men. I'm not going to document the winning criteria as I don't have a clue how the game will pan out, and at this stage I just want to use the scenario to drive some of the elements of the rules, melee, firing, movement, and most importantly the reaction/morale rules...

The Dervish are all on the table, but are deployed in ambush and I won't know where until I find them. All I know is that they are in one of the numbered terrain features, I'll have no idea which as I will randomly shuffle a number of cards equal to the number of terrain features, some of which will have Dervish on them and some not - as the British come within sighting distance of each feature the card is turned over and any Dervish then take their reaction test as per the rules.

OOB's:

Imperial: One troop of Cavalry, one company of Camel Corps (mounted Infantry), and two companies of Infantry (one British, one Sudanese)

Dervish: Six "rubs" of foot soldiers, and two of Cavalry - half of which are rifle armed....

Part two will document how the game progressed.... J

Sunday, September 9

Sudan fort..

...just before I went away on holiday you may remember that I had been ferreting about (what an excellent phrase..!) in a large box of Airfix plastics that my brother-in-law (in-law) has passed across to me, and had found an almost complete model of the Airfix Desert fort of French Foreign Legion fame.

The plan was to put this together and paint it up as a Dervish stronghold for the Sudan Colonial project as although the model was OO/HO it fitted 15mm quite nicely. Well, I'm pleased to say I finished it yesterday, here's a couple of pictures for your viewing pleasure...

I used a black spray undercoat, but the top colours were some cheap craft paints that I picked up at the local Hobby Craft (brand name DecoArt). I started with a heavy dry brush of "Soft Suede" (a light terracotta/burnt brick colour) followed by lighter and lighter brushes of Tan and then Sandstone. The door was a single dry brush of Dark Earth... the flag is from Warflag (what a brilliant site - the guy deserves knighting in the New Years Honours lists!). I've placed two of the village huts (15mm) I already had as contrast/comparison - with a 'rub' of fanatic Dervishes leaving the fort to provide scale:

...the good thing about the fort is that I can also give that higgledy piggledy shambolic look by placing the huts inside the fort - as follows:

Friday, September 7

Brief updates and some beer....

...just a short update this time to answer/comment some of the comments left in the last post...

...first off, Stokes get in there and start painting immediately J - the regiment was not made "Royal" until 1830 so at the time of the Napoleonic Wars they would still have had those distinctive coloured facings. I have a couple of pictures of the uniforms at the time that I can scan if you're interested? The regiment fought, and distinguished itself, at the taking of Malta in 1800 (theirs was the first regimental flag on the ramparts of the captured fort), also Maida in 1806 which is one of their official battle honours..


..second, Jeff asked about the numbers on the bases - these are purely identifiers; I have a great dislike of rules that involve casualty removal - I think it was Featherstone who said in one of his Newsletter's that he couldn't see the point in spending all that time painting figures only to stand them in a casualty tray and I'm of the same view! What it means however, is that there is a little more paperwork involved so the numbers help to identify the units... a long time ago I realised that I had made an error on the numbering - all my regiments comprise two bases so it would make more sense to have the same number on each, but hey ho, having started numbering them consecutively all those years ago I'm not going to change now!

...lastly I thought I'd also put in a few comments on some of the beer I discovered on this years holiday. Not the most fascinating selection as I mentioned previously - almost certainly down to the fact that the holidays this year were deep in wine country, and obviously the locals prefer that to beer..! I did discover one interesting one though..

La Goudale is described on the breweries website as a top fermented lager - it is a light, golden coloured beer, but I wouldn't call it a lager.. Goudale falls into the category of a national brand as you can get it almost everywhere (like Pedigree or London Pride in the UK) but that's not a problem as it is delicious - it's also powerful (as indeed most Biere de Garde's are) at 7.2%... quite sweet, very similar (I think) to the Scottish beers in taste, lovely.. drank a fair amount of this this holiday as there wasn't much other choice...

Trois Monts not so readily available this one - only in the bigger markets down south, but well worth hunting down. Same light colour as the Goudale, but a much more hoppier (bitter) aftertaste. Also dangerously drinkable at 8.5%!

...I've had both of these on previous trips, these following were new to me though....

Eki - brewed by the Brasserie du Pays Basque - 5% - lager style, and taste... kind of forgettable I'm afraid.

L'Angelus - what a belter, this was the find of the holiday as far as I was concered, the only thing was it was in Caen just as I was heading for the ferry on the way home, and they only had one bottle on the shelf!! Gold medal winner in this years French national beer judging, and I'm not surprised - absolutely delicious... "only" 7%, but lip smackingly drinkable nice and hoppy, light coloured, beer....J

Tuesday, September 4

First things first.. the Lillies are done!

...thanks for the kind words welcoming me back - much appreciated!

Any way - onwards and upwards, and as per my posts from before the holiday I've now finally completed the ‘Lillies’ or the 35th Regiment of Foot, the Royal Sussex Regiment - a couple of shots of them are here for your (hopefully) enjoyment:


The figures are 25mm, and are from "Parkfield Miniatures". The flag is from the Warflag site (I used one of the generic regimental flags with the colour changes to reflect the regiments unique orange facings)... they were "difficult", or rather not easy, to paint but having finished the basing and the standard I'm quite pleased with how they turned out...


...the next unit to paint will trigger a return to the War of the Spanish Succession - specifically, I have another regiment of "heavies" (Peter Pig - Cuirassiers) to complete, and following the suggestion from Grimsby Mariner I plan to make them the Danish Life Guards... I will be doing some research over the next few days to discover uniform details, but any additional help is always appreciated...

Monday, September 3

Je retourne...

...or words to that effect - one thing is certain, my French can only have got worse (going at least on the looks of most of the natives faces when I attempted to engage them in conversation!)

...mixed blessings this holiday, and I'll post at slightly longer length on various activities over the next few posts, but suffice to say that for this summary:
  • the weather was on the whole bloody awful... got to the first destination just north of Biarritz and it proceeded to rain, and I mean RAIN, for the first six days, given we were only there for 10 days this was a bit of a downer.. just a couple of days of sun, and a couple of grey days.. we then moved on to the Loire for 3 or four days where the weather was better (no rain) but being further north a bit colder...
  • highlights for me were the Loire Chateau's which this year were excellent - I'll post further on these..
  • got to visit Bayonne (it was raining - typical - didn't I say it would be either baking, or raining, before I went!?) but didn't get to visit the fort I wanted to as it's still an active French military base.. did see the crossing point though...
  • the beer was a bit disappointing this year - neither the Basque country (Biarritz and south), or the Loire (not surprising given this is the centre of the wine industry!) is renowned for a brewing history and the few local examples I tried were OK but not special - more later, but I did get one bottle on the way back through Caen that was outstanding..
  • the reading pile I took was good - and because of the weather I made some serious inroads - more on that as well later..
...and I think that'll do for now - can't tell you how nice it is to be back in the command bunker/attic, and how nice it is to see that I went through 3000 visits in my absence, crikey, I must be writing something that people want to read......nah, must be morbid interest!! Thanks to all...😏