Monday, September 29

Testors Dullcoat Lacquer test..

Just a short post on my test with the new Testors Dullcote that I picked up at Colours..

This is a lacquer rather than a varnish so needs to be applied over the top of an existing protective coat, rather than direct to paint - I suspect it would do nasty things to paint if you applied it directly..

So, without further ado - here's a before shot (as they say in the adverts):

If you click on the picture for a bigger view, you can clearly see the problem - this was originally sprayed with a Plastikote "Flat" varnish - far from it, I'd say that was "Satin" more than anything else...!

This however, is the after shot (taken, at best, 5 minutes after the lacquer was applied):

A huge improvement.

Thoughts/comments?? None really - they advise a single thickish coat, I used a thin coat as I was a little unsure of what it would do, but in light of how quickly this stuff starts to dry I would definitely go thicker next time. In addition, I noted that having applied it, don't go back to paint the area again.. there's obviously some kind of corrosive/sealing reaction going on! Sounds bad, but when I checked them again this morning there were no ill effects and they look a lot better than they did before....

Steve-the-Wargamer (and also a very irritating bloke in a TV Commercial) says "it does exactly what it says on the can" - 9/10 (would have been 10, but it is a bit smellier than acrylics)

Saturday, September 27

They've got to get through....

DG was on a flying visit this weekend so we grabbed another opportunity for a game while he was down - corr, two games in a month... (the downside of course is that he won't be down this way again until November so a gaming drought is upon us!)

There's been plenty of words spread about how good the latest issue of "Battlegames" is, I wholeheartedly agree with them as it may even be the best issue yet, but I was particularly taken with the programmed Sudan scenario "The Wells of Tarka" (NB. the Teaser is also on the radar!). Either way, not having had the opportunity to march to the sound of the Dervish drums in a while I set the table up to have a go at rescuing the sick & wounded ourselves..

For this game I was umpire (to manage the Dervish), DG played the Anglo-Egyptians.

Background
Not wanting to duplicate to much of the article here (so go and buy the magazine, it's a small price to pay for an excellent set of articles - you need to visit the web site anyway, so as to download the free Zulu wars article, so why not buy it at the same time?!), in summary, a small detachment of British regulars have been ordered to retrace the steps of the main column in order to escort the columns stragglers back to the main body..
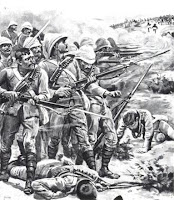
These unfortunates (the sick, wounded, baggage) are camped at an oasis, protected by a zariba - see picture above.

As the column approaches the oasis they hear small arms fire - not much, but an indication that the zariba is under attack....

Orders of Battle:
British:
o three units of infantry (ie. company each)
o one unit of cavalry

Dervish:

o four units of infantry (sword and spear armed)
o one unit of riflemen
o two units of mounted troops on horse/camels (one unit armed with rifles)

Objectives:
The British objective is to reach the zariba in a fixed number of turns; I placed the zariba in one corner of my 6' x 4' table the Anglo-Egyptian forces in the game enter from the corner diagonally opposite.

The number of moves needs to be based on the move distance of the Anglo-Egyptian infantry - the article recommends that the number of moves equals the number of turns it takes the infantry to get to the zariba - I used "infantry in line" movement rate for my scenario, which we worked out as being 15 moves (at 4" per move)

The table therefore looked as follows:
Victory Conditions
To count as a success, the British need to have:

1. at least 25% of their initial forces, or
2. one unit with at least 75% of its original strength

..within one move's distance of the zariba by the end of the game.

Also:

3. There should be no Dervish warriors between the British and the barricade, and
4. The British must have more SP’s within rifle range of the barricade than the Dervishes do.

A tough nut to crack!

Game Mechanics
We used my rules for the game as they also contain programmed responses for the Dervish - if you don't have these then the article in Battlegames has a set, but mine are based on the original Peter Gilder Sudan Rules (see my Sudan War blog for more detail on this) and have a wider range of outcomes so I decided to use mine. You don't need the reaction tables if one of you wants to actually play the Dervish, but the intent with my rules is that once they're bedded in, DG & I will both play against an "automated" Dervish...

I used the rules direct from the article to cover Dervish appearance, and also the "recycling" rules... the former (and may be the latter) will almost certainly make their way into my rules - simple and elegant (there's another reason to get the magazine!)

...so on to the game.....

The Narrative (!):

"Major Herbert Featherstonehaugh of the North Middlesex Regiment was hot....... damned hot.... the sun blazed down from a sky so clear that it appeared almost white and bounced back in waves of heat from the sand, so intense was this heat it was like standing in front of an open boiler on one of those new fangled paddle steam ships.

Grunting irritably as yet another fly tried to work it's way down between his neck and collar, he flicked it away and adjusted his smoked goggles more comfortably before turning to watch the progress of the column he had the honour to (temporarily, alas) command..."

DG (as Featherstonehaugh) had opted to advance in column of march so as to make as much progress as possible, it wasn't long however before standards of Dervish started to appear..

Appearance of the Dervish (and position) was decided by dice and it wasn't long before the first engagement was triggered as a result of a standard of Dervish sword and spear men jumping out from a hidden ravine just as the last company of North Middlesex had passed.

Stopping to about face (quarter move), move into line (successful dice throw required against training, and then half move), DG prepared to engage with small arms fire and bayonet.

Two successful volleys (DG opted to rapid fire which uses up more ammunition, but allows you to fire twice in the same turn) resulted in significant casualties, and a subsequent reaction test resulted in the Dervish fleeing the battlefield. I then tested to see whether the unit was available to be re-used elsewhere on the battlefield but threw a 1 which meant they were permanently removed from play... first blood to the Anglo-Egyptians...
"Featherstonehaugh pulled the silk handkerchief that his beloved wife Daphne had given him before he boarded the troop ship for Alexandria all those months ago, and wiped his face which was dripping with sweat... that had been a close one, the damned heathen had come from no-where! Touching his riding crop to the brim of his helmet to acknowledge the salute from the captain commanding the company, he offered his congratulations, and asked him to ensure the company made best speed to catch up with the rest of the column while maintaining a careful watch for any further attacks..."

DG was using his cavalry to scout ahead of the column which allowed him to continue in column of march with his infantry - time was pressing! As it happened, he was slowed to line speed anyway as a result of the need to keep pace with the pack camel carrying the replacement ammunition, but that's by the by... :o)

It wasn't too long before the cavalry also faced a number of Dervish standards - in the picture next they face a charge from a unit of sword and spear men, the camel unit are rifle armed but blocked from the British by the rough ground which has obscured their line of sight - in the background the other unit of riflemen who up until now have been engaged in taking pot shots at the zariba have also thrown on the reaction test as a result of the first Anglo-Egyptian unit coming within rifle range...
The cavalry summarily dispatched the sword and spear men who routed off through the village before finally getting a successful reaction test to bring them back. In the next picture you can see them just about to charge..
The next turn however, the Dervish camelry finally got their act together, and charge home on the horse - the "attack" on the reaction table also triggered the other Dervish units in the area to also start charging, and in my rules the only way to stop the charge is to kill the unit!

The Dervish camelry threw high, the cavalry threw low, and after their initial success were routed, and last seen heading back to the main column...

"Featherstonehaugh lifted himself on his stirrups, and pulling his horses reins so as to steady himself pulled his binoculars from his saddlebag... there was no way that cavalry was going to stop, and with them gone he'd lost his remote eyes and ears... damn them, he'd had a feeling they weren't up to much when they'd first joined the column, but Dickie Arbitter at HQ had told him they'd be alright. Sitting back into the saddle he shouted out orders to the company commanders to deploy their forces into line and fix bayonets. Hot as it was the morning was going to get hotter yet...."

Things were not going well for the British at this stage - the two leading company's one of the North Middlesex, and the Egyptians, had been dealing death left, right and center but only at the cost of rapid fire which was eating up their ammunition. The Egyptians were almost completely out.

Bringing up the ammunition camel DG ordered the company's into line, and then passed on his chance to fire so as to re supply .. in front of them, the Dervish standards were now well within rifle range and all reaction test outcomes were still being followed to charge.

"Only pausing to bark orders at the last company to move up fast, Featherstonehaugh kicked his horse hard to catch up with the front most companies. He was pleased to see that one Egyptian contingent at least today was not letting him down today. The Egyptian infantry was firing fast and well at the oncoming Dervish infantry but the fire was not having the effect he would have wished.. 'should have re-armed earlier' he muttered, while knowing in his heart of hearts it had not been possible. Looking to his right, he drew breath sharply, what were the North Middlesex doing? He spurred towards them whilst knowing already that it was too late....."

The North Middlesex had become disorganised while changing formation to line, and as a result although able to fire were not firing as effectively as they could. Despite sending one unit off in rout, and severely damaging another the Dervish contacted the Anglo-Egyptian Line.
The Egyptian infantry were contacted by a unit of sword & spear men, the disorganised North Essex managed to halt the camelry to their front, but were contacted by the Jihadiya riflemen to their flank.

An unlucky dice throw resulted in the Egyptian unit breaking in rout. The North Middlesex fought off the flank attack, but in the subsequent reaction test the Dervish threw an "attack" roll (even though they were throwing on a "lost melee" test!) which resulted in them, and the camelry re-charging, and contacting the British. It was all too much, and they broke as well.

The remaining British company had deployed into line and attacked the Dervish that had routed the Egyptians but with a similar lack of success! They broke as well, and at this point DG forfeited the game...
"Featherstonehaugh shook his head in shame, how could it have all gone so wrong, so quickly? Kicking his horse into movement he followed the fleeing infantry, already looking for the company commanders he shouted out orders as best he could to get them to start rallying the troops. He'd seen it before though and he doubted there was any chance that he was going to get them stopped and re-organised soon. Behind him he heard the Dervish ululating in triumph.. 'those poor devils in the zariba are done for, now!' Slowing the horse slightly he looked behind him at what was supposed to be the scene of his triumph - the battle field was there's... this time".

Post Match Analysis:
o There's little room for "hanging around" in this scenario - if the infantry are engaged by the Dervish they need to finish it quick, in order to meet their objective!

o DG and I discussed the game afterwards and found little wrong with the rules, a few amendments are required, but nothing significant - both of us agreed we liked the ammunition rules very much (can't take the praise for this as I lifted them wholesale from "Pony Wars"!

o We also discussed what had gone wrong as the result had not been what I was expecting, and we both came to the conclusion that the problem was primarily one of terrain - all things being equal, in my rules a unit of Anglo-Egyptian infantry should get in four volleys at a unit of Dervish infantry before it charges home (two lots of rapid fire). The problem in this game was that the terrain was so closed in that the Dervish were able to get a jump on them.. now my understanding of the Sudan is that although there were battles where scrub, and poor terrain had an effect, most rifle battles were fought over open ground to 200 or 300 yards... so I may need to leave a few of the hills in the box next time! It's worth pointing out that DG was also pretty unlucky with the dice - both on morale checks, and (more disatrously), on melee's.

o Being the Sudan the refreshments this evening was a particularly fine bottle of "Old Speckled Hen", not quite an IPA but defintely along the same lines. Nibbles, of course, were Bombay mix! :o)

o I intend having another go at this solo, so stay tuned....!

Friday, September 26

Rhode Island Regiment..

I was long overdue some time at the painting table, so I took myself off on Wednesday night and finished these guys...
These guys have been painted to "represent" the Rhode Island Regiment - I say represent, as I'm a little unsure what these guys would actually have looked like! Sources on the web seem contradictory at best, as do my off-line resources (ie. books!)... in the end I went with the depiction you see in the two paintings below...
The figures are Minifigs 25mm's, bought as part of a group of used figures from one of my fellow Old Schooler's (thanks Jim!), and originally painted as, I think, light infantry from one of the New York regiments. Happily I didn't have to strip them, I just re-undercoated in black, and painted as if they were new.

Caveats - before anyone thinks to let me know:

1/. It is far from certain (in my mind) that the whole regiment would have worn the cap - a couple of sources show the regiment in tricorn.... may be only the light company wore them? I went with the caps based on the other sources... :o)

2/. the caps as depicted are not right for the Rhode Island regiment. The cap the Rhode Island guys are shown wearing is pretty unique (see picture to the left), these Minifigs are wearing the standard light infantry cap painted to a rough approximation...

3/. I can't paint anchors that small, so they're absent from the hats...!

Some history then for what was a very unique regiment in the American service. The 1st Rhode Island (there were eventually two) was formed as a result of a decree by the revolutionary Rhode Island Assembly on 6 May 1775. The regiments first colonel was Colonel James Mitchell Varnum, and they were known "Varnum's Regiment" - the regiment consisted of eight companies.
Shortly after the Yorktown campaign, a young French sub-lieutenant named Jean-Baptiste-Antoine DeVerger sketched a watercolour image of four foot-soldiers in his notebook. The guy on the right is from the Rhode Island regiment...

Timetable:

~ From June 1775: took part in the siege of Boston.
~ 14 June 1775: adopted into the Continental Army
~ 28 June 1775: reorganized into ten companies.
~ 28 July 1775: assigned to General Nathanael Greene's Brigade in General George Washington's Main Army.
~ 1 January 1776: as part of the Continental army re-organisation, Varnum's Regiment was reorganized with eight companies and re-designated as the 9th Continental Regiment.
~ 1776: took part in the disastrous 1776 campaign, retreating from New York with the Main Army.
~ 1 January 1777: as part of another Continental army re-organisation, the 9th Continental Regiment was re-designated as the 1st Rhode Island Regiment (at the same time Varnum was promoted brigadier general; his successor being Colonel Christopher Greene)
From http://ancientgreece-earlyamerica.com/the_first_rhode_island.htm
~ 22 October 1777: regiment successfully defended Fort Mercer at the Battle of Red Bank against an assault by 2,000 Hessians.
~ 14 February 1778: having difficulties in meeting the recruiting requirements of the Continental Congress, and after a suggestion made by Varnum to Washington, the Rhode Island Assembly voted to allow the enlistment of "every able-bodied negro, mulatto, or Indian man slave" that chose to do so, and that "every slave so enlisting shall, upon his passing muster before Colonel Christopher Greene, be immediately discharged from the service of his master or mistress, and be absolutely free....". Owners would be paid for any slaves that joined.. 88 slaves enlisted in the regiment over the next four months, as well as some free blacks. The regiment eventually totalled about 225 men of which approximately just over half were African Americans. The enlistment of slaves had been controversial, and after June 1778, no more non-whites were enlisted.
~ August 1778: the regiment fought in the Battle of Rhode Island.

Like most of the Main Army, the regiment saw little action over the next few years, since the focus of the war had shifted to the south.
~ 1 January 1781: the regiment was consolidated with the 2nd Rhode Island Regiment and re-designated as the Rhode Island Regiment. It took part in the siege of Yorktown where the light company served with Lafayette. Greene and several of his black soldiers were killed in a skirmish with Loyalists earlier in the year, my records indicate that the regiment was then commanded by Lt. Col. Jeremiah Olney, and comprised 298 officers and men.
~ 1 March 1783: the regiment was re-designated as the Rhode Island Battalion, and was reorganized into six companies
~ 16 June 1783: reduced to two companies.
~ 25 December 1783: regiment disbanded at Saratoga, New York.

I think we probably should leave the final words to Rochambeau (the commander of the French troops under Washington):

"I had a chance to see the American army, man for man. It was really painful to see these brave men, almost naked with only some trousers and little linen jackets, most of them without stockings, but would you believe it? Very cheerful and healthy in appearance. A quarter of them were negroes, merry, confident, and sturdy. … Three quarters of the Rhode Island regiment consists of negroes, and that regiment is the most neatly dressed, the best under arms, and the most precise in its maneuvres (sic)."

Not a bad regiment to have in my American forces... even if they might perhaps have the wrong hat!

Monday, September 22

Asquith goes to the Sudan..

Prompted by the request for a comparison of the two Asquith Sudan books I thought I'd put up a mini-review to let people know what I thought of them.

First off, as a good reviewer I suppose I need to set my stall out and say that I have a lot of time for Stuart Asquith. As editor of "Practical Wargamer", and as a wargamer of some considerable years and experience, I'm more than ready to have a listen to what he says, and where there's doubt, cut him a little slack (until I get time to do my own research!)....

So what are the books like?

"War in the Sudan 1884-1898: A Campaign Guide" was the first of the two books that I bought, and I thought it provided a good wargamers overview of the three main campaigns that the British fought in the Sudan, namely the Gordon Relief Expedition, the campaigns against Osman Digna in the eastern Sudan, and finally the Re-conquest period.

Asquith gives a very good overview of how the Anglo-Egyptian army was organised for each period, as well as an overview of weaponry, and uniforms. He also does the same for the Mahdist army, but in the other campaigns usually refers you back to the first as they didn't change that much! I know that there are some concerns about some of the uniform details Legatus Hedlius (click here) (a fellow Sudan blogger) has some concerns about the veracity of some of the detail in the uniform section for some of the Anglo-Egyptian units, and certainly in the case of the Royal Marine Light Infantry his research appears to me to be right, and Stuart is wrong, but I'll hold off judgement on any of the other units..! :o))

The book then has an overview of each of the campaigns, along with the major engagements. The contain orders of battle showing units present (but not numbers) for both sides, and a brief discussion of the strategy used, and outcome.

The last section of the book at 30 pages makes up a quarter of the book, and comprises the wargame element of the book. In it Stuart covers off the primary issues that wargamers need to think about when wargaming in this period - how to balance forces, where Dervish forces were positioned, river boats, earthworks, supply, terrain, trains etc etc. Excellent!

So then we come to his newest book..

I have to admit to being quite excited when I saw this on the Caliver stand at the COLOURS show as I wasn't even aware that it had been published!

On the face of it, the subject matter of this book is very different to the first one, as it comprises detailed wargame scenario's of the major engagement in the three campaigns mentioned above. Each scenario (of which there are 11) comprises an explanation of how the battle arose, orbats for each side including unit specific numbers, a map of the battle as translated to the wargame table, and then a section on wargame considerations that meed to be considered when re-fighting the battle. In a word, excellent - my only comment would be that the wargame consideration sections of some of the scenario's are a little short. Stuart has a huge pedigree in terms of scenario design, and I thought these looked a little hurried...

Where it doesn't differ is that the first section of this book comprises what is in effect a summary of sections of the first book, as it gives an overview of the organisation of the Anglo-Egyptian forces, and to the point where when I re-read the first book after reading this one I recognised phrases almost verbatim. He also includes the same wargaming campaign considerations.

So - would I recommend one over the other, or both?

Unless you're a "completist" I don't think you need both, and if I was asked to make a choice, I would advise buying the "Campaign Guide" rather than the Scenario book. The campaign guide has more detail on the troops and units involved, but still covers off the engagements to the extent that you could create the scenario's yourself with a little additional research.

Both books contain the same extensive coverage of wargame considerations for fighting battles in the period...

Last of all - if you're interested in Colonial period wargaming in the Sudan - be sure to check out the The New York Public Library's Digital Gallery, which, amongst a host of other things has a section on the military uniforms of Egypt, 1820-1898. From it, the following is an example, and shows Sudanese and Egyptian infantry of the period:

Friday, September 19

Move 56 & 57 - 15:00 to 17:00 (Day 3)

15:00 to 16:00 (Turn 56 & 57) - Day 2..For the last two days DG and I have been wrestling with the delightful nitty gritty of post battle campaign moves...

Prompted by one of the comments to my blog entry for the campaign game (from Bluebear Jeff (click here to go to his blog))....

"Realizing that most "casualties" are not really even dead or wounded, but scattered, I use a simple mechanism for campaign games. I roll 1d6 for each lost stand not whole unit). Depending upon how bloody we wish to make it, we might vary the number needed for a safe return. Typically the winning side gets stands back by rolling 3+; loser on a 4+. Thus about half of the loser's lost stands return; and about two thirds of the winner’s...but sometimes the dice are very fickle. In addition, units that lost more than half of their stands need to make a die roll to keep from losing a morale grade; and units that got "wiped out" need to make a much tougher roll to keep from dropping. The rationale for this is that scattered troops keep filtering back into camp after the battle's over . .. . and the winner gets a better chance because they are (generally at least) in possession of the battlefield. The further rationale is that troops that got mauled and scattered have a good chance of having lost some of their élan."
....I did some thinking on my bike on the way home and came to the conclusion that I liked the simplicity and elegance very much. Accordingly with some small changes I proposed the following to DG:
  • The battle took the duration of two campaign moves, so we have two Berthier turns to do:
    • those British units who were on the road (ie. the group with the Irish & Erbprinz etc.) should be grouped with the rest of the British units at their ‘grouping position’ somewhere near Carnine (I leave it to DG to decide where this should be, but suggested no further than three Berthier squares away, but not within 2 Berthier squares).. this represents the British decision to withdraw and re-group at the end of the battle.
    • My ‘grouping position’ will be across the bridge in the other half of Carnine ie. for the same reason I will withdrawn and re-group (following all those militia and dragoons!)

  • In the rules I use ( click here) our units are always depicted as being two bases, but can have a varying number of strength points (SP's) to reflect the "effectiveness" of the unit. A full strength regiment of infantry is assumed to have in the region of 250 men which equates to 5 SP's. In the game SP's are lost as a result of firing casualties, melee casualties, morale checks etc. so in this case they equate nicely to Jeff's bases. For each SP lost I suggested we throw 2D6 (we use 2D6 as a matter of course in the rules so it seemed easy to use the same process); an SP is then recovered on a score of 6+ with the following modifiers:
    • Add the units morale bonus to the dice eg. for the Grenadiers you would be throwing 2D6+2 - my thinking being that troops with a high morale are more likely to return to the colours.
    • Subtract one from the dice if the unit took over half casualties (Jeff’s rationale about being mauled is good, I really like it!)

  • Once the throws are complete, we can then regroup and condense our units as required so as to meet the requirements of the rules ie. “Units with less than 3 strength points should be combined whenever possible, and units with more than 6 strength points must be split.” I also suggested that when condensing units, morale should never improve ie. if you are combining two units one of which has a 0 morale modifier, and one of which has +1, then the combined unit would be 0, not +1...
  • We track fatigue per unit to ensure that our little metal men don't turn into little supermen marching all day and night, day after day. DG came up with the idea - for each turn, depending on what you do, a unit is deducted fatigue points - once it gets over 25 fatigue points it starts to temporarily lose SP's. Either way, all units engaged in the battle also take 5 fatigue points per turn for being in battle.
  • We can then update Berthier to reflect the changes and push on with the campaign..


DG agreed to all of the above so we're currently in the process of starting campaign moves again..

Oh, and the pictures? They're from a web resource that Tony de Lyall (the author of Berthier) and I were discussing this week... an absolute gem for the American War of Independence players amongst us, I've add the link to my AWI Project page, or you can click here. Specifically, they are the French Saintonge Regiment, and a private of British 17th Regiment of Foot - both units were present at Yorktown, and I have these units in my collection, but they don't look anywhere near as good as Mr. Troiani's paintings... :o))

...all this and I've just noticed that I've gone through the 20,000 visitor mark.... corr!!

Tuesday, September 16

Rick Wright (1943-2008)...

I heard first thing this morning that Rick Wright the Pink Floyd keyboardist had died, aged 65, following a short cancer caused illness...

I suspect that those of you who frequent here, and read my random musings, will know that I also have a passion for classic rock, and whilst much of what went before in the world of rock music can be quite easily discarded that's not something you can say about any of the Floyd's output over the years.

Along with Gilmour's guitar work, Rick's keyboard playing defined the Floyd sound, and I for one am sorry for his passing; not the least, because (very) selfishly I'll never get to see the Floyd play again and that is always an emotional experience...

I only got to see them once, but what a night - it was the "Division Bell" tour and they were quite simply magnificent... from that tour, this is one of Mr Wright's compositions..


BBC Obituary (click here)

Sunday, September 14

Colours 2008

This weekend was the Colours 2008 weekend, always one of my favourite shows, and one that DG and I have been going to for donkeys years...

It didn't disappoint this year, and there were some significant purchases and events, amongst which, and in no order, I offer the following....

Even legends have to get lunch... :o) Don Featherstone was at the show, and later on in the afternoon I got an opportunity to say hello to him (and his mate *). For 90 years plus he's still in fine form, and cuts a very dapper figure, but I was sad to hear that his wife had died last year..

Amongst the purchases I picked up a copy of "Wargames, Soldiers and Strategy" magazine - this was a Spanish magazine that has just recently started an English language edition. I bought it primarily because I'd read on The Miniatures Page that they were giving away a CD with it that contained the first three issues. To my mind that's inspired marketing. What an excellent way to attract a new readership... either way, I've not had time to look at it yet but I'm interested to see how it matches up to "Wargames Illustrated" which increasingly I find a little disappointing....

After having looked around for it at shows for some time I managed to get a bottle of Testors "Dullcote". This was lacquer rather than varnish, but it should still do the job. Whilst not being totally anal about how flat my varnish dries, I've had a few tins of spray varnish (sold as Matt) where the finish can best be described as 'satin'! In most periods I can live with this, but for WWII it just doesn't look right, so by way of an experiment, I thought I'd see what a coat of this looks like over the top of the existing spray job...

While on the Caliver stand I happened to spot that Old School author Stuart Asquith had a new Sudan book out, and at a very reasonable price (£15) I had to have it. The book is titled "WARFARE IN EGYPT AND THE SUDAN 1886 - 1892 : Wargames Scenarios for the Sudan Campaigns", and follows on from his other book for Partizan... lots of hints & tips for playing a variety of scenario's (none of which seem to be repeated from the earlier book I was pleased to see). A more detailed review will follow.. it's so good to see the Old School authors back in print, Stuart, Charles Grant, and re-issued books from Grant Sr., Young & Lawford and Featherstone - is this the "second golden age"?

Next the bargain, which was a new copy of Chandlers "Military Memoirs of Marlborough's Campaigns, 1702-12" featuring the memoirs of Merode-Westerloo & Parker. Merode was the gentlemen who was taking his breakfast chocolate when he saw the Allied army start its advance at Blenheim.... a passage that always stuck with me; it kind of reminds me of that bit in in the film "D-Day The Longest Day" where the commander of the German coastal gun battery can't make the high command believe the allies are landing and ends up holding the telephone up to the open window...! Either way, almost new, and only a fiver - classic reading was never so affordable...

Other than that, it wouldn't be a wargame show without some lead making it's way home with me, and this time enough little metal men landed in Steve-the-Wargamers bag to make up a couple of squadrons of Austrian Cuirassiers for War of the Spanish Succession - these were 15mm figures from the Peter Pig ECW range. I also took delivery of four new terrain tiles from the nice people at TSS (various corner sections of stream and road to add some flexibility)...

At which point the wallet was empty, and I was replete - time to check out the games... there were some good ones this year, with I think, one clear winner... so because I couldn't separate the games that would have been in the lower places, I'm going to start with what I thought was the best game..

This was a simply massive game put on by Bedford Gladiators (click here) and featured "D-Day Breakout Normandy" in 15mm using 'Flames of War' rules - basically the game was a kind of summary of the first few days of the entire battle featuring British Para's at Pegasus Bridge, 7th Armoured against Panzer Lehr & elements of 1st SS Panzer Corps, and also the US 5th Corps making their way through bocage.

It was a stunning looking game with lots of planes, models, and figures all in 15mm... what made it for me was that the space was used well - no tanks track to track, they were spaced, and it looked good. Figures and models were exquisitely painted, and the planes were lovely - Typhoons racing over a target rich environment - what's not to like!

Beautiful - and there's more pictures on their site here and also here

Next my second/third/fourth/fifth equal - and in no particular order we have first a picture of the game that funnily enough was situated right next to the previous game. This game was presented by the South London warlords, but unlike the other game was in 20mm focusing specifically on the action at Pegasus - I thought it went well with the game next door and if anything it would have been better if their game could have featured at the bottom of the big game table rather than to the side - almost like a magnified view of one aspect of the big game.. suffice to say, the bagpiper was represented in Lovatt's relieving force (I looked)!

Next, two shots of a game that I particularly liked but don't have any details for despite a lengthy and informative conversation with the guy running it - it was 15mm English Civil War, using his own rules which were a development of other rules he'd already written. What attracted me was the lovely terrain, well painted and compact units; a real wargame in other words...

Lastly - three shots of a lovely 25mm American Civil War game put on by Thames Valley Wargamers using the "Guns at Gettysburg" rules.
Figures are predominantly Redoubt, but again what attracted my eye was the same as the ECW game - nice figures, fighting over good looking terrain - it's not difficult...! :o))
If you like it, by the way, there are some more pictures here.....and that was it for this years Colours, oh, apart from the *.

If you scroll back up to the game put on by the South London Warlords, you can see a tank burning on the bridge - when I spoke to the Warlords running the game they mentioned that Don and his mate had stopped by for a chat, and it turned out that the guy with Don was the man who'd brewed the tank in the real battle, apparently! It makes you think... with that generation of blokes we can be in the presence of real life heroes and we'd never know it

Thursday, September 11

"Night of the long knives".... campaign game report

...or, "The Death or Glory Boys run riot"...

You may remember that in the American War of Independence campaign that DG and I are playing, we had come to a juncture with a major engagement at the town of Carnine.

In campaign terms this was the big throw, the major gamble, as all effectives were present for both sides, and whoever won the game could reasonably claim the campaign victory conditions were theirs.

Orders of Battle:

In numbers terms then DG who was commander of the British troops had a significant superiority with approximately 88 points, the American forces commanded by myself hoped to bolster their significant lower numbers (65 points) with the use of some fieldworks that had been constructed during the campaign to cover the eastern approaches of the town....

The British order of battle comprised the following units - DG was light on cavalry (but not light enough!), but had some of the cream of the British army under his command - the Erbprinz Grenadiers (motto "Nunquam Lucror Pugna" :o) ) and my favourite regiment the Welch Fusiliers (in their fur fusilier caps - and yes, I know it isn't historical for this period/theatre before anyone thinks they need to tell me!):


UNIT NAME UNIT MORALE STRENGTH POINTS
New York Loyalist Artillery Light0 5
New York Loyalist Artillery Medium0 5
16th Light Dragoons 1st (Half squadron - 1 base) +1 5
17th Foot+1 5
23rd Foot (Royal Welch Fusiliers)+1 5
33rd Foot+1 5
71st (Fraser's) Foot+1 5
35th Foot (Royal Sussex Regiment)+1 5
Infantry regiment Erbprinz+2 5
Regiment Prinz Ludwig - 1st Battalion+1 5
Regiment Prinz Ludwig - 2nd Battalion+1 5
Regiment Prinz Ludwig - 3rd Battalion+1 5
Regiment Prinz Ludwig - 4th Battalion+1 5
Royal Irish Regiment+1 5
Total: 88 points +13 75


The American forces comprised:


UNIT NAME UNIT MORALE STRENGTH POINTS
New York Brigade
1st New York05
2nd New York05
New York Loyalist Artillery Light05
Rhode Island Artillery Medium05
Cavalry Brigade
Lauzun's Legion Hussars+15
4th Dragoons+15
French Brigade
Bourbonnais Regiment (1st. Batt.)+15
Bourbonnais Regiment (2nd. Batt.) +15
1st Militia Brigade
Massachusetts Militia - 1st Battalion-15
Massachusetts Militia - 2nd Battalion-15
2nd Militia Brigade
Massachusetts Militia - 3rd Battalion 05
Massachusetts Militia - 4th Battalion (Lights) 03
New York Regiment05
Total: 65 points +2 63


Table Layout:

When the point in the campaign was reached that DG and I realised we had a game on our hands the Berthier map was as follows:

Each of those Berthier squares equates to a foot on the wargame table so that equates to 6' by 8' and in the flesh it looked like this:

So, in the foreground of the picture we have the town of Carnine, occupying either side of an impassable river - the bridge provides the only crossing point. The river doesn't quite follow the Berthier map - I've used some artistic licence with the terrain tiles that I have available....

A close up of what the British faced at Carnine - trenches and redoubts in abundance!


Initial Dispositions:

Translating the last position from the Berthier campaign move we have the following considerations (and this is where campaigns come to the fore as a way of generating table top encounters, as there's no way any sane commander would agree to the position the American commander finds himself in!)

The contact square on the Berthier map comprised the American 1st and 2nd Militia regiments - you may remember that I had sent them out with a view to providing a handy flanking force, they were spotted, and I was bringing them back in Carnine when they were "jumped" by the main British force. This gives us our first compulsory dispositions - the American Militia then is in the first half of the 3rd terrain tile, as are most of the British. With a half troop of British cavalry to the east, and the rest of the British force to the south.

The rest of the American forces need to be placed in the town, and there are British reinforcements just arriving on the road at the "far end" of the table.
This how it was represented on the table - I think you can probably guess what the two lonely Militia regiments were thinking - to their right is the half squadron of British cavalry...
In the far distance is the second British force arriving on table.


...and so to battle:

This was a long and particularly bloody battle that in the end ran to 13 complete moves - just over two hours in real time.

Rather than bore you with a move by move recount of how the game transpired, however I thought I'd try and stick to the major engagements/events.

The game started with the British opening fire on the American Militia - as the moving player I got to fire second, so the response was not good as by that time most of the British regiments and artillery had managed to get their hits... suffice to say that the Militia (of course) did run, harried all the way by the British cavalry (rules note: in our rules, if your contacted while routing that's an automatic damage hit, and further rout ie. light cavalry heaven)

Having manned the trenches, and rolled the cannons in to the redoubts... ..the Americans were more than a little non-plussed to see the recoiling militia (see following) come streaming past - even with the assistance of their commanders I couldn't get them to stop and they disappeared over the bridge heading north!

The next phase was again with the British - the Americans had deployed on a fairly broad frontage - the good Continental infantry in the centre, their French allies on the left, and were sitting their waiting. They didn't have to wait long however, as DG ordered his four Brunswicker regiments (click here to find out why a dragoon regiment is attacking on foot!) to attack the right-most of the two redoubts..... four regiments of Brusnwick's finest failed to make it into the redoubt, though on at least two occasions one of the regiments was fighting bayonet to hand over the top of the earthworks themselves. See following as the first of the poor unfortunates made their way towards the guns...

While this was going on the Americans had pushed forward with their cavalry - whilst I did have a problem with pushing my infantry forward (out numbered badly I needed to stay near the town and earthworks) I had no compunction whatsoever about making the lives of the British infantry a little uncomfortable! Of the British units that had just finished attacking the militia then, the Brunswikers we've just heard about, but the rest of the force comprised British infantry (Frasers, and the 35th Foot the "Orange Lillies") and artillery - and DG was using those to form an attack on the trench line in the centre. Having seen the Highlanders cross the fence line, the American dragoons charged and in the subsequent melee (happily they managed to engage!) drove them off in rout with a bloody nose (and won the first battle honour of the game) Slightly later, Lausanne's Hussars did the same to the Lillies winning themselves the second battle honour of the game. See following for the American 4th Dragoons about to send Fraser's packing..

Unfortunately it all went badly wrong from this point as in withdrawing from the advancing British forces the cavalry was caught and badly cut up by the British cavalry and the advancing Welch Fusiliers.... both American cavalry regiments were sent packing, and following successive failed morale throws exited the field just behind the militia... oh, dear... (the picture at left shows Lausanne's being bashed by the "Death or Glory Boys") The good news was that the British attack in the centre never really materialised after this, and slowly fizzled out...

Which was just as well, as in the last phase, the British developed their biggest attack of the game on the American left. The attack included all the units that were arriving on the road at the beginning of the game - this comprised 4 regiments of foot (including the Prussians) and artillery. Using my artillery and the French to inflict the first casualties on the Prussians I shifted my Continentals to this flank and put in a charge with them and the French - repulsed! Things then went from bad to worse.. with no cavalry to protect my flanks and rear the British Dragoons hit the main lode, pure gold.... I can't tell you what mayhem those Dragoons caused as it's still painful now, but I reckon they probably accounted for at least 3 regiments of foot - as each routed they were attacked by those damned dragoons who just kept attacking and attacking - it was a bit like a sheep dog with a flock! See following for a sight of France's finest being badly treated by the British horse who by the end of it had hustled almost all of those routing units to near destruction (and in the process win the third battle honour of the game

By the time I'd managed to get enough units together to face off the British horse, both sides were exhausted with little in the way of fresh units. Both commanders agreed to the draw - I had little or no fresh troops, and DG who had slightly more, didn't fancy facing those earthworks again...!

..and there you have it - a very bloody encounter!

Post Match Analysis:
  • Losses were fairly even - the Americans had lost 30 strength points (and a regular regiment comes in at 5 SP's total in the rules I use) so a not insignificant loss! I seem to remember that the British had lost about 4 or 5 points more - a pretty good result given that they were the assaulting force.
  • Without a doubt the unit that turned it around for the British were the dragoons - they inflicted at least 10 or 12 of those damage points on the Americans. I trust DG is giving the horses an extra dose of oats!
  • One of the issues I had was being able to turn around quickly enough to face the horse - in the rules I play wheeling is done round a 3" diameter circle, and there is no "about face", getting your horse into the rear of the other army then is akin to getting your queen onto the back row in chess! I'm keen to ensure that manoeuvring is vaguely realistic, but I need to do some checking to see if about face was used... :o))
  • Another issue was that the British horse was only a half regiment - ie. one base... I can claim overlaps in a face to face scrap, but most of the time the British horse were hitting routing units - very frustrating, and there was much muttering of "it doesn't seem right" from yours truly! As a true exemplar of Old School wargaming however I give you the following exchange:

    StW: "Blimey, are we sure they can do that?" (as the British horse drive off yet another regiment in rout)
    DG: "Hmm, they are a bit destructive... if they were yours what would you do?"
    StW: "Exactly the same as you're doing - don't be foolish!" :o))
  • ..and finally, for those of you with an interest in such things - refreshments!Steve-the-Wargamer has changed to decaffeinated tea, which on this occasion was PG Tips (someone must have a wargame use for those little pyramids!) - just as well it was decaf as we drank a lot of it! The biscuits were Co-Op Chocolate Chip Cookies - and very nice they were too...

..so there you have it - the campaign moves on - we have two moves to do to take account of the time the battle took, and then we need to consider consolidation, and I get to start thinking about reinforcements and how they can be introduced into the campaign for both sides....