Sunday, August 23

"Marlborough's War Machine 1702-1711" - a review

....spotted this book while doing some research online following the last "War of the Spanish Succession" game [clicky] that DG and I played, a few of the outcomes from the game had forced me to go back to the books to reinforce my understanding on the basic tenets of what warfare would have been like in the period - wargamers tend to lump all of the period from Marlborough to almost the Crimea into a generic tag of "black powder" but the realities are that the wars during that period did differ, and sometimes quite significantly...

My standard "go to" books for the period are the superb double set by Chandler("Marlborough as Military Commander" [clicky] and "The Art of Warfare in the Age of Marlborough" [clicky]) and it's noticeable (in a good way) that Falkner also thought the same..

In many ways in fact this book is covering the same ground as Chandler's "Art of Warfare" book, the significant difference is that Falkner's book covers the other nations in a little more detail - Chandler's was more focussed on the English/British and French..

So is it worth buying?? I would say a qualified "yes", but I'm not sure that there's very much extra material covered than you would have already got by buying the two Chandler books..

The book is organised along the usual lines..  chapters on the background to the war, how the Allies assembled their army, potted histories of the commanders on both sides, then he goes through each of the major constituents of the army, horse, foot, artillery, logistics, and engineers, before finishing off with a summary of Marlborough's legacy..

My specific takeaway's from the book (apart from stuff that I already knew and the book reinforced) were:
  • a better understanding of the difference between horse and dragoons - latter tended to be on smaller horses, were cheaper, and did fight on foot on occasion, but could fight as normal horse if required.. I also hadn't realised they had bayonets..
  • Cavalry were used primarily for action against other cavalry, or for breakthrough, or for scouting, or against broken troops - they were increasingly ineffective against infantry frontally as a result of advances in musketry, and the socket bayonet..
  • a better understanding of the number of ranks difference for infantry between the two opposing sides (the Allies tended to have fewer ranks than the French)
  • ammunition weight (British Dutch musket ball was heavier than the French) which together with Allied (just British/Dutch??) knowledge of platoon firing [clicky] (a Swedish invention I seem to remember reading) gave such an advantage ..  French fired by rank [clicky], their adoption of platoon firing slower from about 1704 onwards
  • I wasn't (fully) aware of how accepted it was that infantry in the period could form square if required - a complex manoeuvre!
  • the book reinforced some thoughts I had about the relative static'ness of artillery at the time - it could be moved on the battlefield, and sometimes was, but rarely...  heavy artillery was for sieges, not battlefields (Ramillies aside..)
What I had hoped for, and didn't get, what was a little more detail on how infantry/cavalry moved on the battlefield - what they could do..  eg. wheeling/oblique movement etc - if anyone has any sources please feel free to comment. I think I shall be re-reading my Chandler at some point, and I have also picked up my copy of Lynn's "Giant of the Grand Siecle The French Army, 1610-1715" [clicky] for the French point of view...

In terms of practicalities, I intend to re-visit the WSS Rules and make some modifications in the area of artillery movement, cavalry melee vs infantry, and some initial thoughts on the square and how to convey it.... 

Steve the Wargamer rates this one as 8 out of 10 - good, but I think Chandler shades it...

Tuesday, August 18

Hex madness... Chain of Command

..DG was down at the weekend for a flying visit with his daughter, and it seemed churlish not to use the opportunity for an always pleasurable face to face game..

"What do you fancy playing??" quoth I, to which he replied "do you remember saying that you would play a hex based game if I suggested it"...  "gah!" quoth I.. "Good" said DG "I'll bring the hex mat round, we'll have a bash at 'Chain of Command'"...  "GAH!" quoth I 

So it was that Friday evening saw two unlikely (but not impossible, to be fair) events unfolding in the dining room of chez Steve the Wargamer..  a hex mat, and a set of Too Fat Lardies rules....

Regular readers will be aware that Steve the Wargamer is not the 'hugest fan' of hex based games, so I'll not drift on about that again (besides, people tend to take me seriously), but it's been a while since I mentioned my dislike of the Too Fat Lardies rules that I've tried up until now (see how that "up until now" bit, gives the impression of something about to change... ).

The Too Fat Lardies team are without a shadow of a doubt forward thinking, hugely clever fellows, with an admirable interest in military history, and a shared interest in the experience of the individual soldier - what it was like to be a grunt on the ground ...  What they haven't been able to do up until now, in my humble opinion, is to find a decent editor/proof reader (see that.. another "up until now").. their rules are a nightmare to read or navigate around, and in my experience almost invariably prompt more questions than they answer (purely my opinion, I'm aware that there are many, many who wouldn't agree), and I've tried a few of their sets now...  time will tell if I feel the same about this set, and I certainly understand enough about what they are trying to do, to make it unlikely I would turn down the opportunity to try any future/new sets, but enough to say I was slightly.. errr..  trepidous.... on the plus side DG has shared my views and seemed to like these.

Either way - with limited time, and not owning a set of the rules, DG had forwarded me his quick reference sheet (dozen close typed sheets, but to be honest I used three of them most - initiative dice actions/shooting/movement). DG opted for the platoon (with some additional support...)  encounter scenario from the book, I opted for Germans, DG took British..

The rules have a (by now fairly well known) pre-game reconnaissance phase/feature which is interesting..  Having only played the one game, I'm not going to make any comment about how clever/intuitive it is, but suffice to say for this scenario each side had four tokens which were placed in turn on the table, and then moved about until they were a set distance from an opposite token(s) where upon at which point the tokens become "locked" - the aim of this stage of the game is to cover off as much of the table as possible via interconnected/adjacent tokens. Once all the tokens are locked, you then start drawing angles between opposing tokens to find "jump off points" ie. points where your troops arrive on the table...

The first part of this is fairly intuitive - I found the calculation of the jump off points to be less so - I'll need to do that again a few more times before I get to grips with the intent...

...and on with the game - which was a short sharp blast of a game...  in summary, an encounter stroke 'deny the enemy', type, game..  I ended up with a section in the house (rifles and LMG) and two other sections coming on from the left and top left in the picture following (apologies for the flash pictures by the way - poor light conditions and no tripod)


Turns are an indeterminate length long, once you've agreed who goes first, you throw a number of initiative dice determined by scenario, morale level, training etc. After that, poker dice style you allocate your dice as you see fit to your teams/sections/supports  - throw a couple of sixes and you get to go again straight away, fives are added up towards interruption dice (my term for them) which allow you to interrupt the opposing players turn....  useful if they keep throwing double sixes!

So the game is activation based using the initiative dice (vaguely similar to DBA in that you can only activate if you have enough points - but with the added complication that in CoC you also need the right type of points). Section or teams (and the phrase seem to be interchangable) can activate themselves (one action - move or shoot), but if activated by a team/section leader they can do more things depending on the leaders ability (eg. move and shoot, part move and rest shoot etc) - but you need the dice..

Movement is part random, part fixed depending on how you want to move (stealthy/normal/double pace) and affects the normal things you would expect (shooting etc)

Shooting uses a bucketful of dice (eight for my Spandau's!) and reminded me of early Featherstone, throw a too hit score, and then any hits are diced for effect...  affected by targets training level, distance and cover..

Morale is tracked by each section/team via "shock" (caused by shooting) the more shock the less they can do, and the more time leaders spend reducing shock so they can do something - bit of a slippery slope...  more shock points than men in the section/team leads to a pin.. The whole force has then has a "side" level morale table that is affected by routing troops (shock), casualties etcetc


The hexes are incidental - over a certain distance away and you can measure normally (DG uses a coloured stick - you can see one in the picture above)

..and the game - well it was largely a training/familiarisation exercise, but I'm happy to say that the Wehrmacht carried the day...  putting my Spandau in the upper story of the house allowed me to dominate the field DG was advancing down (smoke of war - he'd forgotten I'd put it in there ) and by the time he'd realised, I was pouring in more steel than the total output of Sheffield  so he spent all his time recovering and not being able to shoot back.. it would all have been very different if he'd had some artillery or air cover when the house would very soon have been totalled, I have no doubt..

I enjoyed it - I would certainly not be averse to another game - what's more I hope to buy a rule set fairly soon and perhaps use those WW2 15mm skirmish troops of mine for a few games.. shock horror...!

Sunday, August 9

"One Hour Wargames" - Scenario 3 - "Control the River" - The Game

...and so on with the game, which this time featured the second/updated version of DG's variant of my War of the Spanish Succession variant, of Will McNally's (excellent) Seven Years War rules  which we last used in scenario #2...

Variant of a variant,egad... doesn't get much more Old School than that!  DG and I date back to the days when gamers used to make their own terrain, mould and cast their own soldiers, and write their own rules, simply because the breadth of choice available today was but a dim and distant twinkle back then... I think it fair to say that DG is more of a rules tinkerer than I am, once I have a set (and although I'm on version 9 of my WSS variant they've been unchanged in 14 months now*) I'm fairly conservative, but DG is always looking at mechanisms and trying new one's.. the rules used for this game featured average dice (to iron out some wild variations in result from the game using the first version), but also some new thoughts on morale recovery (which I think it fair to say I didn't like so much.. )

* though as a result of this game I think v10 will be on the way..more anon...

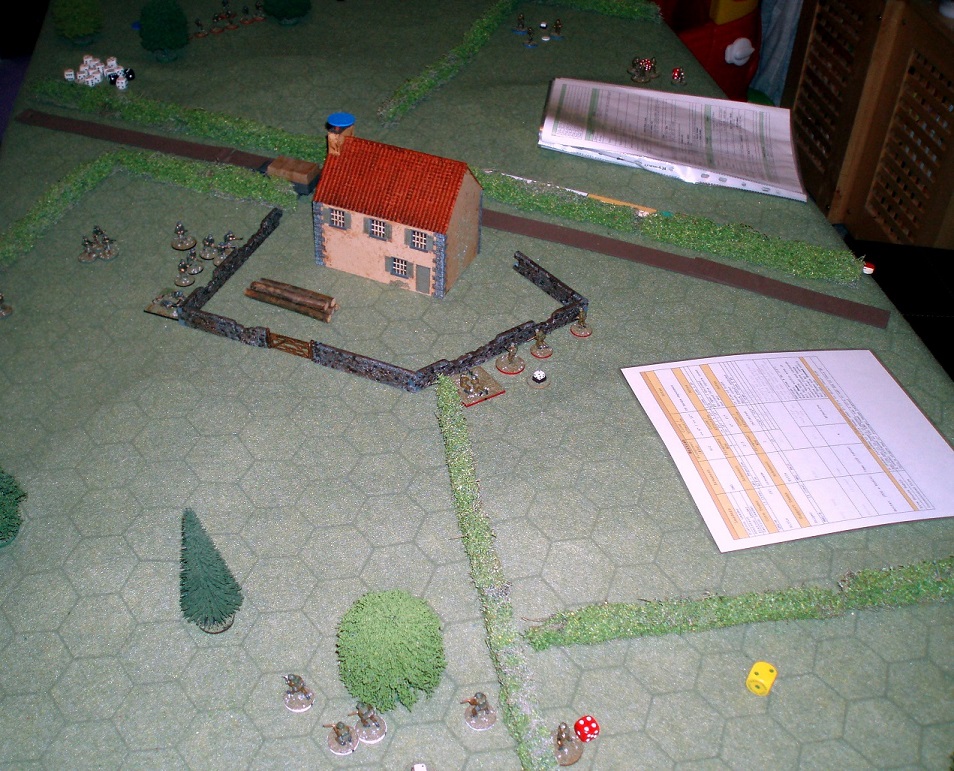
Either way, on with the game, and as a reminder, the table was as follows - starting edges top (DG) and bottom (me):


The game posed some interesting tactical questions for me (and I hope DG! ) - the objective was to capture both bridges but I had rolled a slow moving force comprising mostly infantry, some artillery (which I'd have swapped for a squadron of cavalry like a shot) and in terms of gaining the objective(s) quickly, just the one squadron of cavalry to leap forward and seize the bridge (and even they were slower heavies).

I knew DG's force on the other hand was cavalry heavy - 3 squadrons - so my plan then, was to focus entirely on one bridge (I chose the left one in the picture above), secure it, and then try and wrestle the other one away afterwards...  We only had 15 moves to do this, but given we started the game off table, and I didn't know where DG was going to arrive on his edge, all in all it made for some enjoyable mental tussles on the bike ride to and from work..

The Game:

"The day dawned, only the squeal of axles, and the lowing of cows breaking the peace.. supplies destined to feed the insatiable war machine of M'lord The Duke of Marlborough"...


"Suddenly - more insistent sounds can be heard, the jingle of multiple harnesses, and the tramp of marching feet"...  OK, enough of the cod fiction already.. 

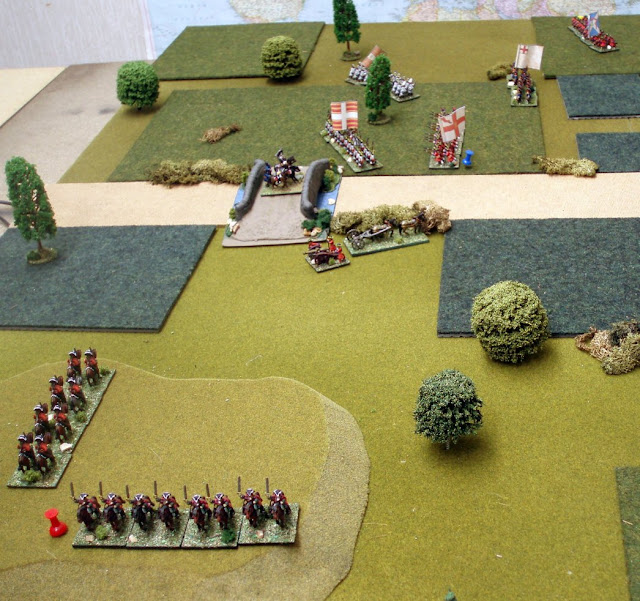
The following is key as it shows the overall approach the two of us had taken..


As above I (bottom edge) had concentrated all of my troops to take the left hand bridge.. cavalry and one infantry battalion on the left of the hill, three further battalions of infantry and the artillery on the right/this side of it,..  DG had split his force along infantry and cavalry lines sending his cavalry to the right bridge and his infantry too the one I had in mind..  interesting!

Next picture - five or six moves later (may be more - apologies - exciting game and I forgot to stop and take pictures!) and DG had completed his cavalry envelopment, two of my infantry battalions were across the bridge and engaging DG's three. The interesting action however was on 'this side' of the bridge where my other two battalions and the deployed artillery were trying to stop his cavalry..  Off picture (to the right), I had had early success with the artillery and DG's heavy cavalry were routing..

A closer view of the picture will show that yet again I had made a schoolboy error and Bourbonnais (blue/purple quadrants), who I had about turned so as to make some space behind Toulouse, had been caught in the flank by DG's cavalry.


Next picture - amazingly however they held (!). On the other side of the river, however, disciplined crashing volleys, and steady advances, were delaying and pushing back DG's heavier force (ie. my dice were slightly better..). The key however, is right in the distance at the top of the table, where my heavy cavalry can be seen beetling to the right behind his infantry - I'd had an idea..

Blue pin disordered, yellow pin shaken, red pin routing...
His cavalry recovered though and a few shock moves later- both of my infantry battalions had routed, and in both cases this had taken them off the table.. only the artillery left this side, but I had started withdrawing Bearn to the bridge to assist... things were not looking good when in the dying moments of the game, the artillery saw off his cavalry...


Whilst on the other side, having noticed the bridge was un-held I had my cavalry over the bridge, and the game was mine by the skin of my teeth..!

Huzzah!!
Talk about leaving it to the last moment!!

Post Match Analysis:
  • First the butchers bill... DG's game easily by those scores 10 vs 5...   trifle discombobulating to have two of your infantry regiments leg it off the table..!


  • Quite a long game, the average dice worked in ironing out the big variations, but resulted in units lasting much longer than they would normally - this was not a one hour wargame.. 
  • I had some problems with the new version of the rules, and as is the nature of things DG and I have discussed since the game...
    • morale recovery; the game turn is A move/B fire/A melee/B move/A fire/B melee, with morale recovery being done in the movement phase for the relevant player - in the original rules morale checks from the melee aren't tested until the move after, but DG had gone for immediate testing, and this meant that the moving player could move into melee, cause the enemy unit to fail morale and scarper, but see that unit immediately recover and advance upon them in the next movement phase..
    • cavalry vs infantry: seemed a bit powerful to me..  I've done some research this week (Chandler/Falkner/web etc) and forwarded it to DG, but as a result I will also update my rules to make frontal attacks by cavalry on steady infantry slightly less optimal
    • manoeuvre: formation changes, and movement options seemed a little fast; armies at this time weren't as slow as say an English Civil War era army, but neither were they as quick in their drill as a Seven Years War/Napoleonic army...  more research is required here, and I am delving into my usual sources, but comments would be appreciated.. I'm interested in sources that would give some insight into the infantry/cavalry ability to advance obliquely, ability to wheel; and for infantry, how common it was for them to go into square (I'm aware of the attempt by Rowse's at Blenheim) 
Excellent..  as a result of this game I've just bought this book [clicky] (NB. It's cheaper on eBay ) so that's no bad thing!


Tuesday, August 4

"One Hour Wargames" - Scenario 3 - "Control the River" - Set up

Time for a return to the table and this time we are playing the third scenario from the excellent "One Hour Wargames"

Following on from the last scenario where we had tried out DG's modification/variation of the Marlburian rules we normally use, DG has made further changes*, so I have again set the scenario in the Marlburian period; we will try another period for the next game.

* one modification features the return of DG's beloved average dice, so I need to hunt some out from the dice box!

The third scenario is another encounter battle, but this time the forces represent the advance guards of two larger forces, tasked with seizing two vitally strategic river crossings. The winner is the player who controls both crossings by the end of the game - we will use our standard method for deciding this ie. whoever last crossed the bridge controls it. We have 15 moves to do this in.

An interesting feature of this game is that the players do not start the game 'on table', they arrive anywhere on the relevant edge - no setting up your artillery straight away to cover the bridge then! Any formation is allowed.

Although it doesn't specifically state either way, it doesn't say whether the river is impassable except at the bridges - in fact it says no special rules apply - so I'm going to play our standard rules for crossing water features.... 

As in all the previous games, all unit morale modifiers will be 0 (for both sides), no National characteristic bonuses will apply for either side (ie. British/Dutch firing bonus doesn’t apply etc etc) – as much as possible each side will be totally equal, except for the results of the randomised force generator. Also as per the last game there are no brigadiers for either side (these are used in the rules for morale saves/improvements)- commander in chief only.

The scenario is another six unit per side, game so we diced using the same randomised force table, this time DG threw a 3, and I threw a 5, giving us the following forces, DG is playing the Allies, and I will play the French

DG first - this is the same force he commanded in the first game:

...then me.. sharp eyed viewers will spot that I rolled the same this game as I did in the last, so I decided to re-use my orbat from that game:


Table was as follows - starting edges top and bottom:


...and from the side - so starting edge left and right.


Both edges are of equal value - the hills are equidistant from the bridges, so I have given DG the left in the above.

Bear with... the game will follow!