...so did it remain peaceful??? Of course, it didn't.... read on for an account of the ensuing struggle!
This game is the third in the linked series of five games that make up the "Raid on St Michel" mini-campaign, so casualties and effects from the first two games have been carried over... rules used for the game were Will McNally's Seven Year War rules, modified for the War of the Spanish Succession (details of those changes are on my project blog).
So, once DG and I had worked out casualties and the saving throws from game two ( "Rear Guard" which you read by clicking here), I then added in the additional forces that come into play in this scenario (no extraneous details - you need to pay the purely nominal amount this excellent little booklet costs to get those!)
Having done that we ended up with the following - in this campaign the British fill the role of the Vereinigte Freie Stadte (VFS) and are the "invaders" - you'll note that some of the British units are carrying casualties from the action described in "Rear Guard"... We agreed between us before the game that DG could combine units if he wished, so he decided to move the remainders of Regiment Goor (who were badly mauled in the last game) into the Beinheim Regiment in order to build them up into a meaningful force.. as a reminder full strength units in my games are 5 points (6 for over strength), once you start getting less than 4 then it starts to affect firing, and of course morale, so overall it was a good move.. please click on any of the graphics for a more pleasing, and bigger, view:
 The forces of Lorraine were played by the French, who for this campaign are the "invaded"... again - casualties are notable (though in both cases are casualties were slightly less than those suggested for the one of game in the book). As my last action I threw a dice and received a length of timber breastwork as additional defensive strength..
 All in all then fairly evenly balanced in terms of points, but the British are right bu**ers when it comes to melee and shooting... I'm an adherent of national characteristics, so in a balanced fight, I would always expect the British to have a slight advantage - but that's based on my reading into the history of the time rather than rampant jingoism...!
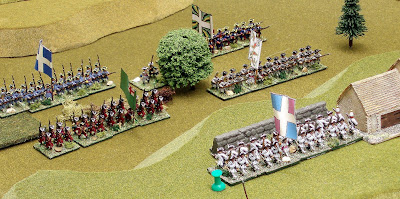
Here then we have the starting positions for the game... the French forces are nearest us, table was 8' x 4'. Deployment area's were as per the book....
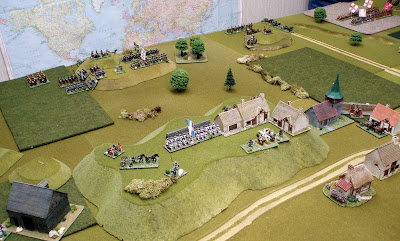 In the distance DG had organised his troops into two brigades of infantry, with the cavalry split between the two.
On his left, so further away from us in the picture, is the British brigade comprising all the regiments of British foot except Derring's, with two regiments of British cavalry in support. On his right was an Allied brigade comprising Dutch (2) Swiss (1) and British (1) regiments, most of his artillery, and the remaining regiment of British cavalry. In the centre, however, was not very much at all - one gun, a regiment of cuirassiers, and the wagons to (hopefully) take away the loot...
 The British Brigade in all it's glory... Ingoldsby's and Howe's in the front, Meredith's and the Guards in the second rank..
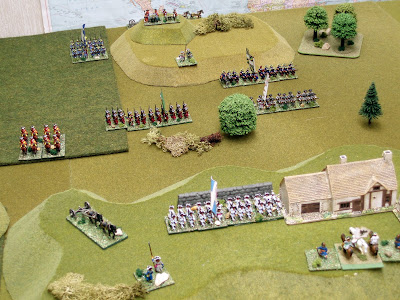
I had the advantage of hidden deployment, as there were at least two hilly area's to shield my preparations from prying eyes... I'll be the first to admit that I had made my preparations primarily to protect St. Michel itself so all my artillery was either on the hill (left and right front edges), or guarding the entrance to the town (behind that timber breastwork). Of my foot, other than one regiment (Bourbonnais) on the hill top, along with one regiment (Agenois) protecting my left flank (you can just see them behind the barn in the next picture) there was just one regiment on the smaller hill to my right (Toulouse - just out of picture) the rest were hidden - five regiments of surprises was my ardent hope...
 The cavalry were split equally between the two flanks as I figured those could be usable to protect both due to their manoeuvrability, again though, three of these were hidden - two squadrons of cuirassiers in St. Michel, another squadron of French horse hidden in the gullet behind the small hill to my right.. His deployment of the large British brigade opposite my right flank came as a bit of a surprise then!
So how did the game turn out - well it was a bit of a game of two halves as our soccer pundits are want to say... with a little bit of artillery naughtiness at the beginning.
The artillery naughtiness was over fairly quickly to be honest, with both my guns on the hill silenced after some typically accurate firing from DG! I have to admit to being a little downhearted at this point, as I'd just lost most pf my ability to hit at distance.. ah well, I ordered the Bourbonnais to lie down behind the wall, so that they got complete cover from the artillery (but couldn't fire back), and waited for events too unfold....
Right Flank - First Half
The first part of the game then started out with a strong advance by DG on his left flank with the British Brigade and accompanying cavalry.
 Sensing things were going to get out of hand, and with only two regiments of foot to DG's four, I decided to pull them back towards St. Michel. I sent out my two French cavalry squadrons to cover the retreat - in the picture above the first of them has trotted out to face the British squadrons...
Cover the retreat?? How wrong could a man be.....!
So the first regiment (de Montreval) faces up to the British squadron and charges, while the second squadron lines up behind - and whammo... the first British squadron is sent reeling! The French squadron then halts, gives fire, causes the second British squadron to halt shaken, and in the subsequent morale check they rout and flee... two down and none to go!
 Leaving the other squadron to pin the British infantry, I sent de Montreval round to the rear - a target rich environment if ever there was one - while in the meanwhile the two infantry regiments I'd sent to St. Michel were wheeled to face the other British regiments of foot. From a position of strength the situation had changed completely, and following some exchanges of volleys, further British retirements led to a collapse on this flank.
Left Flank - Second Half
On the left flank, after an initial advance, DG had been happy happy to halt while he focussed on the British advance.. in the picture following my artillery has been neutralised, he has halted his infantry and is pushing forward with his cavalry to try and hook around the barn, and my flank..
 A quick volley from the Agenois regiment in the barn, and an advance from one of the foot regiments I had behind the hill saw off the British cavalry..
 DG then unleashed his attack up the hill; lead by Beinheim's and Derring's they came storming up the hill - in the next picture Derring's face up Bourbonnais, Beinheim are about to enter the farm..
 At which point the second astonishing event of the night occurred - not only did Bourbonnais hold, but with the Beinheim regiment having taken the farm house, Nivernaise threw all caution to the wind, attacked, and threw them straight out and down the hill..!

...and that was largely it for the Allies - de Montreval had routed the wagons, and got the central British artillery on the run, I'd unleashed my cuirassiers against the shaken British Brigade, and DG decided enough was enough and departed the field...

Post Match Analysis:
This game is the third in the linked series of five games that make up the "Raid on St Michel" mini-campaign, so casualties and effects from the first two games have been carried over... rules used for the game were Will McNally's Seven Year War rules, modified for the War of the Spanish Succession (details of those changes are on my project blog).
So, once DG and I had worked out casualties and the saving throws from game two ( "Rear Guard" which you read by clicking here), I then added in the additional forces that come into play in this scenario (no extraneous details - you need to pay the purely nominal amount this excellent little booklet costs to get those!)
Having done that we ended up with the following - in this campaign the British fill the role of the Vereinigte Freie Stadte (VFS) and are the "invaders" - you'll note that some of the British units are carrying casualties from the action described in "Rear Guard"... We agreed between us before the game that DG could combine units if he wished, so he decided to move the remainders of Regiment Goor (who were badly mauled in the last game) into the Beinheim Regiment in order to build them up into a meaningful force.. as a reminder full strength units in my games are 5 points (6 for over strength), once you start getting less than 4 then it starts to affect firing, and of course morale, so overall it was a good move.. please click on any of the graphics for a more pleasing, and bigger, view:
 The forces of Lorraine were played by the French, who for this campaign are the "invaded"... again - casualties are notable (though in both cases are casualties were slightly less than those suggested for the one of game in the book). As my last action I threw a dice and received a length of timber breastwork as additional defensive strength..
  All in all then fairly evenly balanced in terms of points, but the British are right bu**ers when it comes to melee and shooting... I'm an adherent of national characteristics, so in a balanced fight, I would always expect the British to have a slight advantage - but that's based on my reading into the history of the time rather than rampant jingoism...!
 Here then we have the starting positions for the game... the French forces are nearest us, table was 8' x 4'. Deployment area's were as per the book....
 In the distance DG had organised his troops into two brigades of infantry, with the cavalry split between the two.
 On his left, so further away from us in the picture, is the British brigade comprising all the regiments of British foot except Derring's, with two regiments of British cavalry in support. On his right was an Allied brigade comprising Dutch (2) Swiss (1) and British (1) regiments, most of his artillery, and the remaining regiment of British cavalry. In the centre, however, was not very much at all - one gun, a regiment of cuirassiers, and the wagons to (hopefully) take away the loot...
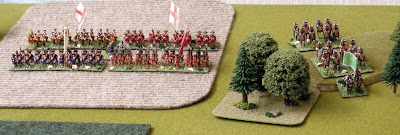
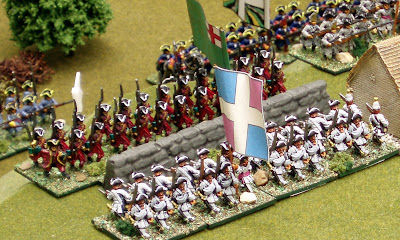
 The British Brigade in all it's glory... Ingoldsby's and Howe's in the front, Meredith's and the Guards in the second rank..
I had the advantage of hidden deployment, as there were at least two hilly area's to shield my preparations from prying eyes... I'll be the first to admit that I had made my preparations primarily to protect St. Michel itself so all my artillery was either on the hill (left and right front edges), or guarding the entrance to the town (behind that timber breastwork). Of my foot, other than one regiment (Bourbonnais) on the hill top, along with one regiment (Agenois) protecting my left flank (you can just see them behind the barn in the next picture) there was just one regiment on the smaller hill to my right (Toulouse - just out of picture) the rest were hidden - five regiments of surprises was my ardent hope...
 The cavalry were split equally between the two flanks as I figured those could be usable to protect both due to their manoeuvrability, again though, three of these were hidden - two squadrons of cuirassiers in St. Michel, another squadron of French horse hidden in the gullet behind the small hill to my right.. His deployment of the large British brigade opposite my right flank came as a bit of a surprise then!
So how did the game turn out - well it was a bit of a game of two halves as our soccer pundits are want to say... with a little bit of artillery naughtiness at the beginning.
The artillery naughtiness was over fairly quickly to be honest, with both my guns on the hill silenced after some typically accurate firing from DG! I have to admit to being a little downhearted at this point, as I'd just lost most pf my ability to hit at distance.. ah well, I ordered the Bourbonnais to lie down behind the wall, so that they got complete cover from the artillery (but couldn't fire back), and waited for events too unfold....
Right Flank - First Half
The first part of the game then started out with a strong advance by DG on his left flank with the British Brigade and accompanying cavalry.
 Sensing things were going to get out of hand, and with only two regiments of foot to DG's four, I decided to pull them back towards St. Michel. I sent out my two French cavalry squadrons to cover the retreat - in the picture above the first of them has trotted out to face the British squadrons...
Cover the retreat?? How wrong could a man be.....!
So the first regiment (de Montreval) faces up to the British squadron and charges, while the second squadron lines up behind - and whammo... the first British squadron is sent reeling! The French squadron then halts, gives fire, causes the second British squadron to halt shaken, and in the subsequent morale check they rout and flee... two down and none to go!
 Leaving the other squadron to pin the British infantry, I sent de Montreval round to the rear - a target rich environment if ever there was one - while in the meanwhile the two infantry regiments I'd sent to St. Michel were wheeled to face the other British regiments of foot. From a position of strength the situation had changed completely, and following some exchanges of volleys, further British retirements led to a collapse on this flank.
Left Flank - Second Half
On the left flank, after an initial advance, DG had been happy happy to halt while he focussed on the British advance.. in the picture following my artillery has been neutralised, he has halted his infantry and is pushing forward with his cavalry to try and hook around the barn, and my flank..
 A quick volley from the Agenois regiment in the barn, and an advance from one of the foot regiments I had behind the hill saw off the British cavalry..
 DG then unleashed his attack up the hill; lead by Beinheim's and Derring's they came storming up the hill - in the next picture Derring's face up Bourbonnais, Beinheim are about to enter the farm..
 At which point the second astonishing event of the night occurred - not only did Bourbonnais hold, but with the Beinheim regiment having taken the farm house, Nivernaise threw all caution to the wind, attacked, and threw them straight out and down the hill..!
...and that was largely it for the Allies - de Montreval had routed the wagons, and got the central British artillery on the run, I'd unleashed my cuirassiers against the shaken British Brigade, and DG decided enough was enough and departed the field...

Post Match Analysis:
- DG's plan was good, I'll be the first to admit that in this game the dice turned my way (for a change!) but everything hinged on the dramatic first successful charge of the French de Montreval cavalry - the rest was like a domino effect...

- Next step is to roll some safety throws to see how many troops return to the colours - I'll do this is in the next few days
- No glaring inconsistencies in the rules this game - we've been playing them long enough now that they play pretty much as we want them to... I will add an update to the rules to allow men to lie down for improved cover (I'd read somewhere in the week before of an account of Marlborough letting his men do this at Blenheim to spare them the worst of the enemy artillery barrage)
- Tea on this occasion was PG Tips decaffeinated, of which two or three breaks were taken to consume, whilst friendly banter was exchanged, the loft ladder rebuilt (don't ask - at one point I thought we'd be stranded!), and Border Strawberry & Cream Shortbread eaten (very nice!!).