 At last you breathe, some table top action.. well,of a kind.. this one was played out over 13 or 14 moves... on Skype!
You may remember that the campaign started with the attack on the gunpowder mill and arsenal at Petreville – which DG won :
Set Up/OOB
The Game
..in this scenario, the fourth in the campaign, an Allied relief force (me) has arrived to attempt to take back the mill..
Forces are as per the following (NB. No artillery - the chance of stray cannon balls is still to horrible to even contemplate...
)| Country | Unit Type | Unit Name | SP | MP |
| French | Cavalry | Souastre | 5 | 6 |
| French | Infantry | Bearn | 5 | 6 |
| French | Infantry | Navarre | 5 | 6 |
| French | Infantry | Toulouse | 5 | 6 |
| French | Infantry | Nivernais | 5 | 6 |
| Country | Unit Type | Unit Name | SP | MP |
| Allies | Cavalry | Schomberg | 5 | 6 |
| Allies | Infantry | North and Grey | 5 | 6 |
| Allies | Infantry | Dering | 5 | 6 |
| Allies | Infantry | Goor | 5 | 6 |
| Allies | Infantry | Beinheim | 5 | 6 |
Set up notes:
- As the forces are small, no Brigadiers were allocated, just the C-in-C..
- French will be defending the arsenal, and can deploy anywhere on the table below the road running across the top of the following; the Allies (me) enter the table from the edge at the top of the following:
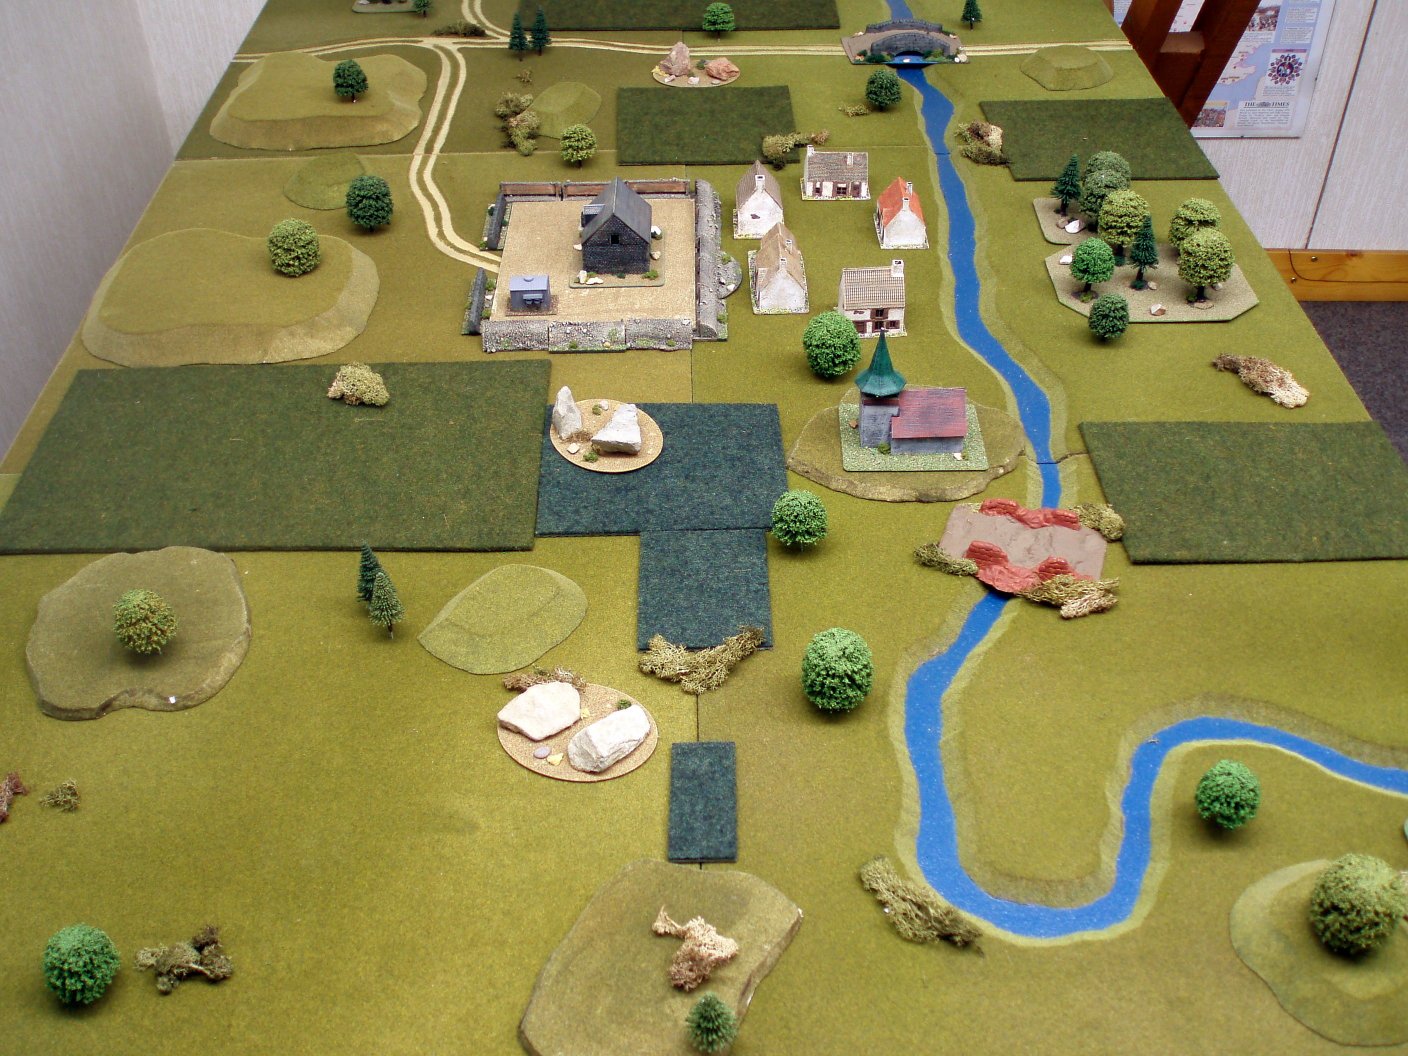
- You'll note that the forces are equivalent (even down to morale bonus), but that the French start the game in control of the (fortified) mill; the Allies get the traditional weighting in favour of the attacker from the fact that in my rules British and Dutch troops get a firing bonus (it emulates firing by platoon)
- It’s a 6’ x 4’ table and we used our usual WSS rules (a modification of the Will McNally AWI rules - details on my project page [clicky])
- Both sides can deploy in any formation they prefer - the French may start the game inside the buildings if so preferred.
- Wood is open; all hills are gentle; river not crossable except at the bridges (which are wide enough for one base width column); rocky outcrops are rough ground; the mill has a surrounding wall; houses will hold one unit each/the mill and church will take two
- Winning conditions:
The winning side needs to ‘control’ the mill at the end of the game… DG came up with a hideously complex formula for working this out - I agreed to it of course, but put him in charge of counting the casualties and working out if any of the conditions in the formula had been met! (For the record they worked out quite well..
)
- "Control" means sole occupancy of the mill
- Game ends when at the end of a Turn one side
- 1] Has 8 or less SP remaining [68% + losses]
and - 2] Has a negative 2+ SP difference from the other side
and - 2] Does not control the mill
or - 3] Concedes
That side is then obliged to quit the field. So, as long as a side controls the mill they can't lose Hint: Read the following slowly and carefully :o)))))) (he knows me so well)
EG1: Side A 7 SP, Side B 8 SP Mill control N/A; Game continues [1 SP difference]
EG2: Side A 6 SP, Side B 4 SP Side B controls mill; Game continues [Side A has a positive 2 SP difference, but Side B controls the mill]
EG3: Side A 4 SP, Side B 6 SP Side B controls mill; Game ends [Side A 4 SP Side B 8 SP, negative 2 SP difference,Side B controls mill. Side A quits the field]
.. and finally :o)
EG4: Side A 7 SP Side B 4 SP Mill uncontrolled; Game Drawn [Both sides <= 8 SP, 3 SP difference, Mill uncontrolled, Both sides exhausted and quit the field]
The game started with French deployment and DG chose to garrison the two houses faving my entry with a regiment apiece, and two regiments in the mill .. he positioned his cavalry by the church bridge to act as a mobile reserve
I chose to bring all of my forces on in column, from the road top left of the map above.. just for once I had a plan.. frontal assaults are deadly and I was hoping I could string DG out enough that I could force an entry... and it worked... leaving Goor as a reserve, I marched with the rest of my force quickly down the mill access road; DG had to move Toulouse to cover, but wasn't quite quick enough with Nivernais, and Schomberg's dashed at the wall in column, and charged over it into their flank and routed them... now isn't that a cracking mental picture..
 |
| Schombergs have charged over the wall- Nivernais can be seen "departing" to the village - red pin - Toulouse remain but are looking perturbed.. On the road, Beinheim are far right, Derings (green flag), and at the back North and Greys regiment |
Things were not going all my way however as DG had bought his cavalry up - Beinheim deployed to line, fluffed it, and were caught mid manoeuvre and sent running... Derings came up and sent the cavalry running with a well aimed volley, and also saved the day..
 |
| A few moves later - Toulouse have been sent packing (far wall) - Derings (green flag) have stabilised the flank, Beinheim (centre bottom) have recovered and are getting a good talking to from the C-in-C. On the other flank Goor are sending out crashing volleys while retiring slowly (and single-handedly keeping half of DG's infantry otherwise occupied!). North and Greys regiment has entered the powder mill to consolidate gains |
Gathering Toulouse he put them into the mill building, and a move later they were joined by the now recovered, Nivernais - North and Grey were too slow and Toulouse just beat them to it
I bought up Derings and both sides then started exchanging volleys... two crashing volleys (two double sixes, successive moves!) from Derings did for Toulouse; cover or no, they routed - Derings then followed up with a successful assault on the mill - they were in!
North and Greys were not so successful however, and a failed assault, followed by a failed morale throw saw them heading off for safety in some discomfort..
In the meanwhile Schombergs had followed up on their earlier success and routed DG's cavalry - at this point the picture was as follows:
 |
| Derings enter the mill... Brave boys! |

Couldn't go on forever though and in the end DG got them (following) too late to change the overall picture though...

Back in the mill and a ferocious fight ensued within the confines of the building with Derings eventually victorious and expelling Nivernais for good (picture following)..

At which point DG told me that his complex formula had resulted in a victory for me as he was below 8SP's in total, with me having a positive 2 SP difference and also being in control of the mill.. hurrah!!
Post match analysis:
First the butchers bill..
| Country | Unit Type | Unit Name | SP | MP |
| French | Cavalry | Souastre | 1 | 2 |
| French | Infantry | Bearn | 2 | 3 |
| French | Infantry | Navarre | 3 | 4 |
| French | Infantry | Toulouse | 1 | 2 |
| French | Infantry | Nivernais | 1 | 2 |
| Points remaining: | 8/25 | |||
| Country | Unit Type | Unit Name | SP | MP |
| Allies | Cavalry | Schomberg | 5 | 6 |
| Allies | Infantry | North and Grey | 2 | 3 |
| Allies | Infantry | Dering | 5 | 6 |
| Allies | Infantry | Goor | 3 | 4 |
| Allies | Infantry | Beinheim | 4 | 5 |
| Points remaining: | 19/25 |
So the French got a right thumping - the points lost is slightly misleading, as a fair amount of them were as a result of my outrageous dice rolls - four of them were lost just as a result of those two double sixes! Having said that I was most chuffed with my plan..
Laurels and battle honours go to Derings and Schombergs (who continue to be my favourite cavalry regiment), and I think possibly Goor as well for holding that flank on their own-some for so long..
Playing via Skype worked out reasonably well but there is no doubt that the remote player suffers from having to see everything via the camera - going to see if for the next game I can suspend the camera above the table to give DG a better view
This one played out in about 3 and a half hours, which is better than 6 months plus...
Cheers DG!
Good to see you got in a game at last, even if it needed technology to conjour up your opponent.
ReplyDeleteDavid - yes, very pleased...! DG is down for Warfare next month so stay tuned for a more traditional game!
ReplyDeleteHi Steve - that was an enjoyable read and a great looking 'traditional' WSS game (ie non hex!).
ReplyDeleteI was also looking through your AWI pages yesterday and noticed reference to the rules. The link seems to be broken but I would be interested to see a copy of your current version, would that be possible please? I'm a bit done in with hex terrain and yearn for something more realistic for my 6mm AWI figures. Do you think they could be adapted for a smaller scale?
Any help much appreciated, keep up the good work,
All the best,
Lee.
Lee, Hallelujah, another soul is saved from the tyranny of the hex... !! :o)
DeleteI've been through the AWI project page today and started tidying it up.. You're right about the broken link, it's a great shame, but that amazing resource the FreeWargamesRules website, appears to no longer be in existence... I have found another link though and have updated the web link on the page.. Will also has his own blog for these rules here: http://willawi.blogspot.sk/
I think I'll upload my own versions to the SYW and AWI pages... of the two, the SYW set is marginally different, but the units look better (4 bases as opposed to two)
They would work for any scale, and are infinitely tinkerable with providing both sides are the same... for 6mm I would just scale the distances down - cm's instead of inches perhaps?
Feel free to ask any number of questions - either here, or via a comment on the project page....
Thanks Steve, I'll have a look at those rules.
ReplyDeleteRe the hex mentality, it's surprisingly difficult to break out of once you get locked into it. I'm going with 44 figure battalions for the regulars - slightly smaller for militia - and I want to be able to march them around the table, change formation and fight etc without the hex restrictions for a change :-)
I'll go check out the AWI pages again now,
Cheers,
Lee.