Campaign Diary..
Day 1Introduction - source, map, Berthier Campaign Manager, etc.
Second Post - fog of war
Third Post ..the British and American first move..initial plans..
09:00 Day 1..
Fourth Post - Campaign - Move 3
11:00 Day 1 (move 4)..
Skirmish at Twogates House
12:00 Day 1 (move 5)..
13:00 Day 1 (move 6)..
14:00 Day 1 (move 7)..
15:00 Day 1 (move 8)..
16:00 Day 1 (move 9)..
17:00 - 19:00 Day 1 (move 10-12)
19:00 - 20:00 Day 1 (move 12-13)
21:00 - 22:00 Day 1 (move 14-15)
23:00 on Day 1 to 08:00 on Day 2 (move 16-25)
Day 2
23:00 on Day 1 to 08:00 on Day 2 (move 16-25)
10:00 to 12:00 - Day 2 (move 27 & 28)
12:00 - 15:00 - Day 2 (move 29-32) Found him!!!
15:00 on Day 2 to 10:00 on Day 3 (move 32-51)
Day 3
15:00 on Day 2 to 10:00 on Day 3 (move 32-51)
11:00 Day 3(move 52)
"Night of the long knives".... campaign game report
15:00 to 17:00 - Day 3 (move 56 & 57)
17:00 on Day 3 to 02:00 on Day 4 (move 58 to 67!)
Day 4
17:00 on Day 3 to 02:00 on Day 4 (move 58 to 67!)
03:00 to 05:00 - Day 4 (move 68-70)
The Skirmish at Carnine
Move 73 and 74
Move 75 to 80
Move 80 to 82 - another small skirmish!
Day 5
Move 83 to 91
Move 92 to 100
The Battle of Camsix - End of the Campaign
Introduction It must be the weather, but as I cycled into work one day (this was Spring 2008) I was thinking that it had been far too long since I had last run a campaign (there goes that rush of oxygen again...). One off games are great fun, but campaigns are a great way of introducing the bigger picture, and they also have a habit of throwing up those lop sided games that provide such a mental challenge....Last year I started the campaign in Charles Grant's "Programmed Wargames Scenario's" book ( highly recommended b.t.w, whether your a solo gamer or not - click on the link for details..), but somehow lost my way and never got round to finishing it. Rather than waste this effort then, I decided to pick it up where I left it, but when I looked at the campaign diary, and my assorted notes, I was struck with the idea that, really, I'd prefer to start it again, and rather than do it solo, I'd challenge my regular opponent, DG. Suffice to say, that after an interesting weekend tidying up the logistics, maps, rules etc. I banged off an email to him with the challenge. Now I don't know if it was DG being nice, but it happens that in his response he happened to mention that he'd just been thinking about a campaign that morning! Great minds....Anyway, by way of an incentive, I thought I'd document the campaign here as a way of tempting you to start your own campaigns, and who knows, perhaps giving some idea's that people haven't thought of before??So where did I start...??

- Step one is the map; with me it's always the map, as without an interesting map I can't summon the enthusiasm to launch my miniature forces across it. In this case I used the map from the book (hereafter referred to as the 'master map'), which I simply scanned into the PC and coloured (no reason to do this, but the original is just black and white, and I think it looks better now)....The map is shown above and to the left (clicking on it, or any of the other pictures, gives you a bigger image by the way), and as you can see it was already gridded, ten rows by eight.In the book Charles gives the size of these squares as being five "table" feet across, and if you were to solely use the map "as is" (ie. putting it on a pin board and using pins to mark units and movement)then a quick calculation from your favourite rules would allow you to figure out how far your miniature forces can march on a hourly/daily basis...
-
Next, I usually then work up the reason for the campaign, troop numbers,
period, etc but in this case most of this was provided and I only needed to
decide on "period".In this case, because of the numbers of troops required,
it's going to be set in the American War of Independence; I wanted to make
it Marlburian, but don't quite have the numbers of units required yet.NB.
The book has a huge amount of detail, that allows you to play the campaign
solo, with programmed responses depending on situation - I have no intent of
duplicating that here, and in fact will give as little information from the
setup as I can get away with by way of an incentive to go out and
buy the book...

-
As I'm playing against DG (who lives in deepest darkest Wales) then email is
going to play a part, so I knew I would be using Berthier to manage the
campaign. There are a number of other applications you could use, but
Berthier (which is free, and which you can get by clicking here)
for me has some distinct advantages - most importantly all movement is
hidden until sightings are made, it has scouting rules, the ability to use
couriers, ability to use email to send move files, etc etc. Some of these
I'll cover later. I loaded the master map image into a little application
that comes with Berthier called GridMap. GridMap allows you to open any map
graphic (in BMP bitmap format), superimpose a grid of any size you want, and
then define each of the squares in the grid with a terrain type. What it
means in this instance was that I didn't have to stick with the bigger grid,
but could go to a much smaller one to allow greater control of
movement/time... this resulted in a Berthier map that looked like the
following:
Once you finished that, GridMap then allows you to save the file as Berthier Campaign file.

-
Now it starts to get (even more) interesting - opening up Berthier, and
loading the campaign map you just created, you can then edit the campaign to
set up the final pieces of information that Berthier needs; there is also
the option to add in some fog of war... (NB. Berthier comes with a very
handy instruction manual which shows you step by step how to do the
following, and what each of the variables does.... far more informative than
my updates following!)First, I set up the movement as I'd already done a
little of this above, so it was a quick and easy... a quick calculation gave
me the ratio of Berthier squares to master map squares, which then allowed
me to work out how far my miniature forces could march across the Berthier
map in any period of time. Once I had that I then took the basic move, and
modified it for the terrain types that I had present on the map. Again, this
is fairly straight forward, and basically I just used the modifiers from the
wargames rules (click here)
I use, which happily are expressed as a percentage. You can then enter these
in the "terrain effects" table, see mine following - these are hourly
rates:
 You'll also note that supply is "off" (more on that in a minute) and that I
defined five troop types (Line Infantry/Light Infantry/Cavalry and two types
of Artillery); you can define up to eight but these were the only types that
are present in my campaign so that was all I set up. Finally - at the bottom
of the screen you can see I've set a courier rate for messages. DG and I use
an honour system - only those units in the exact same geographical location
as the C-in-C can act as desired - all other units have pre-defined orders,
so couriers are required if you want to change them. Berthier handles all
that for you, you send the message, and at the proscribed point in time that
it decides the courier has reached you, you get the message - very neat!
You'll also note that supply is "off" (more on that in a minute) and that I
defined five troop types (Line Infantry/Light Infantry/Cavalry and two types
of Artillery); you can define up to eight but these were the only types that
are present in my campaign so that was all I set up. Finally - at the bottom
of the screen you can see I've set a courier rate for messages. DG and I use
an honour system - only those units in the exact same geographical location
as the C-in-C can act as desired - all other units have pre-defined orders,
so couriers are required if you want to change them. Berthier handles all
that for you, you send the message, and at the proscribed point in time that
it decides the courier has reached you, you get the message - very neat!

Back to top...
Second Post...so where I left off, we'd got the map, loaded it into Berthier, set the terrain, and decided the movement rates for each troop type in that terrain. It suddenly struck me as I was cycling home last night though, that I'd not actually told you what the background to the campaign was! Suffice to say that the peninsula depicted in the map is held by the Americans (myself), and is about to be invaded by the British (commanded by DG in the guise of that legend amongst - fictional - British generals of the American War of Independence, General the Honourable Harcourt Wade-Smith) who have a clear mission of one, occupying all major terrain features and two, destroying or dispersing all American opposition.
Fog of War...so with that, the next is to start adding some of that
"fog of war" I mentioned.
)...and with that - the campaign is set, and I now await the British
first move! I'll post further as the campaign progresses...
- In the "Campaign Options" menu, Berthier allows you to define how accurate your reconnaissance reports are going to be, so that's my first opportunity to inject some uncertainty into the proceedings (and this affects both sides, so I'm not sure what I'm gloating about!) For this campaign I've set the value as 20% which means that the reports can be anything between 80 & 120% correct... by the by, you can also define what kind of reports you want - just numbers of troops, numbers and troop types, full report (with unit names) etc. As I was using option for percentage correct reports I went with just numbers...The second opportunity for uncertainty lies in the option entitled "Terrain Modifies Recon. Range". Berthier works out sightings based on a distance in squares from a unit (more on this in the next step), by ticking this option, the number of squares it takes into account is modified by whatever the terrain features are in the squares around the unit, so, if a unit is in the middle of a wood, or up a hill, or the wrong side of an impassable river, your recon range is considerably less (an in the case of seeing a unit just across that river, nil)... needless to say I have elected to include this option...and that's basically it on this screen - there are a couple of other options that you can also set but for this campaign neither was required. Supply is "off" (the likely length of the campaign is going to be such that supply will not be an issue), and I ignored the options for combat casualties (Berthier will fight your battles for you if you want, it just gives a result with casualties per side) as in this campaign we'll be playing all the battles on the tabletop and tracking rosters on paper.

-
All that remains to be done now is add in the combat units for each
side - Berthier can handle 18 "units" a side. The units can be
anything you want - squads, platoons, battalions, regiments, brigades,
corps, divisions, or even armies... in this game, certainly for the
Americans I defined my units at the regimental level though it's fair
to say that they'll be grouped into brigades by the end of the
campaign.... hopefully...
At the same time you enter the unit you also define it's
reconnaissance range, level of supply, and strength. The latter two I
didn't bother with, as above supply is off, and as we're playing all
battles on the table unit strength is not required. The recon range I
set to be equivalent to movement range though - in essence then, a
unit has the ability to "see" things within a single move of itself...
the thinking here is that units on the march would always have some of
their members off on the flank, or out front - this represents those
individuals. It also gives cavalry an inherent ability to see further
than other units (because their move is further), and therefore
encourages their use in their traditional role... if I'd wanted more
fog of war, then the shorter the recon range the more likely you are
to blunder around trying to find the other guy!For this campaign the
numbers of units are defined in the scenario, along with some specific
rules on deployment for the Americans.. as mentioned before I'm not
going to go into huge detail on what these are (you need to buy that
book!), but in summary, the Americans are fewer in numbers and have
specific requirements on deployment - DG is not aware of what these
are, but he's been given a rough estimate of what numbers to expect
(I've also told him he's not allowed to read the blog!)
 )...and with that - the campaign is set, and I now await the British
first move! I'll post further as the campaign progresses...
)...and with that - the campaign is set, and I now await the British
first move! I'll post further as the campaign progresses...Back to top...
Third Post ..the British and American first move.....while I waited for the British first move, I sat down and had an enjoyable thirty minutes deploying my troops on the map (some of which was pre-decided by the scenario), deciding which unit to place my HQ with (important when orders need issuing), and deciding orders for all my remote units (ie. those not under direct command of the C-in-C).For me this is one of the joys of campaigning, the decisions you're making are not the usual table-top one's - probably much closer to the decisions that the real military we are simulating (badly) would have to make... for right or wrong though, my basic set up is as follows...
- In essence the American response is based round the premise that if the British advance via the eastern route they will withdraw so as to consolidate & give battle at 9.; if the advance is via the western route they will consolidate at 7...
-
As a result of the scenario requirements my numerically inferior
forces (may as well start making excuses now...!) are scattered
throughout the peninsula - all villages and towns are occupied by
varying numbers of troops. In addition one cavalry regiment is
deployed to patrol the road between 1. and 2. - I decided where it was
by counting the road squares between the two locations and generating
a random number in that range... by the time I finished, the Berthier
deployment map for the Americans looked as follows ie. the red squares
mark where the Americans are deployed (please click on any of the
following for a better/bigger view)

- Most perplexing of all was the decision as to where to place my C-in-C, I must have changed my mind at least half a dozen times, but basically you have three choices -
- gamble on either a west or east advance and place the commander in 1. or 2. respectively - but putting the commander in either of the two frontier towns and then having the British arrive on the other flank didn't bear thinking about - it just didn't make sense.
- adopt the WWI approach and keep the commander well to the rear in 8/. where he's able to marshal his forces in a more relaxed and orderly manner. This is also the peninsula's major town so it has the biggest garrison, another plus point... my concern though is that you are a long way away from where the major action is going to be when located here... and that could add delays..
- the middle ground - and that's what I went for - I placed my HQ in 4/. where I'm near enough the front line troops to be able to influence their actions fairly quickly, and also central enough to be able to react to an advance on either flank. I'm also able to bring up my re-enforcements "fairly" quickly.. 'no brainer' as they say, lets hope it doesn't turn out to be a description of my performance!
When I fire it up, the first thing I go to in Berthier is the Red
deployment overview map, as that shows me where all my units are, and also
any sightings that I may have - this is it for this move: ..you'll notice that there is an ominous blue square just to the north of
town 2/. It looks like the British have opted for an advance with at least
some of their units on the east of the two roads - no idea who or how many
though, so I need to find out what or who they are...This move is a pretty
easy one for the Americans - I only have two units that can move. I give
the cavalry on the road between 1/. and 2/. orders to move towards 2/. and
set them off on their way, I then order the American unit in 2/. to move
towards the sighting - I need to find out who and what they are...When the
units arrive at the square I find the following:
..you'll notice that there is an ominous blue square just to the north of
town 2/. It looks like the British have opted for an advance with at least
some of their units on the east of the two roads - no idea who or how many
though, so I need to find out what or who they are...This move is a pretty
easy one for the Americans - I only have two units that can move. I give
the cavalry on the road between 1/. and 2/. orders to move towards 2/. and
set them off on their way, I then order the American unit in 2/. to move
towards the sighting - I need to find out who and what they are...When the
units arrive at the square I find the following:
...British cavalry. My advance has brought a number of units within recon
range and they are now known to me.

I send messages to all other American units advising of the British
advance on the east axis, I then advise DG that it's my intention to break
off from the engagement. In our campaign rules, where this happens and one
side wishes to force battle, then the side breaking off takes 10%
casualties and withdraws straight back (it's a fighting retreat) - we'll
see what DG wants to do... if he doesn't wish to force battle, then we can
both withdraw without taking casualties.. but I know what I'd do if I were
him!My plan is now to withdraw on 2/. then my orders are to withdraw to
9/. as above... it promises to be a long retreat!Position at end of
American move.. things are hotting up..

Back to top...
Fourth Post - Campaign - Move 3..that ominous blue square that I spotted north of 2/ you may remember had metamorphosised into a whole clutch of sightings, but having broken off from the contact with the cavalry, I now find that I've been contacted again - by the same unit.....I have a couple of options - stand and fight - which isn't really going to do a lot of good against what looks like the whole of the British army, or break off again and attempt to follow the units orders... I go for the latter, so take another point of damage....the deployment map is now swarming with "nasty's" (incoming hostiles!) almost certainly a major British advance on this axis
 ..I also have a recon report that gives me a little more detail on how
many (to be taken with a small pinch of salt)...
..I also have a recon report that gives me a little more detail on how
many (to be taken with a small pinch of salt)...
..the cavalry (who are on the road between 1/. and 2/.), I now decide to
put on a hold order for the time being - the British can come to me.What
concerns me most now is the other ominous blue square on the
west road - looks like DG has decided not to put all his eggs in
one basket - I've ordered the American unit their to hold while I wait for
the British to advance so I can recognise who they are. If they don't then
I'll start withdrawing next turn......with none of my couriers having yet
arrived at the other American units, that's it for this turn.
Back to top...
11:00 Day 1 (move 4)....things are not getting any easier for the Americans but the very difficulty of the position makes the final decisions easy - within the confines of the orders I've given my units I only have a limited number of options. This is what it looks like as the start of the move (click on any of the pictures for a bigger view):

..at 2/. DG has advanced to contact and offers battle against my sore
pressed Militia - their commander decides that two retreats is enough, and
in a shades of Bastogne kind of mood responds "nuts" to the British
demands. They are joined by the American cavalry who sidestep the British
unit on the road and join their Militia colleagues in 2/. The cavalry
bring in a recon report:

..on the other side of the peninsula, in danger of being surrounded, the
commander acts on his orders and withdraws..
 ..the position at the end of the move then is as follows - I've worked
the recon reports to show me who's where..
..the position at the end of the move then is as follows - I've worked
the recon reports to show me who's where..
So it looks like that Sudan game on Saturday is postponed for the time
being...
Back to top...
Skirmish at Twogates House DG and I got together yesterday evening for the first, and preliminary, skirmishing in the campaign... this turned out be a fairly short event as the fog of war had truly set in, and I had absolutely no idea that those advance British units were actually as large as they turned out to be..!

Suffice to say that when six entire infantry regiments comprising
King George's finest and their German allies, accompanied by two batteries
of light guns entered the table north of the hamlet of Twogates House (2/.
on the map) it came as a bit of surprise to yours truly, as my sole (under
strength) Militia was expecting one regiment and a battery of guns at
most! So - let's start with the battlefield (and please click on this or
any of the other pictures for a larger view):
 With plenty of time to spare and an enticing table set before us however,
I dragged out the soldier boxes, slapped down two French regiments, two
regiments of Continental's, and two regiments of regulars, plus some
artillery, and with roughly equal sides we decided to set to afresh for a
stand alone game...The Americans started off on the same edge as before
with the British opposite.. here you can see the French and one of the two
regiments of regulars deployed west of the hamlet on the road, the
Continental's were on the other flank just opposite the barn and log
cabin. The Americans had one of their guns unlimbered and facing down the
road towards the British, the other gun was on their far left flank
limbered.
With plenty of time to spare and an enticing table set before us however,
I dragged out the soldier boxes, slapped down two French regiments, two
regiments of Continental's, and two regiments of regulars, plus some
artillery, and with roughly equal sides we decided to set to afresh for a
stand alone game...The Americans started off on the same edge as before
with the British opposite.. here you can see the French and one of the two
regiments of regulars deployed west of the hamlet on the road, the
Continental's were on the other flank just opposite the barn and log
cabin. The Americans had one of their guns unlimbered and facing down the
road towards the British, the other gun was on their far left flank
limbered.


.while their French allies moved forward towards the wood.. (see next)


- ..all in all then an excellent game, and despite the fact that DG conceded when we totalled up the "bill" there was only a point difference in it - truth if any were needed that assaults really are "bloody" - mine in the first half had almost equaled his in the second..
- Truly dreadful dice throwing by yours truly in the first half (I think I'm still paying back for the game DG and I had a couple of months ago!) but managed to get it back in the second half... we had some discussion afterwards as to how to launch an assault more effectively - the secret is probably to get at least two units to one so that the one can't drive both off with musketry, but it's not easy to get the numbers given the largely linear nature of warfare at this time. All in all - totally realistic then..
-
Browsing
Will McNally's AWI blog (click here)
earlier in the week I noticed that Will had been playing around with
the idea of command and control - reducing the god-like status of your
table top brigadiers and generals... you can see the thoughts here (http://willawi.blogspot.com/2008/01/command-and-control-ideas-1.html) and we decided that we'd have a go with this game. We did change
one aspect, which was to drop the idea of the supplementary test -
basically we said that the commander could attempt to order all his
units, if one failed, then he just carried on rather than stopping....
general consensus was that for us the additional die rolls
didn't really add anything, and only slowed the game down (and the
speed of the game is one of the things we really like about it).. we
may not have been applying it correctly though, so I may drop an email
to Will for some more of his thoughts... it may just be of course that
neither DG or I are keen on rules that limit the actions of your table
top men, based on the characteristic of a table top general, when it's
us who are actually in charge...
we like a straight fight, and dice throws limiting movement &
action are just a luck element...but hey, that's just us!
-
All figures for this game were Minifigs 25mm's, terrain by TSS,
buildings by Hovels, tree's by K & M. Snake rail fences were
home-made (using extra long matches you can buy from the supermarket -
used for lighting BBQ's and wood fires etc.). The normal fences, are
Airfix, and I reckon that they are probably in the region of 30+ years
old - bought them with my pocket money when I was in Oz (forces family
so we lived in Sydney for a couple of years) supplemented by returning
coke bottles for the deposit..
- For those for whom I know it's important - the tea on this occasion was Twining's Everyday a lovely brew. More solid refreshments were provided by a plate of the emperor amongst dunking (and check this link out to know why we dunk!)biscuits, the digestive, and also a couple of generous slices of Wild Blueberry and Apple cake... truly we lived like kings!
Back to top...
12:00 Day 1 (move 5)....a move of consolidation - the initial disposition at the start of the move is as follows (and you can click on this, or any of the other pictures here for a bigger view):

- no couriers have yet arrived - you may remember that the commander of the militia regiment at 2/. (now known as Two Gates House), sent messages to all friendly units in move 2. The only units American moving are those who have spotted or contacted the British...
- One of these is the aforesaid militia regiment formerly occupying Two Gates House, who after the fearful drubbing during the skirmish (we can hardly call it a battle), join up with their cavalry (in the map above they are just south of the hamlet) and hot foot it south as per their orders.. one good thing - they both post reconnaissance reports that show the same results - handy for comparison purposes...
- The other unit is militia regiment that was at One Tree Hill (also known as 1/. - you may spot that I've substituted numbers for actual names, but to make it easier to remember them the number features in the name!) They are also hot footing it south following their orders - the only problem being that they believe the major British advance is on the west axis so are heading for entirely the wring rendezvous point - no problem - my assumption is that they are going to meet another American unit at some point in time who will advise them of the error - what's important at the moment is to conserve strength.....
 It also shows that my couriers have started to arrive, and next move I
get to start consolidating in earnest..!
It also shows that my couriers have started to arrive, and next move I
get to start consolidating in earnest..!
Back to top...
13:00 Day 1 (move 6)....and the campaign moves on - further consolidation by the Americans, but still the fog of war dogs our steps...Hard pressed couriers arrive for a number of the units, but especially the garrisons of Threepwood (3/.) and Fourstones (4/.). The latter in particular is key as you may remember that that was where I'd placed my C-in-C.The Threepwood garrison acted as I'd hoped - their standing orders were to withdraw to Carnine (9/.) in the event of an eastern advance by the British - and it's clear that this is what happening. Throwing the antique family hip bath into a cart, the garrison commander is on the road inside the hour, and by the end of this move is on the main trunk having just left the little peninsula that Carnine is situated on...The good news is that the C-in-C also got his courier before the contradictory message came in from the Militia regiment on the eastern flank - stopping only to issue an "immediate" order to all units under his command to meet at Carnine, he too was on the road before the hour was out - slower (minor) road though... he's unlikely to get there before the next day unless some night/force marching is considered...On the east flank however, the courier arrived at just about the same time the retreating Militia did - and the garrison commander at Fivehead (5/.) decided that the news he had been given was enough to assume an eastern advance by the British, and accordingly ordered his troops to join up with the retreating Militia and move to Sevenoaks (7/.) forthwith - go to hope those 'immediate' orders arrive soon!At the end of the move the position is as follows...

Back to top...
14:00 Day 1 (move 7)..Interesting move....the British have clearly opted to send their cavalry towards Fourstones (4/.) while their infantry and artillery continues to advance down the main trunk.....now this is where campaigning gets interesting - what interests me at the moment is 'exactly how much of my deployment can DG see from his current positions'???I suspect that the infantry and my C-in-C may not be visible to him, so by now he should be aware that there are no sightings of any troops in Fourstones (4/.)....so here is the position at the beginning of the move:
 ..my guess is that the only American units he has visibility of are:~ the
ex-garrison of Threepwood (3/.), now hot footing it south with the
garrison commanders antique family heir loom finely balanced on top of a
small dog cart~ the still smarting Militia and cavalry, "fresh" from the
skirmish at Twogates House (2/.)..further interest also in the form of
much needed couriers to the units currently retiring towards Sevenoaks
(7/.) as a result of the British feint along the west road. The couriers
carry news from both the Militia formerly based at Twogates House, and the
cavalry that were patrolling road between their and One Tree Hill. This
allows me to change the orders for these units to move towards Carnine
(9/.)Couriers also arrive to advise the half battalion currently stationed
at Camsix (6/.) that they will be needed at Carnine (9/.) but they have
orders to wait for the other half of the battalion before they march and
these are at Tenterden (10.) I settle for a die roll and it confirms that
the half battalion in Camsix will march towards Tenterden to effect the
consolidation sooner (rather than staying put).....and after all the
American orders and moves are complete - you'll notice that British are
lost from view as I move away from them and out of recon range - but I
know where they are!:
..my guess is that the only American units he has visibility of are:~ the
ex-garrison of Threepwood (3/.), now hot footing it south with the
garrison commanders antique family heir loom finely balanced on top of a
small dog cart~ the still smarting Militia and cavalry, "fresh" from the
skirmish at Twogates House (2/.)..further interest also in the form of
much needed couriers to the units currently retiring towards Sevenoaks
(7/.) as a result of the British feint along the west road. The couriers
carry news from both the Militia formerly based at Twogates House, and the
cavalry that were patrolling road between their and One Tree Hill. This
allows me to change the orders for these units to move towards Carnine
(9/.)Couriers also arrive to advise the half battalion currently stationed
at Camsix (6/.) that they will be needed at Carnine (9/.) but they have
orders to wait for the other half of the battalion before they march and
these are at Tenterden (10.) I settle for a die roll and it confirms that
the half battalion in Camsix will march towards Tenterden to effect the
consolidation sooner (rather than staying put).....and after all the
American orders and moves are complete - you'll notice that British are
lost from view as I move away from them and out of recon range - but I
know where they are!:
Back to top...
15:00 Day 1 (Move 8)..Further consolidation - I've now lost all view of the British units that were approaching on the western road - no doubt they'll pop up at a time in the future when I could least do with seeing them!Other than that all American units proceed as previously - at the end of the move the view is as follows:

..what's interesting is that my last recon report showed that the three
British units I could see were comprised one unit only - interesting...
has DG dropped off a few elements to consolidate elsewhere?? Have I out
paced his artillery and that's why I can't see the main body? I'm betting
on the latter.... more anon...
Back to top...
16:00 Day 1 (move 9)..All the couriers advising of the British advance on the east road, and also the orders from the C-in-C reinforcing the orders to converge on Carnine have now arrived - all American units are therefore, on the march - some more slowly than others..!Sightings of the enemy at the beginning of the move are as per the following - there's only one British unit in sight, and my continuing assumption is that it is a unit of British cavalry (recon reports show a single unit only, though there may be two of course...) I also continue to assume that the rest of DG's units are following up, but more slowly due to having to pull his artillery - he may have decided on something else of course!Simple move for the Americans - they all continue to follow orders...Here is the position at the beginning of the move:

...and here's the position at the end of the move - everything is just a
little closer to Carnine:
Summary:~ the cavalry from the ex-garrison of Threepwood (3/.), has arrived in
Carnine~ the two half regiments of militia at Camsix and Tenterden have
converged..~ the Eighton Banks garrison which comprises a regiment of good
infantry and my artillery has received their orders and left for Carnine -
decided to let the infantry move on ahead as there's no danger the
artillery will be attacked in isolation..~ a half regiment of militia
recently based at Sevenoaks has received their orders and is now marching
to converge with the other half of the regiment who are at Carnine
already..Bottom line though is that is now the end of the day, and DG has
an interesting conundrum - does he continue to flog his infantry down the
road in the hopes of forcing some kind of tactical advantage at the
potential cost of stragglers and lost strength, or does he now rest up the
required period to march on a-fresh??? My troops have an altogether
different problem - given they all activated at different times they can
continue to march, albeit for different lengths of time... all of a sudden
I feel a bit like a general!
more anon...
more anon...Back to top...
17:00 - 19:00 Day 1 (move 10-12)The campaign also continues apace, and the reason I haven't posted is because effectively we are into the night time hours are the troops of both sides are resting - DG and I continue to exchange moves in case one of us decides to sneak in a craft manoeuvre when the other isn't looking, but on the whole no-one has moved and we are now up to move 12 (19:00)One thing we have changed is the rules for tracking fatigue - you may remember that in the original campaign instructions I'd put:"For every move after eight straight moves, there is a percentage chance that troops will begin to see disorganisation, stragglers, and other losses. If you decide to carry on then:o After the first move there is a 10% chance that each unit loses 1SP (strength point)o After the second move there is a 20% chance..o After the third move there is a 30% chance..o Etc..Units should then remain stationary for 2 hours per SP to regain any lost by forced marching."I was beginning to find this difficult to manage as not all my units were marching for eight straight periods so how do we track fatigue when a unit has moved a couple of moves, stopped for one, etc etc.?Not surprisingly DG contacted me at the weekend with the same issue, but being slightly more constructive than me had come up with an alternative mechanism...In essence he suggested we track fatigue per unit on a turn basis, using the following factorsAll units start with 0, each move you add or subtract any of the following that apply:Marching +2Asleep/not marching -3Combat +5Night +1Once a unit gets to 25 fatigue points (FP) it temporarily loses strength points (in my rules each unit has a strength value - typically 5). At 30 FP it loses 2 SP, 35 FP it loses 3 SP etc ,etcBy resting up and recovering fatigue points then strength points are recovered..Nice mechanism - easy to track (see following for the way I'm doing it), and immediately obvious which units are beginning to get dangerously tired..

So, in the above - the units are listed down the left - complete with
their identifying base numbers, their strength in terms of morale, and
also in terms of strength points - each unit then has two rows of data
showing "current" strength points, and the fatigue points... in the case
of 1st New York you can see that they've been marching pretty constantly
right up to 17:00 when they stopped to rest and started to recover
FP's..
Back to top...
Move 12 to 13 (19:00 - 20:00)
 ..as a reminder the campaign map is to the left (click on it and any of
the other pictures in this blog for the usual bigger view).Looks like the
British have made camp - no discernible movement, so I decided to match
their actions in order to keep my troops fresh for any move they make
later/tomorrow.Having said that it's obvious my troops are fresher than
his so at 19:00 (move 12) I got them on the go again - and as a result a
pleasing number of them arrived at the rendezvous point in not too tired a
condition.Having managed to concentrate my forces, it's now time to turn
my thoughts to what DG is trying to achieve...You may remember that his
orders are to "secure" the peninsula, and to do this he must:1. destroy or
capture all American forces and2. be in possession of all key areas,
crossings and centres of population.Clearly he's nowhere near meeting item
1/., but he's doing OK on item 2/. Next move I think it's time I sent out
a cavalry screen, to find where he is, and what he's doing with the rest
of his forces... then I need to think about how to split his force so I
stand a chance of beating him...At the end of the move my positions are as follows:
..as a reminder the campaign map is to the left (click on it and any of
the other pictures in this blog for the usual bigger view).Looks like the
British have made camp - no discernible movement, so I decided to match
their actions in order to keep my troops fresh for any move they make
later/tomorrow.Having said that it's obvious my troops are fresher than
his so at 19:00 (move 12) I got them on the go again - and as a result a
pleasing number of them arrived at the rendezvous point in not too tired a
condition.Having managed to concentrate my forces, it's now time to turn
my thoughts to what DG is trying to achieve...You may remember that his
orders are to "secure" the peninsula, and to do this he must:1. destroy or
capture all American forces and2. be in possession of all key areas,
crossings and centres of population.Clearly he's nowhere near meeting item
1/., but he's doing OK on item 2/. Next move I think it's time I sent out
a cavalry screen, to find where he is, and what he's doing with the rest
of his forces... then I need to think about how to split his force so I
stand a chance of beating him...At the end of the move my positions are as follows:
Currently in Carnine:
- Twogates Brigade (depleted infantry battalion plus some regular cavalry)
- 2nd New York (Continentals)
- New York Regiment (ditto)
- 1st Battalion Bourbonnaise Regiment (French regulars)
- 4th Dragoons (Continentals)
- 2nd Mass Militia (2)
Back to top...
Move 14 to 15 (21:00 - 22:00)..time I think for an update on the campaign - apologies for the break in service - DG was down here last weekend for Salute so a necessary break was required.As a reminder the campaign map is to the left (click on it and any of the other pictures in this blog for the usual bigger view)...because my units started moving some time later than DG's they are as a consequence significantly fresher so I've continued to consolidate on Carnine - my cavalry however, I've moved north and west of there to act as an advance warning of any British advance...The British however, are not moving - they're obviously whacked out
- the cavalry north of Carnine send a message in to report the presence of
that lone British unit and pull back a few squares towards Carnine - I
don't need to be surprised in the middle of the night by a quick British
advance!Now that my forces are mostly present at Carnine I can also start
to re-organise and brigade my forces - much easier to keep track at a
bridge level than the unit level..Positions at the end of move 15 are as
follows - the position of the British unit is based on previous
intelligence as the spotting unit has now moved back outside of recon
range..
...more anon...
Back to top...
23:00 on Day 1 to 08:00 on Day 2..time, I think, for another update on the campaign which has carried on despite the lack of posts - that's the way it's going to be when the moves are taking place overnight and in both instances troops are getting some much needed rest and sleep... I've no interest in boring you rigid...!..you may remember that because my units started moving some time later than DG's they were significantly fresher so I was continuing to consolidate on Carnine long after the British had taken to their encampments for the night.....positions at the end of move 15 (22:00 day 1) were as follows:
..and to be honest things have not altered much though it is now move 25
(08:00 on Day 2) - I can't speak for DG but I can advise that my troops
are fresh and ready to go and all my units are now at the rendezvous
point, with the exception of two cavalry vedettes that are positioned
north and west of Carnine to give me advance notice of any British
movement......you have no idea how worrying it is when your opponent just
stops moving - I know he's probably resting his troops, but DG is a wily
customer and I haven't excluded the possibility of an outflanking movement
(hence the scouts to the west). I've toyed with the idea of withdrawing on
Eighton, and Sevenoaks, but don't see the point as my current position is
defensively strong - the river is impassable except at the road. DG is
going to have to come and winkle my troops out of a strong defensive
position in order to win the campaign - so bring it on...
...more anon...
...more anon...Back to top...
Move 27 & 28 - 10:00 to 12:00 - Day 2..the results of my decision to put the cavalry "in harms way" is pretty swift - in their second hour of movement we spotted the first of DG's outposts:

..the recon reports identified these as single units:
 ...further movement in the second hour identified another single unit:
...I need to keep trying and for the next move I'll shift west and north
- somewhere on the peninsula DG has his main force - problem is - has he
slipped behind me???
...more anon...
...more anon...Found him!!! Move 29 - 32 (12:00 - 15:00 - Day 2)..you may remember if you've been following this extended "paint drying" session (are campaigns the wargaming equivalent of cricket - only interesting if you're actually playing?!) that the decision to put the cavalry "in harms way" reaped some swift rewards in the form of finally finding his vedettes, to the west of Carnine, but that I hadn't yet found his main force......with my absence at Disney, I had time to ponder on the difficulty I was facing, but then had a brainwave (I blame it on the third ride on Thunder Mountain which I think must have jangled my synapses). I had the thought that it didn't make much sense to have your army north of a cavalry screen running north-south, it made far more sense if you were west of the screen... so on my first turn on returning I ordered the cavalry to Camsix.. and am pleased to say that I've found him!!
 Here's the recon report from that half squadron Lauzun's Hussars that I
ordered to Camsix..
Here's the recon report from that half squadron Lauzun's Hussars that I
ordered to Camsix.. ..and that allows me to update my master map to show exactly where the
British are..
..and that allows me to update my master map to show exactly where the
British are..
...I now have (or rather "had" as I've already made my mind up) two
decisions to make - what to do with the scouts, and what to do with the
main army.The first one was easy - I'll pull the scouts back towards
Carnine gradually - making sure that I continue to shadow the main British
force. The second one is slightly more difficult, but only for about 30
seconds - the army stays put - and as soon as the messages arrive, I'll
start fortifying that side of the town.......more anon...
Back to top...
Move 32 (15:00 Day 2) to 51 (10:00 Day 3)...it's been some time, and in campaign terms we're currently up to move 51, so I thought I'd bring you up to date with what's been happening in the campaign. Yes, we're still playing, but at the moment we're into a cautious manoeuvring phase, and rather than bore you rigid I decided to lay off the posts for a while so as to give a summary/overview that may be slightly more entertaining......you may remember that the last time I posted I was cock-a-hoop, as following the decision to put my cavalry in "harms way" I'd hunted down DG's main force at Camsix (6. on the map) behind a screen of his own cavalry. That was late in the previous day, so after getting messages back to my main force in Carnine (9.) the rest of the day was spent shadowing his cavalry, and watching what the rest of his force was up to.After a quiet night he started moving westwards again in the early hours of the current campaign day, and I am wholly expecting a major engagement 'today'. His cavalry have scouted Eighton (8.), but in the last couple of hours his main force is just coming into recon range.Overnight, I ordered a couple of moves that should help to offset the superiority DG has over my forces...Firstly I ordered the infantry in Carnine to start digging earthworks - in the rules we're using, a close order infantry unit can construct 1 strength point of fieldwork every other table top move. There are 6 tabletop moves per campaign move, so that equates to 3 strength points per regiment per Berthier move - with 9 regiments then, an hours move gained me 27 points of fieldworks to use as I want. As an indication a:
- Timber fieldwork (per 100mm) equals 6 strength points
- Earth and Timber Redoubt equals 10 strength points
- Timber Stockade (per 100mm) equals 8 strength points
Current positions then are as follows: ...more anon...
Back to top...
Move 52 - 11:00 (day 3)...things are picking up fast, and the bad news is that my flanking force has been rumbled; I'll need to get them back in quick.As part of the pulling back of my troops in the face of DG's force, I'd bought one of my cavalry squadrons right into Carnine (9. on the map) and that resulted in me getting a sighting of a unit that I hadn't been able to spot up until then, on the other side of the river.I suspect that these guys are cavalry and they'll have been watching every move my flanking force has made - they need to get a message to the British C-in-C before DG can formally react but I hate all that gamey-ness so I'll be conforming as above...Key to the map is as follows - this was the recon report from that unit of cavalry:
 ...and this is the composite view of where everyone is....
 ...more anon...
Back to top...
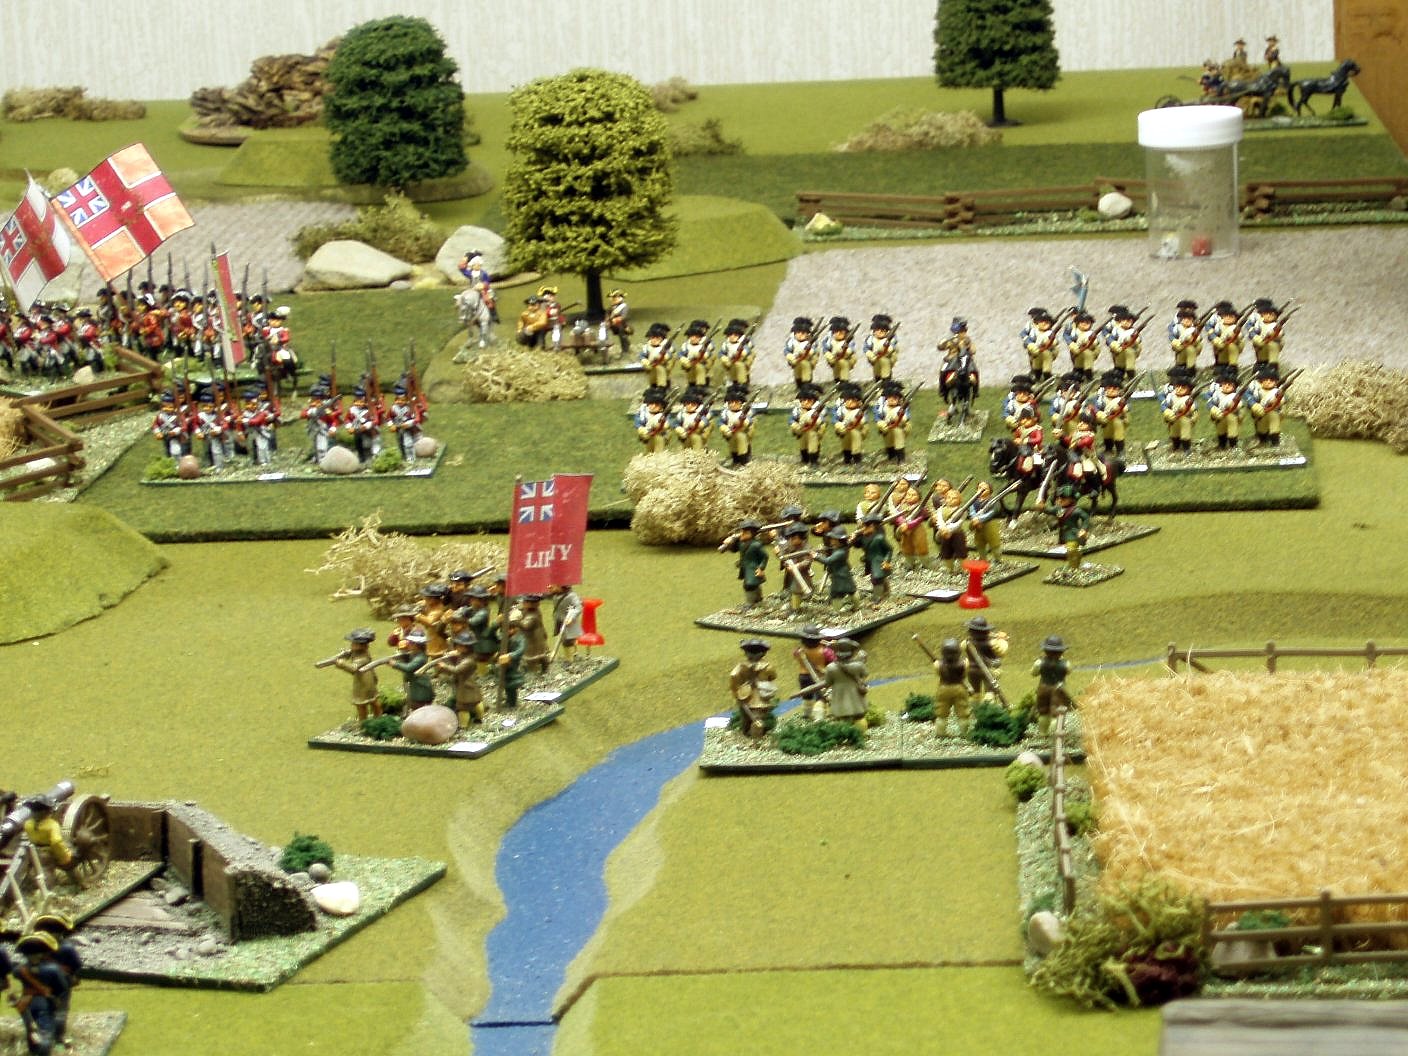
"Night of the long knives".... campaign game report...or, "The Death or Glory Boys run riot"...You may remember that in the American War of Independence campaign that DG and I are playing, we had come to a juncture with a major engagement at the town of Carnine.In campaign terms this was the big throw, the major gamble, as all effectives were present for both sides, and whoever won the game could reasonably claim the campaign victory conditions were theirs.Orders of Battle:In numbers terms then DG who was commander of the British troops had a significant superiority with approximately 88 points, the American forces commanded by myself hoped to bolster their significant lower numbers (65 points) with the use of some fieldworks that had been constructed during the campaign to cover the eastern approaches of the town....The British order of battle comprised the following units - DG was light on cavalry (but not light enough!), but had some of the cream of the British army under his command - the Erbprinz Grenadiers (motto "Nunquam Lucror Pugna" :o) ) and my favourite regiment the Welch Fusiliers (in their fur fusilier caps - and yes, I know it isn't historical for this period/theatre before anyone thinks they need to tell me!):
| UNIT NAME | UNIT MORALE | STRENGTH POINTS |
| New York Loyalist Artillery Light | 0 | 5 |
| New York Loyalist Artillery Light | 0 | 5 |
| New York Loyalist Artillery Medium | 0 | 5 |
| 16th Light Dragoons 1st (Half squadron - 1 base) | +1 | 5 |
| 17th Foot | +1 | 5 |
| 23rd Foot (Royal Welch Fusiliers) | +1 | 5 |
| 33rd Foot | +1 | 5 |
| 71st (Fraser's) Foot | +1 | 5 |
| 35th Foot (Royal Sussex Regiment) | +1 | 5 |
| Infantry regiment Erbprinz | +2 | 5 |
| Regiment Prinz Ludwig - 1st Battalion | +1 | 5 |
| Regiment Prinz Ludwig - 2nd Battalion | +1 | 5 |
| Regiment Prinz Ludwig - 3rd Battalion | +1 | 5 |
| Regiment Prinz Ludwig - 4th Battalion | +1 | 5 |
| Royal Irish Regiment | +1 | 5 |
| Total: 88 points | +13 | 75 |
The American forces comprised:
| UNIT NAME | UNIT MORALE | STRENGTH POINTS |
| New York Brigade | ||
| 1st New York | 0 | 5 |
| 2nd New York | 0 | 5 |
| New York Loyalist Artillery Light | 0 | 5 |
| Rhode Island Artillery Medium | 0 | 5 |
| Cavalry Brigade | ||
| Lauzun's Legion Hussars | +1 | 5 |
| 4th Dragoons | +1 | 5 |
| French Brigade | ||
| Bourbonnais Regiment (1st. Batt.) | +1 | 5 |
| Bourbonnais Regiment (2nd. Batt.) | +1 | 5 |
| 1st Militia Brigade | ||
| Massachusetts Militia - 1st Battalion | -1 | 5 |
| Massachusetts Militia - 2nd Battalion | -1 | 5 |
| 2nd Militia Brigade | ||
| Massachusetts Militia - 3rd Battalion | 0 | 5 |
| Massachusetts Militia - 4th Battalion (Lights) | 0 | 3 |
| New York Regiment | 0 | 5 |
| Total: 65 points | +2 | 63 |
Table Layout:
When the point in the campaign was reached that DG and I realised we had
a game on our hands the Berthier map was as follows:
 Each of those Berthier squares equates to a foot on the wargame table so
that equates to 6' by 8' and in the flesh it looked like this:
Each of those Berthier squares equates to a foot on the wargame table so
that equates to 6' by 8' and in the flesh it looked like this:

So, in the foreground of the picture we have the town of Carnine,
occupying either side of an impassable river - the bridge provides the
only crossing point. The river doesn't quite follow the Berthier map -
I've used some artistic license with the terrain tiles that I have
available....A close up of what the British faced at Carnine - trenches
and redoubts in abundance!


Initial Dispositions:
Translating the last position from the Berthier campaign move we have the
following considerations (and this is where campaigns come to the fore as
a way of generating table top encounters, as there's no way any sane
commander would agree to the position the American commander finds himself
in!)The contact square on the Berthier map comprised the American 1st and
2nd Militia regiments - you may remember that I had sent them out with a
view to providing a handy flanking force, they were spotted, and I was
bringing them back in Carnine when they were "jumped" by the main British
force. This gives us our first compulsory dispositions - the American
Militia then is in the first half of the 3rd terrain tile, as are most of
the British. With a half troop of British cavalry to the east, and the
rest of the British force to the south. The rest of the American forces
need to be placed in the town, and there are British reinforcements just
arriving on the road at the "far end" of the table.
 This how it was represented on the table - I think you can probably guess
what the two lonely Militia regiments were thinking - to their right is
the half squadron of British cavalry...
This how it was represented on the table - I think you can probably guess
what the two lonely Militia regiments were thinking - to their right is
the half squadron of British cavalry... In the far distance is the second British force arriving on table.
...and so to battle:
This was a long and particularly bloody battle that in the end ran to 13
complete moves - just over two hours in real time.Rather than bore you
with a move by move recount of how the game transpired, however I thought
I'd try and stick to the major engagements/events.The game started with
the British opening fire on the American Militia - as the moving player I
got to fire second, so the response was not good as by that time most of
the British regiments and artillery had managed to get their hits...
suffice to say that the Militia (of course) did run, harried all the way
by the British cavalry (rules note: in our rules, if your contacted while
routing that's an automatic damage hit, and further rout ie. light cavalry
heaven)Having manned the trenches, and rolled the cannons in to the
redoubts...


..the Americans were more than a little non-plussed to see the recoiling
militia (see following) come streaming past - even with the assistance of
their commanders I couldn't get them to stop and they disappeared over the
bridge heading north!

The next phase was again with the British - the Americans had deployed on
a fairly broad frontage - the good Continental infantry in the centre,
their French allies on the left, and were sitting their waiting. They
didn't have to wait long however, as DG ordered his four
Brunswicker regiments (click here to find out why a dragoon regiment is
attacking on foot!)
to attack the right-most of the two redoubts..... four regiments of
Brusnwick's finest failed to make it into the redoubt, though on at least
two occasions one of the regiments was fighting bayonet to hand over the
top of the earthworks themselves. See following as the first of the poor
unfortunates made their way towards the guns...

While this was going on the Americans had pushed forward with their
cavalry - whilst I did have a problem with pushing my infantry forward
(out numbered badly I needed to stay near the town and earthworks) I had
no compunction whatsoever about making the lives of the British infantry a
little uncomfortable! Of the British units that had just finished
attacking the militia then, the Brunswikers we've just heard about, but
the rest of the force comprised British infantry (Frasers, and the 35th
Foot the "Orange Lillies") and artillery - and DG was using those to form
an attack on the trench line in the centre. Having seen the Highlanders
cross the fence line, the American dragoons charged and in the subsequent
melee (happily they managed to engage!) drove them off in rout with a
bloody nose (and won the first
battle honour of the game) Slightly
later, Lausanne's Hussars did the same to the Lillies winning themselves
the second battle honour of the game.
See following for the American 4th Dragoons about to send Fraser's
packing..


Unfortunately it all went badly wrong from this point as in withdrawing
from the advancing British forces the cavalry was caught and badly cut up
by the British cavalry and the advancing Welch Fusiliers.... both American
cavalry regiments were sent packing, and following successive failed
morale throws exited the field just behind the militia... oh,
 dear... (the picture at left shows Lausanne's being bashed by the "Death
or Glory Boys") The good news was that the British attack in the centre
never really materialised after this, and slowly fizzled out...Which was
just as well, as in the last phase, the British developed their biggest
attack of the game on the American left. The attack included all the units
that were arriving on the road at the beginning of the game - this
comprised 4 regiments of foot (including the Prussians) and artillery.
Using my artillery and the French to inflict the first casualties on the
Prussians I shifted my Continentals to this flank and put in a charge with
them and the French - repulsed! Things then went from bad to worse.. with
no cavalry to protect my flanks and rear the British Dragoons hit the main
lode, pure gold.... I can't tell you what mayhem those Dragoons caused as
it's still painful now, but I reckon they probably accounted for at least
3 regiments of foot - as each routed they were attacked by those damned
dragoons who just kept attacking and attacking - it was a bit like a sheep
dog with a flock! See following for a sight of France's finest being badly
treated by the British horse who by the end of it had hustled almost all
of those routing units to near destruction (and in the process win the
third battle honour of the game
dear... (the picture at left shows Lausanne's being bashed by the "Death
or Glory Boys") The good news was that the British attack in the centre
never really materialised after this, and slowly fizzled out...Which was
just as well, as in the last phase, the British developed their biggest
attack of the game on the American left. The attack included all the units
that were arriving on the road at the beginning of the game - this
comprised 4 regiments of foot (including the Prussians) and artillery.
Using my artillery and the French to inflict the first casualties on the
Prussians I shifted my Continentals to this flank and put in a charge with
them and the French - repulsed! Things then went from bad to worse.. with
no cavalry to protect my flanks and rear the British Dragoons hit the main
lode, pure gold.... I can't tell you what mayhem those Dragoons caused as
it's still painful now, but I reckon they probably accounted for at least
3 regiments of foot - as each routed they were attacked by those damned
dragoons who just kept attacking and attacking - it was a bit like a sheep
dog with a flock! See following for a sight of France's finest being badly
treated by the British horse who by the end of it had hustled almost all
of those routing units to near destruction (and in the process win the
third battle honour of the game
 dear... (the picture at left shows Lausanne's being bashed by the "Death
or Glory Boys") The good news was that the British attack in the centre
never really materialised after this, and slowly fizzled out...Which was
just as well, as in the last phase, the British developed their biggest
attack of the game on the American left. The attack included all the units
that were arriving on the road at the beginning of the game - this
comprised 4 regiments of foot (including the Prussians) and artillery.
Using my artillery and the French to inflict the first casualties on the
Prussians I shifted my Continentals to this flank and put in a charge with
them and the French - repulsed! Things then went from bad to worse.. with
no cavalry to protect my flanks and rear the British Dragoons hit the main
lode, pure gold.... I can't tell you what mayhem those Dragoons caused as
it's still painful now, but I reckon they probably accounted for at least
3 regiments of foot - as each routed they were attacked by those damned
dragoons who just kept attacking and attacking - it was a bit like a sheep
dog with a flock! See following for a sight of France's finest being badly
treated by the British horse who by the end of it had hustled almost all
of those routing units to near destruction (and in the process win the
third battle honour of the game
dear... (the picture at left shows Lausanne's being bashed by the "Death
or Glory Boys") The good news was that the British attack in the centre
never really materialised after this, and slowly fizzled out...Which was
just as well, as in the last phase, the British developed their biggest
attack of the game on the American left. The attack included all the units
that were arriving on the road at the beginning of the game - this
comprised 4 regiments of foot (including the Prussians) and artillery.
Using my artillery and the French to inflict the first casualties on the
Prussians I shifted my Continentals to this flank and put in a charge with
them and the French - repulsed! Things then went from bad to worse.. with
no cavalry to protect my flanks and rear the British Dragoons hit the main
lode, pure gold.... I can't tell you what mayhem those Dragoons caused as
it's still painful now, but I reckon they probably accounted for at least
3 regiments of foot - as each routed they were attacked by those damned
dragoons who just kept attacking and attacking - it was a bit like a sheep
dog with a flock! See following for a sight of France's finest being badly
treated by the British horse who by the end of it had hustled almost all
of those routing units to near destruction (and in the process win the
third battle honour of the game By the time I'd managed to get enough units together to face off the
British horse, both sides were exhausted with little in the way of fresh
units. Both commanders agreed to the draw - I had little or no fresh
troops, and DG who had slightly more, didn't fancy facing those earthworks
again...!..and there you have it - a very bloody encounter!
By the time I'd managed to get enough units together to face off the
British horse, both sides were exhausted with little in the way of fresh
units. Both commanders agreed to the draw - I had little or no fresh
troops, and DG who had slightly more, didn't fancy facing those earthworks
again...!..and there you have it - a very bloody encounter!
Post Match Analysis:
- Losses were fairly even - the Americans had lost 30 strength points (and a regular regiment comes in at 5 SP's total in the rules I use) so a not insignificant loss! I seem to remember that the British had lost about 4 or 5 points more - a pretty good result given that they were the assaulting force.
- Without a doubt the unit that turned it around for the British were the dragoons - they inflicted at least 10 or 12 of those damage points on the Americans. I trust DG is giving the horses an extra dose of oats!
- One of the issues I had was being able to turn around quickly enough to face the horse - in the rules I play wheeling is done round a 3" diameter circle, and there is no "about face", getting your horse into the rear of the other army then is akin to getting your queen onto the back row in chess! I'm keen to ensure that manoeuvring is vaguely realistic, but I need to do some checking to see if about face was used... :o))
- Another issue was that the British horse was only a half regiment - ie. one base... I can claim overlaps in a face to face scrap, but most of the time the British horse were hitting routing units - very frustrating, and there was much muttering of "it doesn't seem right" from yours truly! As a true exemplar of Old School wargaming however I give you the following exchange:StW: "Blimey, are we sure they can do that?" (as the British horse drive off yet another regiment in rout)DG: "Hmm, they are a bit destructive... if they were yours what would you do?"StW: "Exactly the same as you're doing - don't be foolish!" :o))
- ..and finally, for those of you with an interest in such things - refreshments!Steve-the-Wargamer has changed to decaffeinated tea, which on this occasion was PG Tips (someone must have a wargame use for those little pyramids!) - just as well it was decaf as we drank a lot of it! The biscuits were Co-Op Chocolate Chip Cookies - and very nice they were too...
Back to top...
Move 56 & 57 - 15:00 to 17:00 (Day 3)For the last two days DG and I have been wrestling with the delightful nitty gritty of post battle campaign moves...Prompted by one of the comments to my blog entry for the campaign game (from Bluebear Jeff (click here to go to his blog))...."Realizing that most "casualties" are not really even dead or wounded, but scattered, I use a simple mechanism for campaign games. I roll 1d6 for each lost stand not whole unit). Depending upon how bloody we wish to make it, we might vary the number needed for a safe return. Typically the winning side gets stands back by rolling 3+; loser on a 4+. Thus about half of the loser's lost stands return; and about two thirds of the winner’s...but sometimes the dice are very fickle. In addition, units that lost more than half of their stands need to make a die roll to keep from
losing a morale grade; and units that got "wiped out" need to make a much tougher roll to keep from dropping. The rationale for this is that scattered troops keep filtering back into camp after the battle's over . .. . and the winner gets a better chance because they are (generally at least) in possession of the battlefield. The further rationale is that troops that got mauled and scattered have a good chance of having lost some of their elan."....I did some thinking on my bike on the way home and came to the conclusion that I liked the simplicity and elegance very much. Accordingly with some small changes I proposed the following to DG:
-
The battle took the duration of two campaign moves, so we have two
Berthier turns to do:
-
those British units who were on the road (ie. the group with the
Irish & Erbprinz etc.) should be grouped with the rest of the
British units at their ‘grouping position’ somewhere near
Carnine (I leave it to DG to decide where this should be, but
suggested no further than three Berthier squares away, but not
within 2 Berthier squares).. this represents the British decision
to withdraw and re-group at the end of the battle.

- My ‘grouping position’ will be across the bridge in the other half of Carnine ie. for the same reason I will withdrawn and re-group (following all those militia and dragoons!)
-
those British units who were on the road (ie. the group with the
Irish & Erbprinz etc.) should be grouped with the rest of the
British units at their ‘grouping position’ somewhere near
Carnine (I leave it to DG to decide where this should be, but
suggested no further than three Berthier squares away, but not
within 2 Berthier squares).. this represents the British decision
to withdraw and re-group at the end of the battle.
-
In the rules I use (
click here) our units are always depicted as being two bases, but can have a
varying number of strength points (SP's) to reflect the
"effectiveness" of the unit. A full strength regiment of infantry is
assumed to have in the region of 250 men which equates to 5 SP's. In
the game SP's are lost as a result of firing casualties, melee
casualties, morale checks etc. so in this case they equate nicely to
Jeff's bases. For each SP lost I suggested we throw 2D6 (we use 2D6 as
a matter of course in the rules so it seemed easy to use the same
process); an SP is then recovered on a score of 6+ with the following
modifiers:
- Add the units morale bonus to the dice eg. for the Grenadiers you would be throwing 2D6+2 - my thinking being that troops with a high morale are more likely to return to the colours.
- Subtract one from the dice if the unit took over half casualties (Jeff's rationale about being mauled is good, I really like it!)
- Once the throws are complete, we can then regroup and condense our units as required so as to meet the requirements of the rules ie. Units with less than 3 strength points should be combined whenever possible, and units with more than 6 strength points must be split.. I also suggested that when condensing units, morale should never improve ie. if you are combining two units one of which has a 0 morale modifier, and one of which has +1, then the combined unit would be 0, not +1...
- We track fatigue per unit to ensure that our little metal men don't turn into little supermen marching all day and night, day after day. DG came up with the idea - for each turn, depending on what you do, a unit is deducted fatigue points - once it gets over 25 fatigue points it starts to temporarily lose SP's. Either way, all units engaged in the battle also take 5 fatigue points per turn for being in battle.
- We can then update Berthier to reflect the changes and push on with the campaign..

Back to top...
Move 58 to 67..yes, the campaign is still in flow, and after a slight hiatus for DG's absence on more important business, he and I are busily exchanging Berthier campaign files again, as both sides struggle to make an impact on the victory conditions set at the beginning of the campaign.You may remember that at the Battle of Carnine, despite some appalling dice throwing, I managed to hold the British (just!) at what is now known locally as the "Night of the Long Knives" (as a result of the success of the British Dragoons that day)...
 Having withdrawn to lick our wounds, both he and I are still encamped
within the region of Carnine. I have pulled my units back north of the
river, while he, as far as I can tell, is pulling back southwards.I say
"as far as I can tell", as to be honest I've lost contact with him - and
my efforts to date have been concentrated northwards.. So, what have I been
up to?
Having withdrawn to lick our wounds, both he and I are still encamped
within the region of Carnine. I have pulled my units back north of the
river, while he, as far as I can tell, is pulling back southwards.I say
"as far as I can tell", as to be honest I've lost contact with him - and
my efforts to date have been concentrated northwards.. So, what have I been
up to?
- Well firstly, I have had my troops resting and recuperating following the battle - you may remember we discussed how we would handle casualty recovery in my post immediately after the battle (here) but since then - ever the tinkerer - DG came up with a more elegant mechanism which we have now adopted into the campaign rules..We dice for recovery of lost SPs following any loss due to skirmish or battle. To determine how long before each SP recovered would become effective once more, throw 2D6 per lost SP and apply the following formula:
- Time (Turns) = 2D6 - Current Morale Value (CMV)
- If the result is 0 or negative then the recovery is immediate
- If the result is positive then the SP is recovered in that number of Turns
- However, if the 2D6 is a double the SP is permanently lost ( a 1 in 6 or 16.7% chance)
- In summary, lightly damaged and/or units with superior morale are more likely to recover quicker than units that have been heavily damaged and/or with poor morale. An example to illustrate how this would work:
- Erbprinz Regiment has 1 SP left out of its normal complement of 5, its Morale = +2, therefore its CMV = 3 (ie. Strength plus Morale Benefit). It has 4SP to be recovered:
- 1st SP 2D6 (10) - 3 result SP recovered in 7 Turns
- 2nd SP 2D6 (08) - 3 result SP recovered in 5 Turns but the result of 8 was from a double 4 so the SP is lost permanently
- 3rd SP 2D6 (09) - 3 result SP recovered in 6 Turns
- 4th SP 2D6 (07) - 3 result SP recovered in 4 Turns
- So an Elite unit that was damned near destroyed in battle has slowly recovered 80% of its strength, but all in just 7 hours
- 23rd Foot Its SP = 4, its Morale = +1, so its CMV = 5. It has 1SP to recover 1st SP 2D6(07) 5 result SP recovered in 2 Turns
- Good, eh??
- While the main body of my army has been resting, the artillery has not - DG made the mistake of leaving some of his scouting units on the road north of Carnine, and a couple of moves of artillery fire, whilst not managing to inflict any casualties (lighter artillery at long range), had certainly caused him to break camp and disappear promptly!
- Then just to finish things off I sent the cavalry after him and in a couple of dashing hit and run attacks inflicted double points of damage (which he diced for using the above procedure) whilst driving him considerably north of where he is at the moment - and well out of recon range! On the way back - to add insult to injury, I also attacked his cavalry, which was on the hill just north of Carnine and drove them off with additional casualties...
- Lastly, DG is on a roll, and then came up with the idea of reducing reconnaissance ranges at night.. this was one of those blinding "doh!" moments, and other than some discussion about whether we should also have a third setting for dusk (abandoned at the moment as perhaps a step too far) was adopted immediately. Our recon ranges overnight (21:00 to 04:00) are now as follows:
Cavalry Light Infantry Line Infantry Artillery Night Time 1 2 1 1 Day Time 9 6 4 4
So - where are we at the moment?? See following:...and more to the point -
what are my plans for the future?? Increasingly, I am thinking about a
break out to the north, using my overwhelming number in horse to drive off
DG's recon troops and deprive him of knowledge of where I am. On the other
hand - the name of the game is defeating the British and I'm not going to
do that by running away!So how to "find, fix, track, target, engage" in
modern military parlance?DG out numbers me, so I need to pick off what
units I can, until he doesn't out number me. If he hasn't snuck off in the
night - I think I'll start with the cavalry north of Carnine.. first step
- "find".....more anon..
Back to top...
Move 68 to 70 - Day 4 - 03:00 to 05:00Interesting times - well to me anyway...The first dictate ("Find") turned out be easier than I thought as with the reduced overnight reconnaissance ranges in force DG had obviously decided to move his Rangers and the half squadron of cavalry closer to the town in case I decided to move...I was working on the assumption that they had remained where I left them, so my first move was move one unit of my cavalry to the last position I had known they occupied. In the dark they must have marched right past them as they turned out to be on the road just north of town!No hesitation - time to "Fix" them... so I ordered the other horse north of them to block the escape route, while I ordered my lights to close to contact.As you can see DG chose to break off from the skirmish (which in our rules means he took 10% casualties) but in doing so moved past that cavalry that I'd put their expressly to stop that exact thing...DG re-did his move in order to avoid the zones of control of my various units and in the end finished just south and west of the horse...Which is where I've now contacted him with both units of horse - with my light infantry adding weight...
What will DG do now?? I've suggested to him that this may require a
surrender roll on the dice, but feel rather like I'm on shaky ground with
that one!
Back to top...
Skirmish at Carnine..and the answer came soon enough - DG was never one to give up without a fight and he's living up to reputation! We're all set for a skirmish while we play out what happens to the Rangers.. the game will be played virtually, the table in my attic, with DG some hundreds of miles away in deepest darkest Wales..My objective is simple - absolute destruction of his lights prior to deciding my next step... I have 6 table top moves to do it in before having to make the next Berthier campaign level move.
Move 1:First move, and the Americans (me) win the dice throw and move first (in
our rules -
available here
- the first side moves, the second side fires, then moves, and finally the
first side fires) - the militia have wheeled and advanced towards the
flank of the Rangers.B.t.w - you can click on any of the pictures for a
much bigger view.. I've applied a grid to the first picture (1' squares)
to make it easier for DG to see the kids of distances involved - for good
measure I've also left a ruler on the table...

The American cavalry to the front of the Rangers (Lauzun's) have pulled
back out of musket range, the other cavalry unit have moved over (now that
the half squadron of British Dragoons have withdrawn)

DG orders both his units to retire; it's clear that he intends to keep
distance between his units and mine! There was no US firing (my units were
out of range) so that brought the move to an end.Positions at the end of
the move were as follows:
 Move 2(06:20 in campaign time)All the American units advanced –
the pictures show the end of this movement - one from the
west:
Move 2(06:20 in campaign time)All the American units advanced –
the pictures show the end of this movement - one from the
west:

..and one from the north:
 The British firing was devastating (and thereby hangs a funny tale which
I'm too embarrassed to share!) the Rangers both fired at the cavalry in
front of their respective positions inflicting a hit on one unit, but
causing both the units to become "shaken"..
The British firing was devastating (and thereby hangs a funny tale which
I'm too embarrassed to share!) the Rangers both fired at the cavalry in
front of their respective positions inflicting a hit on one unit, but
causing both the units to become "shaken"..
 Move 3:Both Ranger units continued to retire … DG's objective
was the other side of the fence behind them. As it turned out they didn't
quite have the legs to get there so stopped with their backs to it…The
US firing was dreadful. The nearest US militia regiment fired but with
huge numbers of deficits (for being lights, militia, under strength etc.)
it came to no effect..In the US move the cavalry both passed their morale
tests - though Lauzun's had to retire before fully recovering.The American
Dragoons then charged the right of the two Ranger units, while the militia
unit that fired so abysmally before, charged the flank of the other
unit.The remaining Militia move to fence line to the right of charging
Militia unit - their purpose is to cover the area immediately behind the
fence:
Move 3:Both Ranger units continued to retire … DG's objective
was the other side of the fence behind them. As it turned out they didn't
quite have the legs to get there so stopped with their backs to it…The
US firing was dreadful. The nearest US militia regiment fired but with
huge numbers of deficits (for being lights, militia, under strength etc.)
it came to no effect..In the US move the cavalry both passed their morale
tests - though Lauzun's had to retire before fully recovering.The American
Dragoons then charged the right of the two Ranger units, while the militia
unit that fired so abysmally before, charged the flank of the other
unit.The remaining Militia move to fence line to the right of charging
Militia unit - their purpose is to cover the area immediately behind the
fence:
British firing was as effective as it could be - the cavalry were stopped
in their tracks - a second strength point lost, and shaken to boot..The
other Ranger unit could only bring half its number to bear, and their fire
as a consequence was not enough to stop the militia swarming over the
fence and into their flank - you could almost see the tomahawks and
hatchets gleaming as they were swung up into the air..The Rangers may well
have gulped, but true to their lineage drew their own edged weapons and
stood to oppose the charge...After the initial clash however, it is the
Rangers who were forced to retire, and the Americans claim their first
casualties...

As part of their recoil then, the Rangers ended up on the other side of
the fence to their rear, which then brought them directly in line with the
other Militia unit that had been out there for that exact purpose (see
picture above)!Happily for DG it was now the British turn to move and he
opted to retire both his Ranger units directly to their rear.. the unit
recoiling from the melee now ended up outside of musket range, but the
other unit only just managed to scramble over the fence to their rear and
as a result were fired upon by both Militia units (the Dragoons were out
of range).In the ensuing volley, the Ranger unit nearest the fence took
further casualties this time from the accurate shooting of that very under
strength Militia unit - battle honours are in the offing! At last things
are beginning to look up for the Americans..Move 4Never speak too
soon... time for the Americans to move, and in the first phase of this the
Dragoons fail their morale test and rout - two rounds of firing was
enough.In the movement phase the second, bigger, Militia unit launches
itself after the rapidly retreating Ranger unit and declares a charge.
Lauzun's move up to exploit any further routs. The smaller Militia unit,
not wanting to chance it's luck any further retires back over the fences
it had charged across so shortly before..Positions were now as follows
(click on this or any other pictures for a bigger view by the way!):

The Rangers fire but are unable to stop them charging home, though they
pass the test to stand and prepare to give as good as they get -
unfortunately this is not to be, and the Militia drive them back with
considerable casualties - they rout!Of my two Militia regiments - the
smaller one, somewhat blown and amazed at their earlier exploits (which
you can read in the extended report on the campaign page) had retired back
over the fence they'd just charged so successfully over. The larger,
fresher unit, had in the meanwhile gone after the rapidly retreating
Ranger unit that they had so summarily dismissed earlier. Despite a
hurried volley from the British they had charged home on them and sent
them back in rout again (they can be seen routing on the right - marked by
red pin - in the next picture. Click on it as usual for a bigger
view)...

We now rejoin the game as the British prepare to test morale and move..In
the morale tests the routing Ranger unit pass and halt shaken (the McNally
AWI rules use a three stage morale status - good, shaken and rout). The
other Ranger unit now began their advanced upon the (still recovering)
smaller of my two Militia regiments - it's clear they have mischief in
mind, and I have to say that with my Militia unit being as weak as it was,
I quite expecting a sorry outcome.Steadying their muskets on the top rail
of the fence the militia took careful aim, fired, and hit absolutely
nothing - obviously they're still a little excited...!On to move 5 - the
Dragoons tested their morale and again failed, this time though I decided
that campaign strength was the better part of valour and allowed them to
leave the table (rather than stay on it, and try to recover them)The
following shows current status - this was one of the tactical pictures
that I sent DG as it shows distances on it...

Moves were beginning to move quicker now in our own "kleine krieg" -
these were all Light units and were worn down to the point of little
effect. British firing was ineffective so DG & I pushed on to the
second part of the move, and the British do their moral checks on the
routing Ranger unit who passed (amazingly!) and halt shaken.. the other
Ranger unit continues it's ominous advance and finally halts within charge
reach... Despite my throwing 8 (on 2D6), with the penalties the American
firing was not sufficient to deter them from charging, so with a heavy
heart I prepared to throw the dice to see if they would stand the
charge.Second miracle of the day - they stand! Oh, happy day....The
Rangers come pouring over the fence in a green tide, roaring, shouting and
pulling out knives and tomahawks as they rush forward. The Militia brace
themselves, ready their weapons, but the protection of the fence is just
enough to save them and (third miracle of the day) they stop the Rangers
in their tracks and send them back in rout!On to Move 6 - and the last
move of the hour before we have to do a campaign turn.. focus now shifted
to the south of the battlefield, where the Americans pushed forward both
Militia and Lauzun's horse within charge reach of the halted Rangers.
American fire was ineffective, and in the face of the overwhelming odds
the Rangers broke and ran - this was to prove the end for the unit as all
remaining strength points were then lost (DG then threw the dice for any
recovery of the unit)....With one final throw of the dice to check morale
for the other Ranger unit - in which they halt shaken - that brings the
move, and the end of the hour, to a close.... and that to all intents and
purposes was the end of the game.As I brought my other units up, including
Lauzun's Hussars, the Rangers failed two further morale tests and as a
result literally routed to extinction.
 In the picture, at the top of the page you can see the Rangers routing to
the north, being followed by the first of my Militia units; further
towards the bottom of the picture Lauzun's (the cavalry) are beginning to
hit top gear, and you can almost hear the scrape of swords as they are
loosened in the scabbard. They are accompanied (more slowly) by the second
Militia unit...
In the picture, at the top of the page you can see the Rangers routing to
the north, being followed by the first of my Militia units; further
towards the bottom of the picture Lauzun's (the cavalry) are beginning to
hit top gear, and you can almost hear the scrape of swords as they are
loosened in the scabbard. They are accompanied (more slowly) by the second
Militia unit...Back to top...
Move 73 & 74A time of rest and recuperation for the Americans as we work out our next step... or do we have to do anything??The onus is on the British to win the campaign - the winning conditions after all are clear - they have to capture all towns and strategic crossings, and destroy all American forces.So....
- I currently hold an almost impregnable defensive line along the north side of an un-fordable river, on the opposite bank to the British
- .. but from my current positions I have no view of any British forces.
- There's no way DG is going to attack me in my current position so I think he's going to try and get round me, and if he's going to do that, then the obvious ploy is to come round the hill on my west flank and attack me either from the rear or flank..
- The danger for him of course is that if he does that I just move across the river and occupy the same impregnable defensive line - but facing north instead of south!
- So I think he'll leave a holding force in place while he moves with the main part of his army....

Well! If this is to be believed then the only forces I can see are
Lights and Cavalry - 3 units. No Line and no Artillery, so where would
they be??!
 OK, next step is to push forward with the Militia a little further
but not until more of my units have rested from the skirmish. The
added benefit of this delay being that DG's units will be further away
when I launch with my whole army across the river to take out this holding
force... mwah ha ha ha!!! Welll... that's the plan anyway...More anon...
:o)
OK, next step is to push forward with the Militia a little further
but not until more of my units have rested from the skirmish. The
added benefit of this delay being that DG's units will be further away
when I launch with my whole army across the river to take out this holding
force... mwah ha ha ha!!! Welll... that's the plan anyway...More anon...
:o)

Back to top...
Move 75 to 80In many ways this period was one of rest and recuperation for the units involved in the skirmish north of Carnine, and an attempt to follow up on my fiendish plan outlined above..There was one happy interlude in Carnine when new colours were presented to the 4th Massachusetts Militia - these distinguished themselves mightily during the skirmish and all agreed that the colours were well deserved..
 So - what else has happened - I moved the 4th Dragoons across the hill to
the west of the skirmish with the intent of nosing into the enemy held
side of the river to find out where they are.. there has been no sight of
them while crossing the hill which throws into some doubt my initial
thought that DG might have withdrawn so as to try and outflank me...On
move 80 all becomes clear - the Dragoons report the following sightings:
So - what else has happened - I moved the 4th Dragoons across the hill to
the west of the skirmish with the intent of nosing into the enemy held
side of the river to find out where they are.. there has been no sight of
them while crossing the hill which throws into some doubt my initial
thought that DG might have withdrawn so as to try and outflank me...On
move 80 all becomes clear - the Dragoons report the following sightings:

Back to top...
Move 80 to 82As it happened, this was not to be - moving quickly DG threw his own light cavalry behind mine and then pinned me with his light infantry such that I had no option but to stand and fight - shades of what happened to his Rangers just north of Carnine! So another skirmish was on, but given the disparity in numbers this wasn't going to take long..!Battlefield/tactical view:


...a bit of work with the tape measure translated this into the following:

...with units deployed as per their entry points:

A fair amount of effort for what turned out to be a very short game!
Move 1 (15:00)
As the moving player I took first turn, and ordered my cavalry to retire
just as quickly as they could. In the rules we use each player takes it in
turn to move and fire, with his opponent doing the opposite, so having
retired it was DG's turn to fire - out of range!

It being DG's turn to move he immediately charged with his cavalry - there
was no way he was going to let me get away! The advantage to me of course
was that it brought him into firing range for my attempt at firing.
Unfortunately with all the negative modifiers, for target, low strength,
and firing from horseback no damage was scored and the charge appeared to
be about to slam home.

Time for me to test whether the cavalry would stand - alas they break and
run taking casualties as they rout... not in itself too bad a result as
it's often the best way to get a weak unit out of harms way quickly, but
this is a campaign game....Move 2 (15:10)In my move, having routed
in the previous phase I continue to rout - basically, it's too soon to
test morale and see if they recover. DG follows up with his cavalry, but
at normal pace my cavalry are disappearing into the distance as rout speed
is greater, and also ignores terrain...Move 3 (15:20)My move again
and now it's time for me to check morale - I'm currently some 30 odd
inches away so my cunning plan is to pass this morale test, and then leg
it for the hills, not too much the worse for wear. Being me of course I
then proceed to throw almost maximum on the dice "continue to rout and
lose 1 strength point". Now given that I only started with 3, I'm now down
to 1SP which makes recovery from the rout almost impossible.... DG can
scent the blood in the water and sends his cavalry haring after me
again.Move 4 (15:30)My move again, and as suspected I fail the
morale test and the cavalry disintegrate.... end of game.Post game
workings:Adopting our new campaign rules it's time to decide what happens
to the regiment... Firstly, I throw to see if they surrender... happily
they do not. Next I throw for recovery of the lost SP's, the regiment will
reform with the C-in-C so I need to add some moves on to account for the
distance they need to travel, but basically they will have reformed on him
by 04:00 tomorrow - even more happily they don't lose any strength points
in this process!
Move 81 and 82
Nothing major of note - further
probing towards Eighton by my light infantry to see what DG's intent is...
Back to top...
Move 83 to 91Much further probing and scouting as both sides seek to find what the other side is doing while making sure that at the same time they can't see what they're doing.. it's at times like these that the value of the light troops and cavalry come to the fore.As Day 5 limps into being however, I sense a breakthrough - on move 90 DG 's main force appears exactly where I thought it would - just a little later than I was expecting!
Move 83 to 91Much further probing and scouting as both sides seek to find what the other side is doing while making sure that at the same time they can't see what they're doing.. it's at times like these that the value of the light troops and cavalry come to the fore.As Day 5 limps into being however, I sense a breakthrough - on move 90 DG 's main force appears exactly where I thought it would - just a little later than I was expecting!

When the recon is complete these show as the following:

ie. that's his main force, and to keep me interested he's probing with the
remaining units he has to the south of the river!After much thought
(almost the whole of the cycle to work this morning!
) I decide on my plan of action - I order my army to dig entrenchments
facing north along the line of the river... I bring my outposts back in to
the main body of the army - I know where he is for the time being...
) I decide on my plan of action - I order my army to dig entrenchments
facing north along the line of the river... I bring my outposts back in to
the main body of the army - I know where he is for the time being...

In the meanwhile I attack south of the river against the unit he has there
- one regiment of light infantry, and the reconstituted 4th Dragoons which
reach full strength this move - now let's see what he does!
Move 92 to 100DG is taking his time and my assumption is that he's resting his troops
after what must have been a pretty arduous night time march all the way
round the large hill at the end of the river..This shows the positions at
Move 94 after I have pulled my cavalry back (and therefore temporarily
lost sight of his main force):
recon reports show me that DG's unit to the north is cavalry, the units south of the river are cavalry and light infantry. This is the recon report from Berthier for the units south of the river:

I'm keeping a close eye on his main force, and thanks to my ability to out
number his own scouting forces we've had a couple of small "bumps" where
on both occasions DG elected to withdraw his cavalry rather than face the
possibility of losing a strength point.After one such incident my cavalry
reported the following:


It's clear that it's his main force.....and finally here's the latest
position.

So what's my next step?? Clearly there is little value in me quitting my
current position as tactically I am in a strong position - having spent
time over night building earthworks, I can defend well to front and
sides... It's not a good idea to have an impassable river in your back,
but there is a bridge, and that same obstacle means I don't have to worry
about the units DG has left south of the river.Alternatives? Plenty - but
the objective is to destroy the British invading force, and that is
exactly what I plan to do!
Back to top...
The Battle of Camsix
Back to top...
The Battle of Camsix
Introduction
DG and I started this game using a new wargame
application called
Battle Chronicler to
document moves between the two armies - this doesn't replace for me the
beauty and joy of placing little metal men on a well laid out wargame
table, but it is extremely useful when it comes to playing a game across
the ether... basically you design the battlefiled and define the units,
you can then exhange the file by email to record what moves you're making
- very simple description for what is a very elegant application that has
a lot of detail... for the final moves we went "traditional" as DG was
down for a visit.So... the battlefield is as follows - with Camsix in the
left upper quadrant. All slopes are gentle, the river is impassable over
its entire length with the exception of the bridge. The grid is 2' square
- Battle Chronicler however allows you to zoom in, and at the zoomed in
view I'm using a 1" grid to allow accurate measurement of movement...(as
usual - clicking on any of the pictures will give a far better/bigger
view)
 With regards to the timing of the battle - one interesting side effect of
campaigning is that a campaign often throws you a curve ball that a simple
set-up game doesn't. In this particular case the curve ball is the fact
that the battle is starting at 11PM in game time. DG and I have agreed
therefore, that we need a couple of additional rules - specifically, all
visibility is limited to 12", if you can't see what you want to fire at,
you can't fire at all. If a target is visible, then units an fire but we
have added an additional -1 firing modification.
With regards to the timing of the battle - one interesting side effect of
campaigning is that a campaign often throws you a curve ball that a simple
set-up game doesn't. In this particular case the curve ball is the fact
that the battle is starting at 11PM in game time. DG and I have agreed
therefore, that we need a couple of additional rules - specifically, all
visibility is limited to 12", if you can't see what you want to fire at,
you can't fire at all. If a target is visible, then units an fire but we
have added an additional -1 firing modification.OOB's:American
forces are as follows:
 I can't be precise on the strength points (fog of war and a long
campaign!) but the British have the following strength - those shaded
green are present on the battlefield.. some of the others (cavalry and
light infantry) are close and will arrive in the upper left quadrant -
I've left a battalion of Light Infantry there to watch my back!
I can't be precise on the strength points (fog of war and a long
campaign!) but the British have the following strength - those shaded
green are present on the battlefield.. some of the others (cavalry and
light infantry) are close and will arrive in the upper left quadrant -
I've left a battalion of Light Infantry there to watch my back! In the deployment phase the units are then laid out as follows to conform
with their last positions on the campaign map... DG's better at doing this
than I am, so I usually go with his version of the file rather than
mine!Some interesting tactical decisions (or "curve balls") to have to
deal with for both of us...
In the deployment phase the units are then laid out as follows to conform
with their last positions on the campaign map... DG's better at doing this
than I am, so I usually go with his version of the file rather than
mine!Some interesting tactical decisions (or "curve balls") to have to
deal with for both of us...
- You'll notice that there are some brown oblongs in front of the American units (NY Infantry, the Bourbonnais, and the Artillery) - these represent trench works that I've had my infantry building while I watched the British advance...
-
When night fell I had pushed forward my best "listening" units to
ensure I didn't get surprised - which explains why the two cavalry
units, and a regiment of lights have been surrounded by DG! In his
words "ok, I'll take the bait" but they were never intended as that,
honest DG....
The Battle:Move 1
First requirement for me is
to get my advance guard out of it, and back to the main lines -
accordingly working on the principle that attack is the best form of
defence, I launch charges with my light infantry at his unit of Rangers to
my front (IR2), and with Lauzun's at the other unit of Rangers (IR3) - see
following. A desultory volley by IR2 is not enough to stop my Militia, so both of
DG's units test to stand... IR3 fail (light infantry, charged in the rear,
by cavalry - not good odds), IR2 stand and in the ensuing melee I defeat
him by a single point - first blood to me as IR2 and 3 both take
casualties, with IR2 retiring shaken, and IR3 routing for the hills
(literally) - see following:
A desultory volley by IR2 is not enough to stop my Militia, so both of
DG's units test to stand... IR3 fail (light infantry, charged in the rear,
by cavalry - not good odds), IR2 stand and in the ensuing melee I defeat
him by a single point - first blood to me as IR2 and 3 both take
casualties, with IR2 retiring shaken, and IR3 routing for the hills
(literally) - see following: Time for DG's move - and not surprisingly he reacted very quickly to my
attacks with an attack of his own by his cavalry against the American
cavalry who had just crossed the hedge line (my 4DG):
Time for DG's move - and not surprisingly he reacted very quickly to my
attacks with an attack of his own by his cavalry against the American
cavalry who had just crossed the hedge line (my 4DG):
(Couple of points - note the ruler which is to scale and shows the fine
level of detail you can get in Battle Chronicler - I also added some
components, one of which is the smoke marker in front of MM3 to denote
that they have fired, plus obligatory "rout" and "shaken"
markers)Unfortunately my own cavalry, constrained by the hedge, are unable
to turn and fire themselves, and the volley by my lights (MM3) is not
sufficient to stop the British cavalry from charging so the charge
crunches home.In the subsequent melee test my brave boys dice to see if
they stand, and do! Unfortunately
their sword arms were not up to their grit however, and in the ensuing
melee were severely bested - 2 strength points lost, and sent off in
rout...... ah well, lots of time to go yet.
Move 2
Remember - click on any of the pictures/maps for a bigger clearer view

Move 2 started with the American’s (me) determined to extract those
troops from their exposed position but with DG’s Rangers (IR2) in some
disarray just to my front I decided that rather than ignore them I’d
sweep them away on my way back… hindsight is a wonderful thing of
course, but I really should have gone round them and carried on –
you’ll find out why in a minute!Anyway - in the ensuing melee, I moved
Lauzun's (L) on to their flank while attacking frontally with the Militia
light infantry (MM3) – the Rangers were unable to stop the charge and
when DG drew the cards they broke and routed to the south.

It then started to go downhill rapidly… in DG’s move, as I suspected,
he charged home on the Militia lights with his cavalry. The angles were
such that the Militia couldn’t turn to face, but had to suffer the
charge in the flank uncontested.. I guess the jury is still out on whether
DG could still have done this had I ignored the Rangers and moved on, but
I think that the result would probably have been the same whether I had,
or hadn't!Sabres flashing, DG's Dragoons proceeded to ride over my Militia
like they weren’t even there….
 Move 3 Time for the Americans to
test morale on the routed units – one success, one not, and one
disaster! The Militia recovered one morale status to become shaken, but
the cavalry both failed, and in the case of my dragoons this was enough to
reduce the unit to zero points. In campaign games DG and I agree to dice
for what the unit then does - surrender (ie. disappears from the campaign)
or rally on the general (ie. we dice for recovery of lost strength points
and dice for when they are recovered). In this case despite a healthy
weighting, the dice come up "surrender"... things are going downhill
fast....Having fired unsuccessfully on them in the first part of the move,
when DG became the moving player (the rules we use divined the move into
two turns or phases, where players move and fire by turn – in this game
I move in the first turn/phase of the move, and fire in the second, with
DG doing the opposite) he charges home on the shaken militia.The amount of
mis-handling they’ve already had is enough to see them break and run
before the cavalry even come to contact….
Move 3 Time for the Americans to
test morale on the routed units – one success, one not, and one
disaster! The Militia recovered one morale status to become shaken, but
the cavalry both failed, and in the case of my dragoons this was enough to
reduce the unit to zero points. In campaign games DG and I agree to dice
for what the unit then does - surrender (ie. disappears from the campaign)
or rally on the general (ie. we dice for recovery of lost strength points
and dice for when they are recovered). In this case despite a healthy
weighting, the dice come up "surrender"... things are going downhill
fast....Having fired unsuccessfully on them in the first part of the move,
when DG became the moving player (the rules we use divined the move into
two turns or phases, where players move and fire by turn – in this game
I move in the first turn/phase of the move, and fire in the second, with
DG doing the opposite) he charges home on the shaken militia.The amount of
mis-handling they’ve already had is enough to see them break and run
before the cavalry even come to contact….
Intermission:
Although DG (my regular opponent) and I are using
Battle Chronicler to play the game (for the simple reason that DG lives a
couple of hundred miles away), I couldn't miss out on the opportunity to
push some lead around even if it is only to show the action on the
actual table top that is being
fought on the virtual table top! So
without further ado then here's the action from moves 1 and 2... these are
the two engagements that the British cavalry earned their battle honours
in.First off we have the engagement that resulted in the the American
Dragoons routing from the field...In the first picture, the American
Militia (in the distance) have just seen off the Rangers, the American
Dragoons have just crossed the fence line only to see the British cavalry
move up - sabres glinting in the sun...
 The American Militia fire in an attempt to stop the cavalry in their
tracks - unfortunately unsuccessful (it must have been the angle they were
firing at!) The "smoke" by the way is authentic welsh sheep wool rescued
from a wire fence near DG's house - looks much better than cotton
wool....
The American Militia fire in an attempt to stop the cavalry in their
tracks - unfortunately unsuccessful (it must have been the angle they were
firing at!) The "smoke" by the way is authentic welsh sheep wool rescued
from a wire fence near DG's house - looks much better than cotton
wool.... So having seen off the American Dragoons, the British cavalry align
themselves to deal with the Militia and (in the distance) the hussars of
Lauzun's Legion. Little was I to know what an impact this little
engagement would have! The Militia and the Hussars had combined to see off
one of DG's Ranger units when they should have pushed on to safety...
caught napping the British cavalry commander must have been quite
literally licking his his little metal lips!!
So having seen off the American Dragoons, the British cavalry align
themselves to deal with the Militia and (in the distance) the hussars of
Lauzun's Legion. Little was I to know what an impact this little
engagement would have! The Militia and the Hussars had combined to see off
one of DG's Ranger units when they should have pushed on to safety...
caught napping the British cavalry commander must have been quite
literally licking his his little metal lips!! In the ensuing skirmish the British cavalry saw off the Militia, and in a
very unusual situation (for us - I can't think of more than 3 or 4 other
games where the cavalry have managed to get a second charge in all the
games DG and I have played) charged home ont he Hussars and drove them off
as well...
In the ensuing skirmish the British cavalry saw off the Militia, and in a
very unusual situation (for us - I can't think of more than 3 or 4 other
games where the cavalry have managed to get a second charge in all the
games DG and I have played) charged home ont he Hussars and drove them off
as well...
.. suffice to say the pace of the battle has slowed down now that the
initial skirmishes have finished - major manoeuvring is now the name of
the game so let's return to the action...Move 4:The Militia and the
hussars of the Legion continue to rout - in order to stiffen their resolve
I move some staff officers to join them (they add bonuses for the morale
throws).DG continues the general advance - so many troops - slightly
unnerving!Move 5:First piece of good news in a while, the hussars of
Lauzun's Legion rally... well... halt shaken anyway!With the very rough
handling of my advance guard complete I can see that DG has now started to
manoeuvre so as to nullify the benefits of my field works. His troops are
moving in echelon to the east - it's clear he's looking to try and
outflank the field works and bring his superior numbers to bear.
Move 5:First piece of good news in a while, the hussars of
Lauzun's Legion rally... well... halt shaken anyway!With the very rough
handling of my advance guard complete I can see that DG has now started to
manoeuvre so as to nullify the benefits of my field works. His troops are
moving in echelon to the east - it's clear he's looking to try and
outflank the field works and bring his superior numbers to bear.
Move 6:The hussars recover fully, but the Militia continue to rout
and in this turn hit zero strength points and cease to be an effective
unit and are removed from the table.NB. As this is a campaign I dice to
see if they surrender, or survive to reform at a later date - happily it
is the latter..

Move 7:An hour into the game in real time and the first of DG's
forces enter from the south of the table. I've already limbered one of my
guns with the idea of moving it to the east to help bolster my open
flank..I also move up Lauzun's to cover DG's flank... hopefully this will
worry him slightly..

Move 8:To the south of the river I move the Militia (MM4) out of
the house and closer to the bridge - there are a lot of troops coming up
including two squadrons of horse and two regiments of Brunswick foot
(Prinz Ludwig's regiment).Not much to look forward to in this move, but
one good piece of news is that DG's Rangers who have been routing since
about move 2 finally hit zero and are removed from the table (and when the
campaign saving throw dice are rolled, they come up with a "surrender"
result!)

Move 9:OK - time to take the bull by the horns - at the bridge I
move the spare Militia unit to cover the river bank, and the artillery
that was destined for the east is also moved to cover the bridge - the
last thing I need is to be attacked in the rear. On the other side of the
river I move the other Militia regiment in to the house nearest the
bridge. I also about face on of my two crack French regiments and ready
them to move.In the British move the American artillery finally opens fire
(reduced ranges because of night time and this is the first time I've had
a target). No effect but its good to be hitting back..!
 More anon... stay tuned.The following should help with identifying units
referred to:
More anon... stay tuned.The following should help with identifying units
referred to:
Move 10:Probably the last of the
"manoeuvre moves" as DG was aligning himself for his attack - a fairly
unique move as there was also no firing... During my move I finally
realised that there was no way I could leave my militia across the river
in the face of such numbers, whether they were in a house or not, so made
a break for the bridge.. I could have done with doing it a move earlier
but had no idea so many of DG's units were still this side of the
river.Elsewhere, the other militia unit and the artillery deploy on the
river bank to cover their retreat (I still have to get across the bridge
yet and that involves a deployment to column in the face of the enemy!).
Lastly, the second of the two French Battalions moves back from the
earthworks to conform on DG's move towards the bottom of the map and cover
the gap left by some of my units having to cover the river bank.

Move 11:No firing but the 4th
Battalion of the Militia make it to the bridge - have to cross it yet
though! In his turn DG's units face front and start to advance, in
addition DG launched a cavalry charge with his cavalry at Lauzun's
Hussars.True to form my firing was about as successful as ever (not a good
game so far!) and the Rhode Island artillery failed to inflict casualties,
while the New York Artillery was out of range.Lauzun's fired, but failed
to stop the ensuing charge by the 2nd Squadron of the 16th Dragoons.So
here we were... a full squadron of Britain's finest, with fresh honours
recently won (see the
this post) facing up to a depleted squadron of France's finest, only recently
recovered from a mauling.... I have to say I didn't hold out much hope but
a miracle was about to occur!In the following test "to stand the charge"
Lauzun's held, and engage the British cavalry (first hurdle overcome), but
then in the melee, despite the charge bonus the British lose to the French
and retire shaken and with casualties!

Move 12:Across the river the 4th
Massachusetts Militia (MM4) deploy in column to cross the bridge, and by
the end of the turn they are half way across - so far so good... elsewhere
the first of the two French Battalions faces about to move towards the
American right, I'd decided that they were too valuable resource to be
left as isolated as they are...

 )
)
Move 13:The first part of the move (that is with the the
American's as the moving player, the British as the firing player; in the
second part of the move we swap over) saw the 4th Mass. Militia, shaken,
bloodied, but on the right side of the river at last... Elsewhere however,
with a regiment of shaky looking Highlanders just to their front, the
troopers of Lauzun's Hussars look to their sabres, push their side plaits
back and out of the face, and calm their sweat laden horses for another
charge.. (curious fact - apparently hussars would weight the plaits with
pistol balls to make them hang straight...)...but first the British firing
- and to show you how the rules work I thought I'd give you the full
mechanics of one of the exchanges.... so, starting with the cavalry
squadron on the far side of the river who were firing at the 4th Mass.
Militia we see the following - in our rules (which you can obtain from the
link on my AWI project page, or direct
from here, oh, and they're
free...
) all damaging hits are scored
on 7 or more thrown on 2D6, they cause strength points to be lost and the
unit taking the damage to become "shaken"; less than 7 won't cause damage
but may still cause morale to worsen depending on the strength of the unit
being fired at.....so here we have a squadron of British Dragoons - to
start with they throw 8 on 2D6, a good start, but they then modify this
with the following.
- They are slightly understrength (as a result of previous casualties) so they subtract 1 - if they were greatly understrength it would have been more
- They are also "shaken" so subtract another 1 ... so we are already under the magic "7"
- The game is being fought at night so before the game DG and I agreed some blanket rules to cover this - amongst which was an automatic -1 on firing for everyone.. so there goes another...

In their morale test (to stand the charge) Lauzun's hold firm (brave
boys!) - in the ensuing melee however, despite being under strength,
surely tired, and meeting the charge at the halt - they win!!! Hurrah! If
it wasn't 30 years too early the Marseillaise would surely have rung
out..With the rout by Fraser's - the move comes to an end;...
 The positions were now as follows:As a reminder the following should help with identifying units referred
to:
The positions were now as follows:As a reminder the following should help with identifying units referred
to:Move 14 to the End: With the arrival of DG in the area for a visit
we took the opportunity to transfer the game from the virtual table top to
the physical table top to complete, and true to form we had it finished in
about an hour or so...My apologies as the game was some time ago and the
memory is not as good as it was (nor ever has been!) so the details are
slightly sketchy but DG's troops were in excellent form (as were mine) and
he came on in grand style with an all out assault... the attached pictures
give a view..
 Later in the battle and the Brunswickers of the Prinz Ludwig regiment
have now crossed the bridge and are in my rear area - nothing to stop
them due to the continued pressure from the front.. it was nicely done I
have to admit!In the foreground as part of that frontal assault the 33rd
Foot are crossing the earthwork taking bloody mayhem and cold Sheffield
steel to the valiant troops of the 2nd New York regiment, who, for the
time being at least have managed to stop them in their tracks with a
well aimed volley (see the yellow marker indicating they are
shaken)
Later in the battle and the Brunswickers of the Prinz Ludwig regiment
have now crossed the bridge and are in my rear area - nothing to stop
them due to the continued pressure from the front.. it was nicely done I
have to admit!In the foreground as part of that frontal assault the 33rd
Foot are crossing the earthwork taking bloody mayhem and cold Sheffield
steel to the valiant troops of the 2nd New York regiment, who, for the
time being at least have managed to stop them in their tracks with a
well aimed volley (see the yellow marker indicating they are
shaken) Right flank of the British front and the Hessians are trying their level
best to get at the American artillery who have managed to stop them in
their tracks for the time being, but are swiftly about to caught up in a
European sandwich..
Right flank of the British front and the Hessians are trying their level
best to get at the American artillery who have managed to stop them in
their tracks for the time being, but are swiftly about to caught up in a
European sandwich..Anyway - numbers counted in the end (as both sides fought honourably) and
I was finally forced to surrender as it was clear that I no longer had the
troop numbers to put up a good fight.. in a campaign situation, with
nowhere to withdraw to, and no troops to retreat with it was a no brainer
- I put up a good fight against greater numbers, delayed him, caused
casualties that in a historical context he would find more difficult to
replace than I will, but nonetheless lost.. I give DG the joy of his
victory both in the battle and the campaign!!
No comments:
Post a Comment