On Friday evening (the 20th) DG and I met on the field of Mars to decide the outcome for the second teaser in the linked series of games that make up the "Raid on St. Michel" mini campaign; as promised here is the write up on the game..
OOB
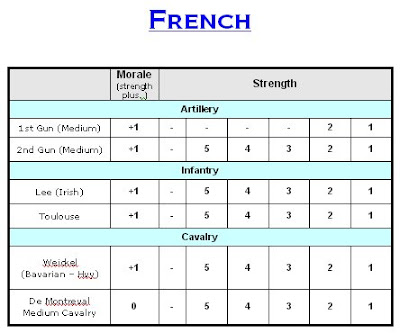
First then, the orders of battle:
Playing the part of the country of Lorraine in this campaign are the French - a relatively small force. You'll note that one of the two guns is weak - this was the artillery that made such a poor showing of it at fight for the Bridgehead. They were advised that heads would roll if their performance wasn't improved...!
Other than that - two regiments of horse, two regiments of foot (please click on the tables and any of the pictures for the usual far larger view):
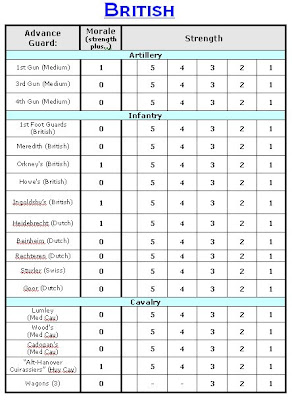
 The British on the other hand (playing the role of the VFS) had a veritable cornucopia of troops to play with.
All units were at full strength, as despite some of them having fought their way over the bridgehead casualties had been light to non-existent.
The Allied forces then comprised 3 guns, ten battalions of foot, four squadrons of horse:
 Terrain/Table:
An analysis of the table however, should show that despite their far inferior force (only in numbers my friends, not their fighting qualities..!) the French were in a strong position, because in effect this game is almost a re-fight of Thermopylae.
The river is impassible expect at bridge or ford so any change of plan involves a costly (in terms of time) march back to the ford. In addition there are two obstacles that the attacking (Allied) commander had to deal with.
To the west of the river the sides of the gorge come in towards the river causing a very narrow defile that makes deploying those large numbers of troops very difficult.
To the east of the river, the approach to the bridge is dominated by Hougemont, oops, the farm, at the southern end of the gorge - a real stronghold of a position.
So how did DG (as British commander) decide to handle this... read on for the report of how the game unfolded..
The Game
The scenario calls for an "advance guard" to enter the table before the main body of the army - in the following you can see how DG's plan began to unfold. DG had deployed all his medium cavalry as the screen for the advance guard, but on the far side of the river (the east side) he had far fewer troops than on the west side... by a factor of more than two..
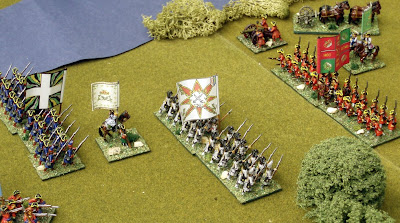
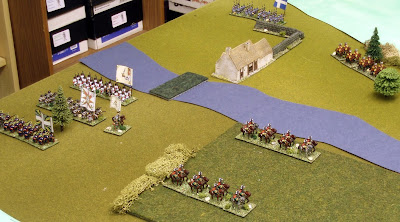 DG's advance Guard enters the table - just one infantry and one cavalry regiment to the east - more than double that to the west
DG had concentrated most of his Advance Guard on the west bank of the river, and when the main body came on that also proved to be the case, with no further troops being deployed on the eastern bank of the river. With that number of troops, and a time constraint as well (DG only had so many moves to exit the table at the other end), things soon started to get a little congested...
 DG's main force jostles for position as they shake out into line to attempt an assault through the defile...
I on the other hand - despite a somewhat scary paucity of troops had a couple of advantages, in fact three - the first two were the obstacles previously mentioned which both landed nicely within my deployment zone, but also because I had the ability to deploy in a hidden state.
My dispositions were thus as follows (and I had to plan these before the game - not knowing what DG was going to do)
One of my artillery units as mentioned took a hammering at the bridge - this one I placed within the barn using a hidden deployment. The barn had a rather handy opening that faced down the valley - I hardened my heart to the undoubted damage that firing from within the barn would have to the gunners ears!
The other gun I placed on the west side of the river, just north of the bridge and close to the bank so that they could fire at maximum range without impediment.. and before you say anything maximum is only 2 foot - and this was an 8 foot table - so DG had plenty of time to manoeuvre...
The cavalry were both deployed on the east bank - I had just assumed that it looked like the more obvious choice. I deployed both hidden in the farm area (behind the buildings).
My infantry I also deployed in hidden mode - one regiment (Toulouse) were deployed in the woods on the east side of the valley (on the slopes of the valley side, looking "down" towards the river). I was looking for a possible enfilade...
The other (Lee - the Wild Geese) I positioned in the lee of the defile on the west bank...
...and so I waited for DG to arrive...
The action then turned out to be quite literally in two parts - east and west of the river.
East bank of the river:
Taking the east side first, this was a simpler engagement in many ways though not without its "moments". You may remember from above that DG had opted to make this his "light" bank - he had only sent one battalion of foot, and one squadron of cavalry. I on the other hand had two squadrons, one gun, and a battalion - all things being equal then I should have expected to win the fight her, and so it turned out.
With two small hills in the middle of the approach blocking visibility to the woods where I had my infantry concealed, and the barn, DG opted to send his cavalry between the hills and the river - which meant I didn't need to reveal my infantry in the woods. Having said that the moment he moved them the other side of the hill it was clear I was not going to get an ambush, so I decided to pull them back to the farm complex. This manoeuvre was completed, but not without a few heart stopping moment while they changed formation (or rather didn't)!
DG's infantry came over the hill which gave me my first opportunity to fore with the artillery in the barn - setting a bit of a pattern for the rest of the evening (I'll admit it, I was damn lucky... for a change!) the first blood was spilled, and DG's battalion of foot was stopped in their tracks..
Subsequent firing saw more damage dealt out to both the foot and the horse, until, in the end, the foot broke and wouldn't/didn't return. In the meanwhile, with events unfolding as they were on the west bank, I decided to send my two squadrons of cavalry over the bridge to assist.
I almost wished I hadn't as it was at this point that as a result of some uncharacteristically bad shooting, DG managed to get his horse to the barn, and I looked in real danger of losing my gun (and therefore the battle)
DG did however, manage to get his cavalry to the barn
 Something wicked this way comes... DG's cavalry about to come knocking at the door with a request to my artillery to "please come along, like nice gentlemen"...
Happily, a sharp rap on their knuckles from the artillery on the west side of the river saw them off for good... just as well really as my infantry had fumbled another change of formation and were in no position to help!!
At which point I decided enough was enough and it was time I got the gun away - I sent the infantry with them as a rear guard in the event that DG managed to get his guys across the bridge.
West bank of the river:
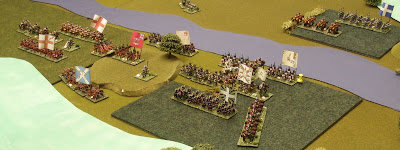
Things were altogether much more fraught on the west bank of the river, for a start there was a quite unfeasibly large number of infantry battalions approaching!
Happily - the success of the artillery on the east coast of the river was also replicate on this bank and a steady stream of casualties were inflicted on the advancing "hordes". I was helped in this by the occasional shot from the gun in the barn.
Soon however the advancing Allied units were close enough that I had to reveal the wild Geese so these joined the artillery, forming a line just beyond the defile.
 French front line - artillery with Lee's to their flank...
 French cavalry reinforcements arrive - in this case Bavarian cuirassiers - "get those damn cows out of the way!"...
After this things began to hot up as DG struggled to deploy enough if his battalions into line in order to make a concerted and coordinated attack...
 First off the Dutch - have a go - this is Beinheim, supported by some Swiss (Sturler's)...
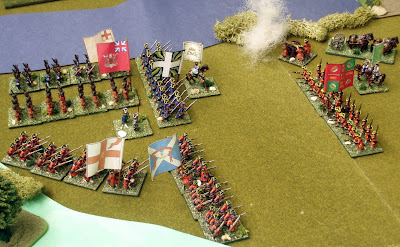 ..next up Orkney's, supported by the Foot Guards - still in column - Beinheim have broken and run...
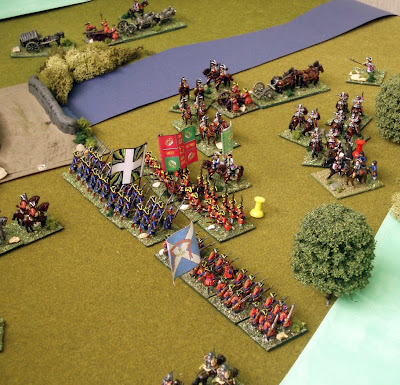
 ..wider angle of the same view, behind the French line you can see the other French cavalry arriving; on the other bank the artillery and accompanying foot are readying to leave...
At which point it all got very messy, and very complicated - the Allied assault was such that I felt that the only solution was to get the artillery away (losing it was an automatic lose for the scenario as a whole). In retrospect I might have done that a move earlier, because the subsequent moves were very close!
In this final picture you can see the gun on the far bank is now safe, on this bank however, the cuirassiers have been broken and are in rout (the red pin) following their attempt to bolster the line. The French Commander in Chief is attached to them in order to improve their possibility of passing the next morale check.
Lee's are shaken (the yellow pin) so a morale check will soon be required. The other French cavalry are placing themselves between the Allied forces and the other gun.
..and so it ended - Lee's broke and routed from the field in the end - the French cavalry shield the gun until it left the field, before departing themselves.
Just for once, a French victory...!!
Post match analysis:
OOB
First then, the orders of battle:
Playing the part of the country of Lorraine in this campaign are the French - a relatively small force. You'll note that one of the two guns is weak - this was the artillery that made such a poor showing of it at fight for the Bridgehead. They were advised that heads would roll if their performance wasn't improved...!
Other than that - two regiments of horse, two regiments of foot (please click on the tables and any of the pictures for the usual far larger view):
 The British on the other hand (playing the role of the VFS) had a veritable cornucopia of troops to play with.
All units were at full strength, as despite some of them having fought their way over the bridgehead casualties had been light to non-existent.
The Allied forces then comprised 3 guns, ten battalions of foot, four squadrons of horse:
 Terrain/Table:
 An analysis of the table however, should show that despite their far inferior force (only in numbers my friends, not their fighting qualities..!) the French were in a strong position, because in effect this game is almost a re-fight of Thermopylae.
The river is impassible expect at bridge or ford so any change of plan involves a costly (in terms of time) march back to the ford. In addition there are two obstacles that the attacking (Allied) commander had to deal with.
To the west of the river the sides of the gorge come in towards the river causing a very narrow defile that makes deploying those large numbers of troops very difficult.
To the east of the river, the approach to the bridge is dominated by Hougemont, oops, the farm, at the southern end of the gorge - a real stronghold of a position.
So how did DG (as British commander) decide to handle this... read on for the report of how the game unfolded..
The Game
The scenario calls for an "advance guard" to enter the table before the main body of the army - in the following you can see how DG's plan began to unfold. DG had deployed all his medium cavalry as the screen for the advance guard, but on the far side of the river (the east side) he had far fewer troops than on the west side... by a factor of more than two..
 DG's advance Guard enters the table - just one infantry and one cavalry regiment to the east - more than double that to the west
DG had concentrated most of his Advance Guard on the west bank of the river, and when the main body came on that also proved to be the case, with no further troops being deployed on the eastern bank of the river. With that number of troops, and a time constraint as well (DG only had so many moves to exit the table at the other end), things soon started to get a little congested...
 DG's main force jostles for position as they shake out into line to attempt an assault through the defile...
I on the other hand - despite a somewhat scary paucity of troops had a couple of advantages, in fact three - the first two were the obstacles previously mentioned which both landed nicely within my deployment zone, but also because I had the ability to deploy in a hidden state.
My dispositions were thus as follows (and I had to plan these before the game - not knowing what DG was going to do)
One of my artillery units as mentioned took a hammering at the bridge - this one I placed within the barn using a hidden deployment. The barn had a rather handy opening that faced down the valley - I hardened my heart to the undoubted damage that firing from within the barn would have to the gunners ears!
The other gun I placed on the west side of the river, just north of the bridge and close to the bank so that they could fire at maximum range without impediment.. and before you say anything maximum is only 2 foot - and this was an 8 foot table - so DG had plenty of time to manoeuvre...
The cavalry were both deployed on the east bank - I had just assumed that it looked like the more obvious choice. I deployed both hidden in the farm area (behind the buildings).
My infantry I also deployed in hidden mode - one regiment (Toulouse) were deployed in the woods on the east side of the valley (on the slopes of the valley side, looking "down" towards the river). I was looking for a possible enfilade...
The other (Lee - the Wild Geese) I positioned in the lee of the defile on the west bank...
...and so I waited for DG to arrive...
The action then turned out to be quite literally in two parts - east and west of the river.
East bank of the river:
Taking the east side first, this was a simpler engagement in many ways though not without its "moments". You may remember from above that DG had opted to make this his "light" bank - he had only sent one battalion of foot, and one squadron of cavalry. I on the other hand had two squadrons, one gun, and a battalion - all things being equal then I should have expected to win the fight her, and so it turned out.
With two small hills in the middle of the approach blocking visibility to the woods where I had my infantry concealed, and the barn, DG opted to send his cavalry between the hills and the river - which meant I didn't need to reveal my infantry in the woods. Having said that the moment he moved them the other side of the hill it was clear I was not going to get an ambush, so I decided to pull them back to the farm complex. This manoeuvre was completed, but not without a few heart stopping moment while they changed formation (or rather didn't)!
DG's infantry came over the hill which gave me my first opportunity to fore with the artillery in the barn - setting a bit of a pattern for the rest of the evening (I'll admit it, I was damn lucky... for a change!) the first blood was spilled, and DG's battalion of foot was stopped in their tracks..
Subsequent firing saw more damage dealt out to both the foot and the horse, until, in the end, the foot broke and wouldn't/didn't return. In the meanwhile, with events unfolding as they were on the west bank, I decided to send my two squadrons of cavalry over the bridge to assist.
I almost wished I hadn't as it was at this point that as a result of some uncharacteristically bad shooting, DG managed to get his horse to the barn, and I looked in real danger of losing my gun (and therefore the battle)
DG did however, manage to get his cavalry to the barn
 Something wicked this way comes... DG's cavalry about to come knocking at the door with a request to my artillery to "please come along, like nice gentlemen"...
Happily, a sharp rap on their knuckles from the artillery on the west side of the river saw them off for good... just as well really as my infantry had fumbled another change of formation and were in no position to help!!
At which point I decided enough was enough and it was time I got the gun away - I sent the infantry with them as a rear guard in the event that DG managed to get his guys across the bridge.
West bank of the river:
Things were altogether much more fraught on the west bank of the river, for a start there was a quite unfeasibly large number of infantry battalions approaching!
Happily - the success of the artillery on the east coast of the river was also replicate on this bank and a steady stream of casualties were inflicted on the advancing "hordes". I was helped in this by the occasional shot from the gun in the barn.
Soon however the advancing Allied units were close enough that I had to reveal the wild Geese so these joined the artillery, forming a line just beyond the defile.
 French front line - artillery with Lee's to their flank...
 French cavalry reinforcements arrive - in this case Bavarian cuirassiers - "get those damn cows out of the way!"...
After this things began to hot up as DG struggled to deploy enough if his battalions into line in order to make a concerted and coordinated attack...
 First off the Dutch - have a go - this is Beinheim, supported by some Swiss (Sturler's)...
 ..next up Orkney's, supported by the Foot Guards - still in column - Beinheim have broken and run...
 ..wider angle of the same view, behind the French line you can see the other French cavalry arriving; on the other bank the artillery and accompanying foot are readying to leave...
At which point it all got very messy, and very complicated - the Allied assault was such that I felt that the only solution was to get the artillery away (losing it was an automatic lose for the scenario as a whole). In retrospect I might have done that a move earlier, because the subsequent moves were very close!
In this final picture you can see the gun on the far bank is now safe, on this bank however, the cuirassiers have been broken and are in rout (the red pin) following their attempt to bolster the line. The French Commander in Chief is attached to them in order to improve their possibility of passing the next morale check.
Lee's are shaken (the yellow pin) so a morale check will soon be required. The other French cavalry are placing themselves between the Allied forces and the other gun.

..and so it ended - Lee's broke and routed from the field in the end - the French cavalry shield the gun until it left the field, before departing themselves.
Just for once, a French victory...!!
Post match analysis:
- The French won this game on victory points, having inflicted twice as many casualties as they suffered (in the end it was 9 to the British versus 21 to the French), whilst protecting their artillery (just!)
- This is a real killer of a scenario for the Allies (this time) - there is very little they can do other than batter and batter at the French line, while the French throw everything at them that they can! Reading the write ups from Charles Grant's and Phil Olley's game, it would seem that they experienced much the same!
- We both agreed that artillery in the rules can move too quickly and fluidly, so an enhancement is on it;s way to slow it down - artillery in this period was heavy, and slow, hopefully the rule changes will help to enhance that
- I diced for casualty recovery after the game, and suffice to say my luck departed the building - DG recovered 11 of his 21 casualties, while I only recovered 2 of my 9!! Typical... we're now looking forward to the third scenario...
Steve,
ReplyDeleteThank you for another exciting battle report . . . and congratulations on the French "victory".
In my own "home rules", I tend to always give the side that holds the field at the end of the battle a better chance of recovering troops.
For example a 4+ for them vs a 5+ for the side that left the field . . . figuring that it is a lot easier for "stragglers" to creep back into camp overnight than to make the effort to follow the army that left the field.
Using this system, the British would have recovered about half of their losses (as they did); and the French about a third (which would have been 3 instead of the 2 you got) . . . still pretty close.
I look forward to the next scenario (which is a biggie). Any idea as to when you and DG will be able to play it?
-- Jeff
Great stuff Steve. I really need to get back to the gaming table and play this linked series through myself.
ReplyDeleteGreat game Steve. Nice to read. Its always interesting to see how other people run battles
ReplyDeleteJeff - I neglected to respond - apologies..
ReplyDeleteHolding the field always gives an advantage, but in this case even though they didn't I gave the French an equal recovery chance on the grounds that the Allies are in their home territory..
I think we're going have to wait a while for the next one, unfortunately - I'm not expecting DG to pay another visit before next April (Salute '10).. :o(