...and so on to the game... just one addition to the previous post in that DG
and I decided that one each of our infantry regiments could be classed as
"Guard" - in the rules I use (which are the Will McNally AWI rules with
suitable modifications to suit this much earlier period*) a Guard rating
allows a morale modifier - we used +1 (it can be +2), which means that with
each unit have 6 strength points, the Guard regiments are given a virtual
strength of 7 - very handy when testing morale (which is tested against the
units strength). It makes the Guard regiments a little "stickier", ie. they
stay on the battlefield longer as one would expect them to.. DG chose the 1st
Foot Guards (naturally), and I chose Regiment Navarre (as one of the “Vieux
Corps” it seemed apt).
* If you're interested in the rules check my WSS Project Page which has a link to the rules, and the modifications I'm using)
Next, DG diced for unit arrivals and in an event that one very rarely sees on the wargame table (a definite plus for the random arrival mechanic!!) he found that all his cavalry (with one exception) was arriving at entry point #1, and all his infantry and artillery (also with one exception!) were arriving at point #2 (click here for a map refresher).. interesting times for DG!
On my side I deployed most of my units hidden (not that I had many) with one regiment on the steep hill to the left of my line - overlooking the British entry point #1.
I deployed the artillery immediately as I fore saw these being my battle winners - one on either side of the gap, on first contours as I didn't think the movement penalty would be a problem - I wasn't planning on moving them!
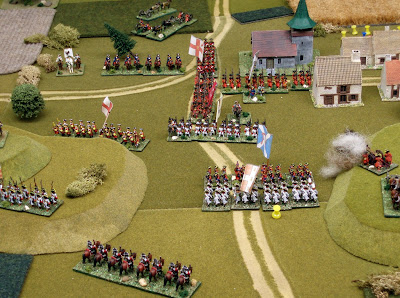
Lastly I placed Navarre bang slap in the middle of the gap, straddling the road... the other infantry regiment I chose to deploy were on the hill to the left of the road (with my senior general) - the following gives a view (as usual - click for a bigger view)...
 This was taken later in the game but I hadn't moved much..
So what of the game?? An interesting tussle, quite exciting as I think DG will agree, it swung both ways a few times...
DG brought all his infantry piling down the road from the entry point #2 in column - they advanced quickly! He put his artillery and the single regiment of cavalry with that force at the front of the column so as to bring them into action as soon as possible..
 meanwhile his cavalry - in line - plus the single infantry regiment piled on
at #1 - clearly DG had taken his orders to heart and was looking for a quick
win...
meanwhile his cavalry - in line - plus the single infantry regiment piled on
at #1 - clearly DG had taken his orders to heart and was looking for a quick
win...
 He then deployed a couple of his cavalry regiments so as to threaten the hill
(a demonstration of force!) which effectively tied down my infantry regiment -
he had numbers to spare and had effectively nullified one of my units without
firing a shot...
He then deployed a couple of his cavalry regiments so as to threaten the hill
(a demonstration of force!) which effectively tied down my infantry regiment -
he had numbers to spare and had effectively nullified one of my units without
firing a shot...
Elsewhere however, my artillery had opened fire - it would be a long day for the French artillery - the first casualties were the cavalry leading DG's infantry column (the column can be seen following) - strike one for the French as they were not to return due to failed morale tests until much later in the game...
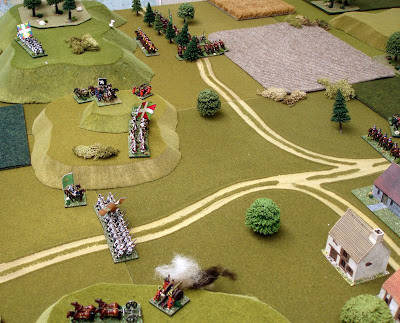
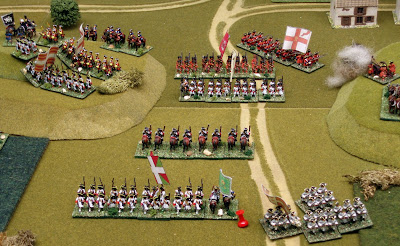
 An overview of the battlefield mid-game (see following).. things were getting
hot by this stage of the game.. I had already deployed one of my hidden
regiments to block the hole left by regiment Foix routing (as a result of
casualties from artillery fire)
An overview of the battlefield mid-game (see following).. things were getting
hot by this stage of the game.. I had already deployed one of my hidden
regiments to block the hole left by regiment Foix routing (as a result of
casualties from artillery fire)
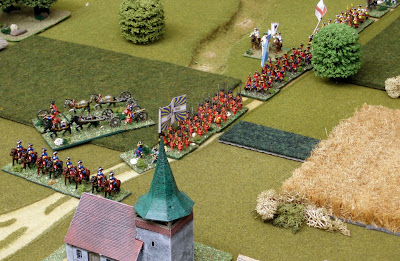
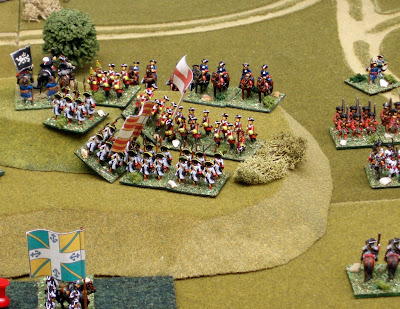
 On the left flank the British cavalry make it up the hill in the first of a
succession of charges - little point in infantry charging cavalry, so the
regiment I placed there was a blocking force... In this instance they saw the
cavalry off with a volley and then subsequently a poor morale throw that
caused each of the two regiments you can see to break and rout... first battle
honours of the game won by the Regiment Saintonge! In the background Wyndhams
are gearing up to charge the French artillery - at the moment they are clear
of the beaten zone - sheltered by the edge of the hill..
On the left flank the British cavalry make it up the hill in the first of a
succession of charges - little point in infantry charging cavalry, so the
regiment I placed there was a blocking force... In this instance they saw the
cavalry off with a volley and then subsequently a poor morale throw that
caused each of the two regiments you can see to break and rout... first battle
honours of the game won by the Regiment Saintonge! In the background Wyndhams
are gearing up to charge the French artillery - at the moment they are clear
of the beaten zone - sheltered by the edge of the hill..
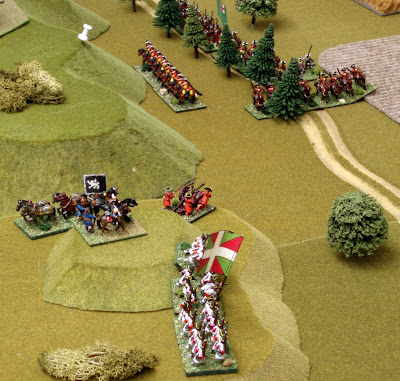
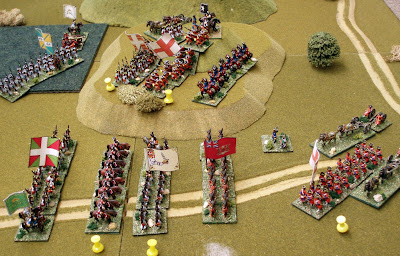
 Later in the game and I have had to deploy my hidden cavalry to provide some
much needed support as DG's regiments start arriving cab rank style... game
hung in the balance here, and only good dice rolls by the artillery, and poor
die rolls from DG's morale checks, saved me..
Later in the game and I have had to deploy my hidden cavalry to provide some
much needed support as DG's regiments start arriving cab rank style... game
hung in the balance here, and only good dice rolls by the artillery, and poor
die rolls from DG's morale checks, saved me..
 Following - Navarre have routed - not surprising as they were bl**dy useless
all game!
Following - Navarre have routed - not surprising as they were bl**dy useless
all game!
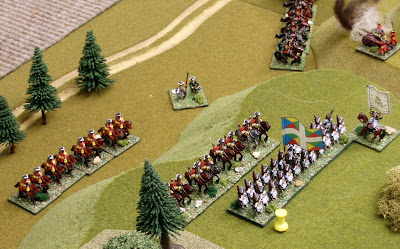
 The French cavalry have swung to close the gate, and happily Regiment Foix
have recovered and are being brought back up post haste..
The French cavalry have swung to close the gate, and happily Regiment Foix
have recovered and are being brought back up post haste..
 Following - Meanwhile, on top of the hill to the left of the gap DG had
managed to get his first infantry into melee - the French held!
Following - Meanwhile, on top of the hill to the left of the gap DG had
managed to get his first infantry into melee - the French held!
 Following - End game - despite his numbers, DG's regiments are severely
depleted, I have just bought out my last infantry regiment (Toulouse - the
guys with the anchor on their flag) fresh for the battle, and with "going home
time" fast approaching DG decided to concede... as night falls, the French
remain in control of the gap, and therefore win the game.
Following - End game - despite his numbers, DG's regiments are severely
depleted, I have just bought out my last infantry regiment (Toulouse - the
guys with the anchor on their flag) fresh for the battle, and with "going home
time" fast approaching DG decided to concede... as night falls, the French
remain in control of the gap, and therefore win the game.
 Stay tuned for some post match analysis and other thoughts...
* If you're interested in the rules check my WSS Project Page which has a link to the rules, and the modifications I'm using)
Next, DG diced for unit arrivals and in an event that one very rarely sees on the wargame table (a definite plus for the random arrival mechanic!!) he found that all his cavalry (with one exception) was arriving at entry point #1, and all his infantry and artillery (also with one exception!) were arriving at point #2 (click here for a map refresher).. interesting times for DG!
On my side I deployed most of my units hidden (not that I had many) with one regiment on the steep hill to the left of my line - overlooking the British entry point #1.
I deployed the artillery immediately as I fore saw these being my battle winners - one on either side of the gap, on first contours as I didn't think the movement penalty would be a problem - I wasn't planning on moving them!
Lastly I placed Navarre bang slap in the middle of the gap, straddling the road... the other infantry regiment I chose to deploy were on the hill to the left of the road (with my senior general) - the following gives a view (as usual - click for a bigger view)...
 This was taken later in the game but I hadn't moved much..
So what of the game?? An interesting tussle, quite exciting as I think DG will agree, it swung both ways a few times...
DG brought all his infantry piling down the road from the entry point #2 in column - they advanced quickly! He put his artillery and the single regiment of cavalry with that force at the front of the column so as to bring them into action as soon as possible..
 meanwhile his cavalry - in line - plus the single infantry regiment piled on
at #1 - clearly DG had taken his orders to heart and was looking for a quick
win...
meanwhile his cavalry - in line - plus the single infantry regiment piled on
at #1 - clearly DG had taken his orders to heart and was looking for a quick
win... He then deployed a couple of his cavalry regiments so as to threaten the hill
(a demonstration of force!) which effectively tied down my infantry regiment -
he had numbers to spare and had effectively nullified one of my units without
firing a shot...
He then deployed a couple of his cavalry regiments so as to threaten the hill
(a demonstration of force!) which effectively tied down my infantry regiment -
he had numbers to spare and had effectively nullified one of my units without
firing a shot...Elsewhere however, my artillery had opened fire - it would be a long day for the French artillery - the first casualties were the cavalry leading DG's infantry column (the column can be seen following) - strike one for the French as they were not to return due to failed morale tests until much later in the game...
 An overview of the battlefield mid-game (see following).. things were getting
hot by this stage of the game.. I had already deployed one of my hidden
regiments to block the hole left by regiment Foix routing (as a result of
casualties from artillery fire)
An overview of the battlefield mid-game (see following).. things were getting
hot by this stage of the game.. I had already deployed one of my hidden
regiments to block the hole left by regiment Foix routing (as a result of
casualties from artillery fire)  On the left flank the British cavalry make it up the hill in the first of a
succession of charges - little point in infantry charging cavalry, so the
regiment I placed there was a blocking force... In this instance they saw the
cavalry off with a volley and then subsequently a poor morale throw that
caused each of the two regiments you can see to break and rout... first battle
honours of the game won by the Regiment Saintonge! In the background Wyndhams
are gearing up to charge the French artillery - at the moment they are clear
of the beaten zone - sheltered by the edge of the hill..
On the left flank the British cavalry make it up the hill in the first of a
succession of charges - little point in infantry charging cavalry, so the
regiment I placed there was a blocking force... In this instance they saw the
cavalry off with a volley and then subsequently a poor morale throw that
caused each of the two regiments you can see to break and rout... first battle
honours of the game won by the Regiment Saintonge! In the background Wyndhams
are gearing up to charge the French artillery - at the moment they are clear
of the beaten zone - sheltered by the edge of the hill.. Later in the game and I have had to deploy my hidden cavalry to provide some
much needed support as DG's regiments start arriving cab rank style... game
hung in the balance here, and only good dice rolls by the artillery, and poor
die rolls from DG's morale checks, saved me..
Later in the game and I have had to deploy my hidden cavalry to provide some
much needed support as DG's regiments start arriving cab rank style... game
hung in the balance here, and only good dice rolls by the artillery, and poor
die rolls from DG's morale checks, saved me.. Following - Navarre have routed - not surprising as they were bl**dy useless
all game!
The French cavalry have swung to close the gate, and happily Regiment Foix
have recovered and are being brought back up post haste..
Following - Navarre have routed - not surprising as they were bl**dy useless
all game!
The French cavalry have swung to close the gate, and happily Regiment Foix
have recovered and are being brought back up post haste.. Following - Meanwhile, on top of the hill to the left of the gap DG had
managed to get his first infantry into melee - the French held!
Following - Meanwhile, on top of the hill to the left of the gap DG had
managed to get his first infantry into melee - the French held! Following - End game - despite his numbers, DG's regiments are severely
depleted, I have just bought out my last infantry regiment (Toulouse - the
guys with the anchor on their flag) fresh for the battle, and with "going home
time" fast approaching DG decided to concede... as night falls, the French
remain in control of the gap, and therefore win the game.
Following - End game - despite his numbers, DG's regiments are severely
depleted, I have just bought out my last infantry regiment (Toulouse - the
guys with the anchor on their flag) fresh for the battle, and with "going home
time" fast approaching DG decided to concede... as night falls, the French
remain in control of the gap, and therefore win the game.
 Stay tuned for some post match analysis and other thoughts...
Hi
ReplyDeleteNot my era but your figures have a very nice toouch of elegance and distinction! Moreover, I like to read your AAR's
Best regards
Rafa
Great write up and good looking game. Thanks for that.
ReplyDeleteStately manouevres from when men dressed like girls and fought like tigers. A good clear battle report, not the easiest thing to write Steve. Well done.
ReplyDeleteA great looking, well fought game, well presented. A pleasure to read this morning.
ReplyDeletebyw congratulations on holding the line, not an easy feat.
Ross
Your game accounts actually make me want to play a game instead of just painting stuff all the time!
ReplyDeleteWonderful to out-perform history, isn't it?
ReplyDeleteA great-looking table and good action, sir.
-- Jeff