Sunday, November 19

"Firing into the Brown" #29 - "Battle of Grimpen Mire" (OHW #24), and the Lines

"So Carnehan weeds out the pick of his men, and sets the two of the Army to show them drill and at the end of two weeks the men can manoeuvre about as well as Volunteers. So he marches with the Chief to a great big plain on the top of a mountain, and the Chiefs men rushes into a village and takes it; we three Martini's firing into the brown of the enemy".

Kipling "The Man Who Would Be King"

Time for another update.. and about bleeding time too..  eight months since the last one, foresooth!

~~~~~~~~~~~~~~~~~~~~~~~~~~~~~~~~~~~~~

I suppose it behoves me to at least apologise to my reader (you know who you are, Jim πŸ˜„) for my prolonged absence but what can I say - I was busy elsewhere, the wargame mojo left me for a while (well at least the desire to apply paint to little metal men, and set up tables for games anyway - reading in the subject however, was unaffected), it was my first summer as a retired person, so the boat, and Gertrude played a significant part in my absence - the weather (for the first part of it anyway) was glorious, and inconducive to sitting in a stuffy loft...

Clearly however, the mojo is now stirring..  😏

~~~~~~~~~~~~~~~~~~~~~~~~~~~~~~~~~~~~~ 

Based on scenario #24 in Neil Thomas's "One Hour Wargames" I thought it long overdue to get the English Civil War little metal men out for a run..  last game was February..

The scenario posits that one army is trying to clear enemy control from a major road that provides them with both supply and communication. The fly in the ointment though is that while they have superiority in force, their ability to use those forces is constrained by the fact that there is terrain either side of the road that is impassable/unavailable to them...  

West of the road is a dense wood that not only have they have not managed to reconnoitre, but of which they have intelligence it is hard going, and not passable. Meanwhile, East of the road is Grimpen Mire*, a supposedly bottomless marsh of sucking water and soft mud providing no footing or passage for any troops. There only routes north to south then, are via the road, or on either flank.

For this scenario, the Royalists (all regular quality troops) are the attacker and comprise four regiments of foot, one regiment of horse ("galloper") and a regiment of dragoons. Parliament (also all regular) comprises three regiments of foot, and  regiment of dragoons. Both sides were rolled for on the random tables in "One Hour Wargames", substituting "skirmishers" for dragoons

Parliament starts the game with all units on the table but is allowed to have one of them deployed in the woods - following shows the position at move one with the Royalist attackers just appearing at top..  

Parliament has deployed its dragoons in the wood (a logical choice I thought), but as the winning condition for the game is to have a unit within 6" of it at the end of 15 moves they have deployed all three regiments of foot to withstand any Royalist attempt to drive them off. 
 

The Royalists (following) are pushing all their foot down the road - column of march where necessary to move quickly. They gave sent their cavalry and dragoons down the east and west flanks. Parliament is turning their flank foot regiments to face the threat. Blue dice is the move counter so this is turn 3..


"Boom!" - following - and the muskets of both sides open fire as the Parliamentary dragoons and Sir Charles Gerard's Regiment of Foote exchange fire.. to the left John Belasyse's Regiment of Foote [blue flag] and Colonel Thomas Blagge's Regiment [St George flag] have taken advantage of the dragoons being otherwise occupied, to slip past..


It is all too much or the Parliamentary Dragoons (following picture) and after a couple of diabolical morale checks they re seen here routing from the field (bottom right) the Parliamentary commander desperately trying to rally them..  


It's about turn 9 from memory, and in the centre John Belasyse's Regiment (blue flag) have come to close quarter fighting with Colonel Charles Essex’s Regiment (yellow flag - musketry only - neither regiment could get the ascendancy to close to push of pike), no room on either flank for overlaps..  


..the Royalists are 'cab ranking' their foot regiments to maintain pressure in the event Belayse's break.


Here you go - following - we suddenly went back to 197'pffft... πŸ˜†

Crunch point of the battle - turn 11 - on the right Lord Wharton's regiment have formed stand of pike to receive horse but as is always the way the horse swerved and targeted Lord Mandeville's Regiment on the left where the Dragoons had dismounted and were providing flank support..  it was all too much for Mandeville's and they break and stream away past Wharton's..


Move 13 - following -  and I think it safe to say that the Royalists are in the ascendancy..  for Parliament Gerard's have finally broken but not before first having sent Belayse's off with a flea in their ear.. happily the Royalists already have a replacement to feed into the mincer in the form of Sir William Pennyman's Regiment, who finish them off 

Mandeville's (blue) continue to rout to the right/East accompanied by Gerrard's - all hopes for Parliament are now pinned on Lord Wharton's regiment (green flag) who stand like a rock - pikes ready to receive horse, but looking worriedly at Pennyman's - they have yellow dice so they're already shaken, but so are the Royalist horse - can they pull it off?? Can they last two turns??


Final move of the game - following - and no they couldn't...  they managed to see off the Royalist horse but the continued pressure from Pennyman's - with flank support provided again by the dismounted dragoons was in the end too much, and they break and rout ...


...pursued by Pennyman's (following)..  


Royalist mission accomplished - just in time!

Post match analysis..
  • Very close and enjoyable game even solo - and the scenario delivered exactly what it promised it would, a four foot table width is reduced to little less than 9" total available 'advancing room' for the attacker..  very clever..
  • I realised after I'd started the game that terrain placement is key to the game - with only one unit allowed in the woods, it was theoretically possible for the Parliamentary dragoons to just sit in the woods out of range of muskets, but within 6"of the road to meet the victory requirement..  such games'manship is of course is beyond contempt, below the salt, and unthinkable to any of my reader..
  • * thanks Sherlock.. πŸ˜€

~~~~~~~~~~~~~~~~~~~~~~~~~~~~~~~~~~~~~ 

Since the completion of the little local history project based on the Portsmouth canal [clicky] which I enjoyed immensely, the next local history investigation is the old Hilsea Lines [clicky] an 18th/19th-century fortification built between roughly 1858 and 1871 to protect the northern approach to Portsea Island/Portsmouth (not generally known that Portsmouth is built on an island, by the by) but more importantly to protect the key naval base...   the lines were rendered obsolete by advances in artillery technology even before they were completed, and never saw actual action, not even in WW2 where you might have expected a significant anti aircraft presence, but where I suspect the lines would have been too far away from the dockyard to provide meaningful cover..   bit of geography may help here:


Portsea island..  the Lines are highlighted, dockyard circled..

As always, the bogeyman causing the huge expenditure was fear of invasion by the French under Napoleon III - this amble concerns the central section - Bastion 3, specifically - see following - but over this winter I'll go and check the other sections as well, if Gertrude is willing..


Bastion 3 following.. these are the casemates - so this would be behind/south'ish of the gun line which would be firing from the other/north side, connected to these, internally, inside the mound..  


This is very descriptive; helps understanding of the construction and design.. 


Other direction to the first picture ..  so approximately 10 casemates in total in this bastion..


Artillery store entrance I think.. 


Stay tuned - this will be a slow'ish burner - I have details on the sallyport, but the other bastions I plan to visit over the winter..

~~~~~~~~~~~~~~~~~~~~~~~~~~~~~~~~~~~~~ 

 Laters, as the young people are want to say...  and hopefully not so long this time!

Tuesday, March 7

"Firing into the Brown" #28 - "Skirmish at Long Bute Farm" game, Wargamers Newsletter, and stuff..

"So Carnehan weeds out the pick of his men, and sets the two of the Army to show them drill and at the end of two weeks the men can manoeuvre about as well as Volunteers. So he marches with the Chief to a great big plain on the top of a mountain, and the Chiefs men rushes into a village and takes it; we three Martinis firing into the brown of the enemy".

Kipling "The Man Who Would Be King"

Time for another update..   really enjoyed this one..
~~~~~~~~~~~~~~~~~~~~~~~~~~~~~~~~~~~~~

Back when I was a (considerably) younger Steve The Wargamer I played a lot, and I mean quite a lot, of western gunfight games using the simply stunning set of skirmish rules published by the Bristol Wargame Group of Steve Curtis, Mike Blake and Ian Colwill. 

I think I first came across them in the pages of the Wargamers Newsletter, as for a while Don had a series of articles called the 'Skirmish Line' which these guys wrote - the first one featured in about June '73 [clicky], and for a while round that time I was also going to my local wargame club where these also featured heavily. 

Being short of dosh at that impecunious age, I slavishly copied out the entire set of rules (they would have been the v2 ones) by hand!

All of these games I documented in a spare school exercise book entitled "The Annals of Cedar Gulch", as such was the name of my imaginary and troubled town in the dead-lands of some unnamed territory, pray to any passing herd of cows, steers, buffalo's, Indians (sorry, "First Americans"), cowboys, posses or bad men..  glorious stuff... I even had a background tape of spaghetti western film theme's on cassette for added atmosphere.. 😁

So it was that when when someone on Facebook offered up a job lot of old rules a couple of years ago, and they included among them the v1 and v2 rules, I bit their arm off, but they then sat on my shelf ever since, quietly murmuring in my ear every time I passed them that 'it really was time for them to hit the table again'...  until now!  So I present to you (and in as close to that eye catching original font as those guys used to use as I could find on Blogger.. 😏)........

Skirmish at Long Bute Farm

In the long hot summer of '62 the war is but a year old, and the now (long forgotten) town of Cedar Gulch, which was located in one of the contested counties on the edge of the State, has found itself almost on the front line of the war between the States.

Long Bute Farm lies just outside town, but even closer to the contested border area....

The farm is abandoned (a fallout from the war, as the Father and older sons have gone to fight for the Union, leaving the mother and smaller children to go and live with her sister, who lives in a far safer location), but with crops uncollected, and some livestock still present, it's a sure target for any passing Union or Confederate foraging patrol. 

So it was that one warm and sunny day, two groups of men in different uniforms happened upon each other, and as the carbine shots rang out, the skirmish at Long Bute Farm unfolded, and the following is an account of the action..

The Union patrol of three men, comprised Corp, Seth and Zack - Corp being the NCO leading the group. On the Confederate side a similar sized group were lead by Zeke (also an NCO), with Robbie and Buck in support. 

All the men are troopers from two cavalry regiments who have been out on patrol reconnoitering for signs of the enemy, but are currently bivouacked nearby - given the unofficial nature of their activities (they are out foraging for the pot) they are dismounted, but are armed with their traditional weapon, the single shot Sharps Carbine, in addition they each have the almost universal fighting knife.
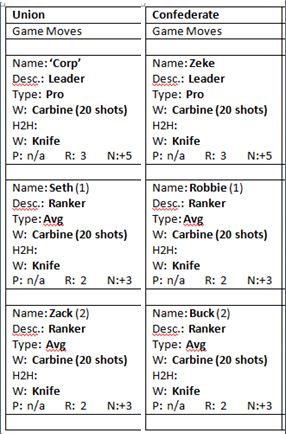
NCO's classed as professional, troopers are average, P is for pistol skill which they don't need, R is their basic rifle skill, N is for "nerves" and in essence is their starting morale - equal forces as I wanted to be able to test the rules

The two patrols arrive at diametrically opposite corners of the table, and quickly deploy into cover loading their carbines as they move.


Move 1:

Corp orders Seth and Zack to rush the farm house, as the farm house covers their quick advance from the Confederate patrol he has spotted across the way. No shots are fired by them, as for the same reason they have cover, they also have no targets. 

Corp opts to remain in cover behind the scrub as he has a fairly clear line of site to Robbie, who is also in cover, but at the end of the Confederate skirmish line. Zeke and Buck use the same tactics as Seth and Zack, and also rush forward using the farm for cover, but branch left and right as Buck is looking to get a flanking advantage. They leave Robbie behind to cover them. 

Taking aim at each other it is Robbie who's quicker however, and spinning round and dropping to the floor, Corp falls, grasping hold of his injured right arm.

Bit of rule mechanicals to show how the narrative was arrived at....  game moves in the Western Gunfight Wargame Rules are divided into 3 phases, all moves are simultaneous, and although you plot your movement first, you don't complete it until after firing - so for this move, other than Corp and Robbie, everyone will complete their movement and end up where they want to be as no one is fired upon. In the firing part of the move, Corp opts to do aimed fire which gives bonuses in firing factors, but can only hit in phase 3, whereas Robbie snap shoots banking on being able to hit quicker than that - and so it was.... Robbie hits in phase 2.. Corp's arm is useless for the rest of the game, he and his now useless rifle (you can't use one with only one arm) drop to the floor before he gets his shot off..

Move 2: 
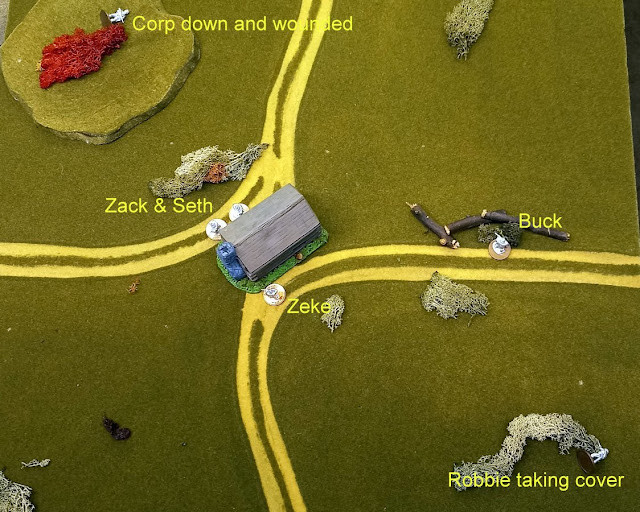
With Corp down, Seth and Zack decide to move round the corner of the farm house to take on Zeke together, the farm house itself covers half their advance, and both of them fire as Zeke comes in sight; Zeke naturally returns fire, but can only fire at one of them, so chooses Zack as his target. In the fusillade of shots that follow, it is Zack that doubles over grabbing his arm before dropping to the floor.. Seth's shot meanwhile has gone wide, and he stares wildly at the enemy corporal deciding what he needs to do next..

Bit more rule mechanicals to show how this narrative was arrived at....  in the firing all three opted to snap shoot as clearly time was of the essence, but with two against one I was kind of expecting a different outcome to the one that transpired..  in summary though, all three shots went off, but Zeke's hit in phase 2, Zack's in phase 3, and Seth's shot discombobulated only a passing crow... the fact that Zack and Seth were moving, while Zeke was stationary was the defining difference..

Buck runs to the corner of the farm in the hope of taking Seth and Zack in the flank, but by the time he arrives they have moved round the corner and are out of sight.

While Corp gets back to his feet cursing the wound in his arm and 'the luck of the devil some Reb's have', he reaches for his fighting knife - he'll not be able to use the carbine again today, and indeed for some time. Across the other side of the farm, Robbie moves forward to the cover recently vacated by Buck.

Move 3: 
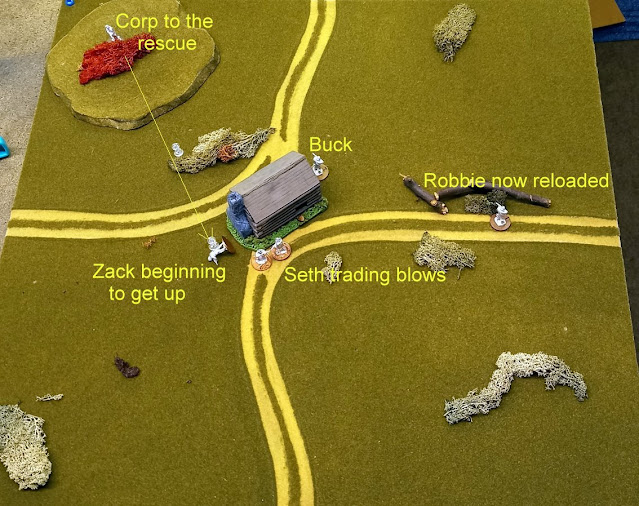
You may notice the clear map pins - I use them to show the position of the character as they move - in this case Corp - he is in phase 1 position, middle in is phase 2, last pin is phase 3

Corp is now on his feet, and surveying the farm see's Zack on his back, holding his arm and clearly in pain... right or wrong he decides to go to his aid. Running forward, Corp aims for the corner of the house where the downed body of Zack can clearly be seen - he's looking to save what little he can from what appears to be a complete and total FUBAR - "damn these, Rebs"

As Corp breaks cover, moving fast, Buck fires from the corner of the farm, and hits him again in the arm Corp collapses to the ground and into the shrub with a second wound. Robbie has paused to reload, or he would have fired as well. Corp drops to the ground.  

At the farm house while Zack climbs groggily to his feet, shaking his head and clutching his arm, Zeke drops his now empty carbine and takes a swing at Seth who returns the blow - neither man lands a telling hit, and they crouch ready to fight on.

Bit more rule mechanicals...  in the firing, only Buck needed to worry as no one else was able to, either due to needing to reload, no line of sight or wounded... even though he was running, because of the range, his shot was good for a phase 1 hit. The hand to hand engagement resulted in a blow from each man that cancelled out..

Move 4: 

The Confederate patrol is doing alright, but all is not yet over..

At the farm, Buck moves round the back reloading his carbine at the same time - he can hear Zeke calling for help. 

Zack, now back on his feet, pulls his knife (taking 2 phases) and moves to attack Zeke (move for 1 phase) in concert with Seth.

Robbie, now reloaded, has seen Corp drop, and breaking cover runs towards his last sighting of him with the intent of either taking him prisoner, or finishing him off if he declines the offer!

Behind the shack, Seth and Zeke continue to square off and on this occasion Zeke's hit is of sufficient force to knock out Seth.

Move 5: 

The Union patrol have had it - seeing Seth knocked out, Zack, rather than attack, runs to the nearest friendly cover. Corp kneels down and moves further into the scrub - enough's enough!

Zeke takes the opportunity to draw breath and reload his carbine. Meanwhile, just as  he comes round the corner of the farm building, Buck see's Zack make a break for the cover and fires off a quick shot dropping him before he gets to cover.

Robbie, approaching the last place he'd seen Corp, slows to a walk and shouts out for him to come out with his hands up. Corp tells him to 'go to hell', but slowly get's to his feet with his hands in the air - he's a realist and knows when it's over  

Bit more rule mechanicals...  as part of the game move all participants take a nerve test at the end of each move, and in this case both Zack and Corp failed, primarily as a result of the number of wounds each had taken (2 each), and the fact that Seth was knocked out and therefore not available as support...  the nerve test result at the end of each move is carried forward, and is a clever way to track the ups and downs of the game in a cumulative way..

Move 6:

Game over - Buck moves to cover Zack and tie him up, Zeke does the same to Seth before emptying a bucket of water in his face to bring him round. Robbie escorts Corp back to the farm..

Pausing only to liberate a couple of hens and a sack of corn, the trio head back to the regiment, prisoners in tow ready to be handed over for further questioning.

Post match analysis:
  • stupid really, but I can't tell you how much I enjoyed that little push around with half a dozen (yeah, unpainted..  mea culpa, mea maxima culpa 😏) figures on a two foot table - but what a narrative it delivered, and what a mental picture it painted of six slightly scruffy, campaign hardened soldiers meeting somewhere between the front lines in search of nothing more than a good chicken dinner...
  • for this little run out I used the version 1 rules, they're slightly simpler and only contain the rules and methods for pistols and Winchester repeater rifles - I mocked up the rules for the carbines which was easy enough to do. For the next game I will be using the expanded version 2 rules, if only because it will once again allow me to arm one of my little dudes with a LeMat revolver again. 😁
    Le Mat pistol..  9 shot cylinder firing normal bullets, but the thing underneath is a shotgun barrel firing buckshot! I can see Zeke carrying one of these, as the Confederacy took delivery of 1500 of them during the war..  more here.. LeMat Revolver [clicky]
  • As I mentioned - I'd forgotten how effective the nerve rules were - they really track the ebb and flow of the action/skirmish on the individual character, and in some case (like Corp and Zack) drives the next action the character has to take ('surrender' and 'run' in our case)
  • I very much recommend this as a read - he argues (quite effectively I thought) that the Western Skirmish Wargame Rules could quite possibly have been the first ever RPG.. Playing at the World: Western Gunfight (1970): the First RPG? [clicky]

~~~~~~~~~~~~~~~~~~~~~~~~~~~~~~~~~~~~~ 

The above also reminds me that I have been entirely remiss in not better advertising the availability of the following, which is quite possibly the best source of online content from the Wargamers Newsletter anywhere...  I was a party to scanning a number of the magazines and adding them to the archive, but John (Haines) has done an amazing job of putting these together and I am ABOLUTELY sure he would be beholden to anyone who has a copy of the few issues he's missing..


...there is an index for the contents of the Newsletter on the Vintage Wargming page..  link 'ere.. 


...utter wargaming gold...

~~~~~~~~~~~~~~~~~~~~~~~~~~~~~~~~~~~~~ 

 Laters, as the young people are want to say...

Saturday, February 18

"Firing into the Brown" #27 - "Hatch End" - game

"So Carnehan weeds out the pick of his men, and sets the two of the Army to show them drill and at the end of two weeks the men can manoeuvre about as well as Volunteers. So he marches with the Chief to a great big plain on the top of a mountain, and the Chiefs men rushes into a village and takes it; we three Martinis firing into the brown of the enemy".

Kipling "The Man Who Would Be King"

Time for another update..
~~~~~~~~~~~~~~~~~~~~~~~~~~~~~~~~~~~~~

As promised, a review of the game I mentioned in the last post...

First off here's a couple of scans of the magazine article that prompted the game (along with random arcane scribbles added by myself as I worked out how to randomize the arrival of the reinforcements for solo play.. 😁)


Clicking on any of the pictures, by the way, should "embig'en" in a pleasing manner..


Which translated to the table top as:


OOB was as per the previous post [clicky] so without further ado - on to the game..

Move 1:

Parliament start the game deployed (as per the scenario setup), but the Royalist advance guard (their horse) have just arrived..


They've got orders to attack immediately, and these Parliamentary foot are practically licking their lips at the thought of poking the nice horses with their long sharp pointy things..😁  The regiment in the middle (purple flag - Brookes) is an elite/veteran regiment, the other two are regulars..


Move 2:

More cavalry arriving (following) and the Parliamentary foot are starting to change formation to 'stand of pike' to receive horse..


In a quite astonishing stroke of luck the Parliamentary horse throw high and return on this move as well - these are Dragoons..


Move 3:

The Royalist foot (following) lead by the guns are beginning to arrive.. one regiment of horse is about to engage the blue regiment, behind them another regiment of horse is milling about mid change from column to line (they flunked the dice roll required 😏)


Move 4:

First blood - Parliamentary artillery and musketry stop the Royalist cavalry in their tracks..  despite what the scenario would have you believe this is not a simple task the Royalists have..  I was convinced at this point that they were going to get tonked!


Move 5: 

More Royalist foot arriving (following) - the cavalry battle on the Royalist right continues..  the rest of the Parliamentary horse has come back and all four regiments are beginning to deploy into line..


Closer view of the Royalist arrivals.. at this point the unengaged Parliamentary foot are inching forward to cramp the Royalist style


Move 7'ish:

BOOM! General engagement along the line as the Royalist foot and horse finally get within musket range - that yellow flag regiment are novice/recruits and are getting handled roughly by the cuirassiers to their front - little do they know it's going to get worse as they have not yet changed formation to receive horse..

All is not going the Royalist way however, as at least one of their regiments has been sent packing by the Dragoons (red dice = rout)


"For the King!" .... John Belasyse's Regiment of Foote are so keen to 'get in' they haven't yet even deployed..  


...and then the incredible happens (as it occasionally does) - the Parliamentary line collapses with failed morale throw after failed morale throw..  they retire along the line (following)..  the Royalist cuirassiers are in a dangerous position (flanked by the dismounted Dragoons) and need to get out of there..


Better view - musket smoke covers the battle field...  that cavalry battle on the right flank still continues!


Some moves later and it is clear (following) that the Parliamentary foot has shot its bolt, and largely legged it..  the Royalist cuirassiers charged the Yellow flag regiment, and treated then so roughly they routed from the field..

Bottom of picture - wonder of wonders - Royalist reinforcements have arrived (threw two 6's on two dice in one roll!) but have gone to 'stand of pike' in the face of the Parliamentary cavalry which is largely intact and undamaged...


The Royalist foot is withdrawing slowly (top right following) covered by their artillery and their remaining horse..  Parliament is trying get one of their cavalry regiments round the flank (same corner as the gun) so as to slow everything down

 
...but (following) - they are stopped in a hail of grape - and that's where I called a halt to the game.. 

Right or wrong I called it a draw..  fairly equal casualties, fairly equal losses in units, and the Parliamentary forces were clearly going to gave to leave the area soon due to the loss of 60-70% of their foot..

Great fun, and much much closer than I thought due to the amazing collapse of the Parliamentary foot...

Sir Thomas Bagshot will ride again..  😁

~~~~~~~~~~~~~~~~~~~~~~~~~~~~~~~~~~~~~ 

 Laters, as the young people are want to say...

Sunday, February 12

"Firing into the Brown" #26 - archives, "Hatch End" and stuff..

"So Carnehan weeds out the pick of his men, and sets the two of the Army to show them drill and at the end of two weeks the men can manoeuvre about as well as Volunteers. So he marches with the Chief to a great big plain on the top of a mountain, and the Chiefs men rushes into a village and takes it; we three Martinis firing into the brown of the enemy".

Kipling "The Man Who Would Be King"

Time for another update..

~~~~~~~~~~~~~~~~~~~~~~~~~~~~~~~~~~~~~

Retirement with time on my hands, and a bout of crappy weather in the UK (non-stop rain, cold, rain. cold and repeat) has seen me in the loft tidying, and chucking stuff out... going forward then, some of the more interesting bits and pieces will find their way here...   well interesting to me anyway....  

First off the chocks then, "Databooklet No. 6" from Military Modelling in December 1981 and written by the inestimable Peter Gilder...  


Difficult to believe how much a of a boon these little pamphlets were in the pre-Interweb days - in general the Internet wasn't even up and running until 2 years after this, and it would take years before it became the font of all the stuff useful (and un-useful!) that it is today...  so bottom line - that's why I kept it to throw away 42 years later...  😁

~~~~~~~~~~~~~~~~~~~~~~~~~~~~~~~~~~~~~ 

Way too long since I had the little metal men out for a jaunt, so whilst engaged in the same clearing out session that unearthed the above, I found a scenario in an old Wargames Journal magazine [clicky] - it was a sample issue, so I'm guessing I picked it up at one of the wargame shows back in the day, and as Board Game Geek reckons it started with issue 1 in November 2005 I'm going to guess I picked it up at Salute that year (that's so long ago they were still at the Olympia venue!)

Anyway - a fairly unexceptional scenario but for some reason it caught my imagination and I decided to use it as an excuse to the get the English Civil War guys out.. they have been in their storage boxes far too long..

Scenario Notes:

  • Parliament is on the table at the start with the exception of their cavalry - this is a Parliamentary incursion into an area sympathetic to the Royalist cause, so they have garrisoned and looted (err..  "requisitioned supplies needed for the war effort"...) the village, seen top centre in the picture. Their cavalry are off forging for further supplies..  they will arrive back sometime up to turn 4 dependent on dice throw, and will appear at the far end of the road leading left/right in the picture following.
  • The Royalists arrive in two tranches - cavalry advance guard first on turn 1, the rest of the troops from turn 3.
  • Royalist reinforcements may arrive from turn 6 - throw a D6 and on a 6 there is then a 1:6 chance of one infantry unit or one cavalry unit arriving...  the odds are stacked against any Royalist reinforcements arriving.. πŸ˜€
  • The Royalist commander is a bit of a buffoon, and in an 'all fired hurry', and the cavalry arrive on table with orders to attack immediately, even if it is a fully formed infantry regiment with pikes set.. 😏

Stay turned for battle report and a ton of pictures - but in the meanwhile here's the table with the opening move taking place.....

Royalist advance guard arriving right.. Parliamentary infantry (top) deployed, but redeploying to face the threat...

OOB as follows:

Royalist/Attacker:

Unit

Notes/Type

Morale

SP’s

Gun 1

Medium (Saker)

0

6

5

4

3

2

1

skull

Gun 2

Medium (Saker)

0

6

5

4

3

2

1

skull

Pennyman’s

Regular/Steady

+1


5

4

3

2

1

skull

Blagge’s

Regular/Steady

+1


5

4

3

2

1

skull

Belayse’s

Regular/Steady

+1


5

4

3

2

1

skull

Grandison’s

Trotter

+1

6

5

4

3

2

1

skull

Byron’s

Trotter

+1

6

5

4

3

2

1

skull

King’s Life Guard

Cuirassier

+2

6

5

4

3

2

1

skull

Carnarvon’s

Galloper

+1

6

5

4

3

2

1

skull

Reinforcements:

Gerard’s

Regular/Steady

+1


5

4

3

2

1

skull

'tba'

Dragoons

+1

6

5

4

3

2

1

skull

Parliament/Defender:

Unit

Notes/Type

Morale

SP’s

Gun 1

Light (Falconette)

0

6

5

4

3

2

1

skull

Gun 2

Light (Falconette)

0

6

5

4

3

2

1

skull

Brooke's

Veteran

+2

6

5

4

3

2

1

skull

Wharton’s

Regular/Steady

+1

6

5

4

3

2

1

skull

Mandeville’s

Regular/Steady

+1

6

5

4

3

2

1

skull

Cholmley’s

Regular/Steady

+1

6

5

4

3

2

1

skull

Essex’s

Recruits

-1

6

5

4

3

2

1

skull

Innes’s*

Dragoon

0

6

5

4

3

2

1

skull

Wardlawe’s

Dragoon

0

6

5

4

3

2

1

skull

Fielding’s

Trotter

+1

6

5

4

3

2

1

skull

Gramson’s

Trotter

+1

6

5

4

3

2

1

skull

*Using Royalist dragoons as a proxy/stand-in

Stay tuned..

~~~~~~~~~~~~~~~~~~~~~~~~~~~~~~~~~~~~~ 

 Laters, as the young people are want to say...