Saturday, March 1

"Jailbreak!" .. the game

Time for another update..  a game report as promised..

~~~~~~~~~~~~~~~~~~~~~~~~~~~~~~~~~~~~~

[Move 1] As the sun slowly rose over the horizon, and a new day burned its way into the retinas, at the  far end of town Andy and Charlie move stealthily towards the window on the side of the jail closest to them. At the other end of town Dave, Eddie and Frank move into cover of a dune between them and the Assay Office and General Store. 

In the jail, breakfast over and coffee in hand, the Sheriff spots Andy and Charlie's stealthy approach, puts his coffee down and draws his gun but holds his fire ["Law dog" trait - can't fire until fired upon].

[Move 2]  It soon becomes clear that they really aren't up to any good as they move rapidly to the front and side windows of the jail, smash the glass, and open fire at the Sheriff inside the jail hitting him in the arm [happily he can ignore the first wound, and then passes his toughness (morale) test]. 

Over in the hotel, Hank hears the shooting, and nervously comes out on to the balcony to see what's going on. Across the way he sees the Jones Gang members behind the dune, but then sees Charlie below and to his left at the front of the jail, and as he's closer, opens fire but misses. 

In the jail the Sherriff his iron cleared, returns fire hitting Charlie in the leg [Charlie then failed his toughness test and went "lily livered" (or Shaken)]. 

Eddie and Frank [Jones Gang] break cover and run across the street towards the Assay office, they've seen Gus hovering in the window with a shotgun and recognise the threat - Gus sees them coming and gives them both barrels hitting with both shots but, amazingly, doing them no harm [Gus threw two 7's on the relevant casualty table which is a non-wounding hit - on the plus side for Gus, both Eddie and Frank then failed their toughness tests - perhaps not surprisingly - and also became "Lily livered"/Shaken - so that means that at this point all three members of the Gang were shaken]

[Move 3]  Frank gets the draw and fires at Gus [at reduced effect and also with cover benefits for Gus] hitting him in the leg [and causing Gus  to become shaken], but Dave, who also crosses the street, takes a shot at Hank on the balcony hitting him - Hank drops unconscious [Dave threw a serious wound on the relevant table]! The Jones Gang boys have reason to be happy..

At the jail meanwhile, Andy continues to fire at the Sherriff, hitting him but only grazing him [the Sherriff then passes his toughness test] but the Sherriff turns, and fires back hitting Andy! Andy looks shaken and drops out of sight [failed his Toughness test] 

In the street Eddy shakes himself down [successful toughness test and becomes unshaken] and races towards the Assay office to give Frank some support. He kicks the door open to get a look in the room, where Gus takes one look at him and runs across the room and dives out of the side window into the alley between the office and the hotel! 

...Gus takes one look, runs across the room and dives out of the side window into the alley..

Move 4 - While Hank remains unconscious on the balcony, at the Jail Andy has finally managed to put his big boys pants on [passed his toughness test], ducks up, fires at the Sherriff and is rewarded with cries of pain in the Jail.. he's hit him! [Twice in fact, in the gut and chest, and not surprisingly perhaps the Sherriff also fails his toughness test and becomes shaken] 

Bart shouts out to Andy and Charlie that "the Sherriff is scared"! 

Out in the street, angry that their prey may get rescued from under their feet, Dave fires twice at Charlie but only grazes him. [Charlie then passes his tough test]Charlies shrugs it off, advances to the jail door and kicks it open. 

Over at the Assay office Eddie has seen Gus dive out of the side window, but runs to the corner of the building and fires off a shot down the alley at Gus, he'd swear he'd hit him but Gus shows no ill effects and continues to run down the alley, turns behind the hotel, and holes up behind the jail..

Frank meanwhile is nervous and runs for cover in the alley between the Assay Office and the General Store [he fails the toughness test again - he's still shaken from that failed shotgun hit!]

In the jail, the Sherriff pulls himself together, it looks like this one is going to be to the death so he has no choice but to fight back and hope for the best. He fires at Charlie who is in the open door, scaring him witless [he fails his toughness test 😏] but only grazing him.

Move 5 - On the balcony, Hank groggily hauls himself to his feet (he got an Ace as his activation card!) and fires at Charlie below, who is still outside the jail - unbelievably he hits him, and then watches him drop to the ground apparently unconscious! [two chest wounds will do that - I also diced for how many shots I'd allow Hank who had only just recovered from being unconscious - he rolled high, hence two shots] 

With horror though he sees that the poetic justice is only momentary as Charlie gets straight back on to his feet [he had an Ace as well, just a lower suit than Hanks] and then shoots at the Sherriff hitting him in the leg [he passes his tough test] but then Charlies luck runs out - the Sherriff fires back ... killing him.

In the Alley, Frank finally recovers, and runs up the street along the boardwalk in front of the Assay Office and the Hotel ending up near the corner of the hotel and the jail where he skids to a halt as he sees Charlie, clearly dead, lying there.. Eddie follows him also ending up in the alley between the Hotel and Jail. 

Round the back of the jail Gus recovers his nerve, reloads his shotgun, and moves  towards the corner of the jail nearest where Andy is crouched at the window on the far side. Andy is almost out of ammo and seeing Charlie is down and done for, drops to the ground and reloads. In the street shots ring out as Dave peppers the balcony of the hotel where Hank is ducked down in cover.

Move 6 - It's difficult to know what was going through Gus's mind as he stepped out from round the corner - normally a fairly nervous guy, but either way he did it, and with Andy in clear sight and no more than six feet away from him gave him a barrel from the shotgun [tussled with this one in my mind a bit as I was aware from the set up that his key driver is that he shouldn't put himself in harms way unnecessarily, but with Andy's wounds and a +2 on close range I assumed a hit would be odds on]

He hit's him - but as the smoke clears can see Andy still standing there! [The phrase "chocolate teapot" is now joined in the lexicon of utterly useless things, by "Gus's shotgun" 😏] Andy is however looking very bloody scared [he failed the tough test]  but though shaken, fires at Gus hitting him in the chest.

Elsewhere Eddie now runs out of the alley and into the jail, he grins as he sees Bart cowering at the back wall of the cell - he fires at the Sherriff hitting him in the leg [but who passes his tough test - with a toughness of 4 he can pass 6 times out of 10 - one tough hombre!] Then Frank runs in as well, and also fires but misses! The Sherriff knows he's living on borrowed time and fires desperately at them but misses - unheard of at that range! 

On the balcony Hank and Dave exchange fire but while Hank's shots hit, Dave's miss, and with Dave out of ammo he runs to the boardwalk underneath the balcony.

Move 7 - The lead's been flying and there are plenty of guns that need replenishing..

In the jail the Sherriff is badly wounded and almost out of ammo - just two bullets, and he's a dead man..  "bugger this" quoth he, and snapping off a shot at Eddie, which only grazes him, he dives through the front window of the jail, on to the boardwalk out front and takes the best cover he can. 

On the balcony Hank reloads. 

Eddie, shaken up by the recent shot, does the same but having partially reloaded then climbs out of the window and into the alley between the jail and hotel.

Dave also reloads, but in the jail Frank is ready, moves to the front door, leans out takes a bead on the Sherriff but misses! 

Around the back of the Jail, Gus skedaddles [when tested he failed to recover his nerve] he'd done far more than he'd been expected to, to be fair, he runs down the back of the hotel, stopping just in time to avoid being shot by Dave who's at the end of the alley! 

At the jail Andy is beginning to think that he might have had enough, Bart is no nearer being free, and Charlie is done for - he fires off a hasty shot at Frank who he can see through the window, and runs for cover away from the jail.

Move 8 - In the jail Frank begins to hope that they might get away with this, moves to the window recently vacated by Andy, and fires at him in the brush across the way hitting him in the leg. 

Meanwhile the Sherriff snaps off a shot at Dave along the length of boardwalk but misses, and then ducks into cover round the corner of the jail. On the veranda Hank leans over, sees Eddie in the alley and fires, hitting him in the chest. 

Now reloaded, Dave moves to join Frank in the jail where he covers the front window. Behind the hotel Gus swallows deeply and recovers his nerve, moving slowly to the corner closest the jail he lets off his remaining barrel at Eddie who's hiding in the alley, hitting him in the arm - Eddie, outraged, returns fire killing Gus outright... [πŸ˜•]

.."time for the Jones boys to get out of there"..

Move 9 - in the jail Frank opens the door of cage where Bart is now sobbing like a toddler and ties his hands together behind his back. 

Out in the scrub, Andy reloads, it may not be over yet. 

Hank, still on the balcony, again leans over and fires at Eddie in the alley, hitting him badly [in the arm and chest]

The Sherriff, sheltered against the wall of the jail, reloads. 

Dave moves to the window that looks out on to the alley between him and the hotel, leans out, and takes a snap shot at Hank hitting him in the arm - with a grunt of pain, Hank ducks back into cover [failed tough test].

Move 10 - time for the Jones boys to get out of there..  the Sherriff eyes his options and makes a break for the livery yard across the street [I made an error here and forgot to factor in the damage to his leg and what effect it would have on his movement] taking cover behind the fence and some scrub on the corner nearest the jail. 

Dave and Frank, with Bart in between them, duck down the alleyway between the jail and the hotel - time to get to their horses. 

Andy runs round the rough ground and scrub to the back of the jail where he now has a clear line of sight on Dave and shoots, hitting him in the leg [he then fails his toughness test becoming shaken]. Hanks snaps off a couple of nervous shots at Frank doing nothing - he's now out of ammo.

Move 11 - Frank moves to cover the front of the group and shoots at Andy but misses. Dave fires shakily, and manages to hit Andy who returns fire hitting him in the arm. 

On the balcony, Hank reloads. 

Across the street in the livery yard the Sherriff has a bit of a  quandary - he has targets in range, but one of them is Bart who is very close to both the Jones boys.. he shrugs and fires twice at Dave killing him outright.. [he's a bit of a Reacher! πŸ˜€]

Move 12 - As sure as eggs are eggs, neither of the bad boys are going to get Bart away..  the Sherriff climbs through the fence so as to get a bead on Frank and fires but misses. 

Andy and Frank, the writing on the wall, run for it, leaving the Sherriff and Hank to take charge of the still tied Bart - looks like the neck tie party will take place after all..

Post match analysis:

  • First the damage:


  • made a few errors on rule application - Ruthless are very simple set of rules but there are a few nuances that need to be applied - movement for characters with leg wounds was one of them
  • a lot of shots were fired in the 12 moves, but as you can see a surprising number of them had no discernible effect - grazes, non-impacting hits, etc
  • the Sherriff is one tough mother! πŸ˜€

~~~~~~~~~~~~~~~~~~~~~~~~~~~~~~~~~~~~~ 

 Laters, as the young people are want to say...

Saturday, February 22

"Jailbreak!" .. preamble and setup..

" Tonight there's gonna be a jailbreak
Somewhere in this town
See me and the boys we don't like it
So were getting up and going down".

"Jailbreak" Thin Lizzy

Preamble..

As the sun rose over a sleepy Cedar Gulch every inhabitant of the (normally) sleepy town knew that it was going to be a hot one - not only because there wasn't a cloud in the sky, but also because today there was going to be a hanging..

Bart Johnson had never had much going for him, and when he'd been caught red handed following a shootout during a failed bank robbery, he'd also been seen to gun down an innocent civilian who was passing the bank as Bart and the rest of the gang tried to escape. 

It was a sure fire bet that the Circuit Judge wasn't going to spend too much time pondering the niceties of the law while deliberating the sentence. Bart could shout to the Heavens all he wanted that "it was an accident", and he "hadn't meant to to kill him, just wing him!", but Bart was going to hang.

.. but it wasn't quite as clear cut as the members of the law would have liked ..

First, the civilian was not quite as 'innocent' as everyone had believed. He was actually one Seth Harkmann, second in command and a senior member of the notorious Jones Gang. Fresh shaven and redolent of Bay Rum following  a visit to the barbers, Seth had been on his way to "Lily's Place" (TM) and with his mind fully occupied never even had time to reach for his iron before meeting his untimely demise. His boys though were far from happy, and a hanging wasn't going to be enough, they wanted a more painful revenge..

Second, the rest of Barts gang were also not happy, in their eyes the Judge was guilty of a huge calumny (if they could even spell it, never mind understand what it meant) in sentencing Bart to hang - it had been an accident, and rightly should have led to jail time rather than a neck stretching session..

So it was that on the morning of the hanging a number of additional people were on outskirts of Cedar Gulch - all of them armed with well polished and heavily used guns..  'the boys we don't like it', indeed 😏

Setup..

Cedar Gulch - Jones Gang bottom right, the Rescuers top left


  • Rules will be "Ruthless" - see the Project Page for links to the basic rules and my solo amendments
  • Bart (#2) is held in the jail under the watchful eye of the Sherriff, who will also be doing the duty of hang man when the time comes. The Sherriff's sole mission is to protect Bart from either death or a rescue.
  • Bart's rescuers comprise two gang members - Andy* (#3) and Charlie* (#4) - their sole mission is to rescue Bart from the Sherriff's office, and then leg it, preferably alive and unwounded
  • The Jones Gang comprises three members - Dave (#6), Eddie (#7) and Frank (#8) - their sole mission is to grab Bart - if they can't do that then a painful death will also do, but not not at any personal cost to them as he's going to hang anyway..
  • While the rest of the population are largely unarmed and unwilling to take part in any gun play, there are two who are armed, and are "ready" - these are Gus (#5) and Hank (#1), who are in the Assay Office, and the first floor of the Hotel respectively.. their sole mission is to aid the Sherriff until it's time for Bart to swing, but as moderately unskilled gun men, and civilians, they will not do anything that puts themselves in harms way.
  • Bart is (clearly) unarmed - it will take one complete move inside the Sherriff's office/Jail for his rescuers to free him on 6+ on 2D6, and two actions to arm him (Andy and Charlie have bought him a replacement rig comprising belt, ammunition and two six shooters).
  • Horses for both gangs are just off table.
  • There is nothing specific in the rules for characters armed with twin six guns, so I'm going to say they can fire both but that's an action for each, and clearly if they are armed with two guns they can't fan fire before putting one of them away..
Orders of Battle.. (or rather, The Dramatis Personae 😏)

Character traits were either diced for or decided by me based on the role the character is playing..  just a reminder, the toughness value is between 1 and 10 and the lower the number, the tougher the character..


* ABC, DEF and GH get it? πŸ˜€

~~~~~~~~~~~~~~~~~~~~~~~~~~~~~~~~~~~~~

Go on, you know you want to.. ✌

~~~~~~~~~~~~~~~~~~~~~~~~~~~~~~~~~~~~~ 

 Stay tuned for the game report, but in the meanwhile, "laters", as the young people are want to say...

Saturday, February 15

"Operation Biting: The 1942 Parachute Assault to Capture Hitler’s Radar" by Max Hastings.. a review..

One of the books I read on holiday (seven in two weeks - not difficult to see what I was mostly doing!) but without a doubt one of the best of that crop..

Max Hastings is 79 now, and getting on, but he continues to write the kind of 'ordinary' people focussed military history that I love.. as he says himself at the start of the book..  "All my books aspire to tell ‘people’ stories, because these are what history is about. This one is especially so".

This book focusses then on the then nascent Parachute Division's first major operation of WW2, an air assault on the north coast of France to capture a German radar installation known as "WΓΌrzburg", but it does it by describing all the major participants and personalities involved in the planning, preparation and the actual assault, as this was one of the first major combined operations actions where all three main services were involved....

In February 1942 RAF intelligence had been baffled by a newly-identified radar network on the coast of occupied Europe, which they codenamed WΓΌrzburg (and in my mind I kept misreading that as Wurlitzer 😁). 

The eminent (and stupidly clever!) scientist Dr RV (Reg) Jones proposed an assault in order to capture key components and as the one at Bruneval in Normandy was the nearest, that was the one that was chosen.  

Given that period of the war, with little or no British victories, with Britain and her Commonwealth standing alone against a Germany that had already occupied all of Western Europe and just completed the successful invasion of Norway, not surprisingly Winston Churchill enthused about the idea and made Lord Louis Mountbatten the chief of Combined Operations with a brief to do exactly that.

Combined Operations seems to have been a bit of a circus as Mountbatten, an ego centric if there ever was one*, bought in his cronies to run the operation some of whom were "interesting" to say the least, but out of it came the basic plan of a company of the newly-formed Airborne Forces under the command of John Frost (yes, him of Arnhem fame) dropped on the target by the RAF from (grudgingly given) converted Whitely bombers (as they had no dedicated transport aircraft at that time - the Dakota was a long way down the line). Once the raiding party had suppressed any defence, they were then to dismantle key components of the radar, and rescue would be by Royal Navy landing craft from the cove at the bottom of the cliff the radar was mounted on.

Following an astonishing recon of the site by RAF spotter plane and also the selfless and brave actions of the French Resistance, the raid eventually took place on the night of 27/28 February 1942 and not surprisingly was far from being as easy as all the planners were sure it was going to be. In heavy snow, 120 men landed (most of them paratroopers but they also brought with them dedicated engineering resource in order to identify the radar parts required), but some of whom were mis dropped almost two miles from their objective. 

"Squadron Leader Percy Pickard, Commanding Officer of No. 51 Squadron RAF [hugely experienced, but his plane was one of those that dropped its load of para's off target], inspects a captured German helmet with parachute troops after the Bruneval raid, 28 February 1942. On the night of 27/28 February Pickard's squadron of Whitleys dropped 'C' Company, 2nd Parachute Battalion (commanded by Major J D Frost) near a German Wurzburg radar site at Bruneval near Le Havre in northern France - its objective to seize components of the radar and then evacuate them by sea". Picture courtesy IWM

The Para's nonetheless launched the assault with the troops they had, against an increasingly strengthening German defence, but dismantled the German radar, and after three hours in France eventually escaped in the nick of time by landing-craft across the Channel (in a Force 5 storm) to Portsmouth. All their radio's were lost in the drops and it was only by almost the purest chance that the Para's managed to signal the Naval forces that they were ready to be evacuated - and then only as German lorried and mechanised reinforcements could be seen coming down the coastal road!

In the end then, despite the obvious flaws and stupidities in planning, and being such a small operation in the grander terms it was a huge success - at that stage of the war a very, very much needed fillip to public morale, and what a cast of characters - 

  • the ‘boffin’ Reg Jones - acerbic, not suffering fools gladly, but undoubtedly a genius; 
  • the peacock Mountbatten (Hasting's sets his stall out early on how he sees his performance), the troubled husband of Daphne Du Maurier (also seemingly mad as a bucketful of frogs); 
  • Gen. ’Boy’ Browning, who commanded the Airborne Division; with a reputation now tarnished by his performance there, but who Hastings thinks may now have been overly criticised and deserves recognition of the huge work he did in first establishing and building the Airborne Division;
  • ‘Colonel Remy’, the French secret agent whose men reconnoitred Bruneval at HUGE risk; 
  • Major John Frost, who led the paras into action - in Hastings' (and my) opinion the perfect battlefield commander who would never have suited higher command ;
  • Charlie Cox, the little RAF technician who stripped the WΓΌrzburg and did his parachute training in a single day - what a hero;
  • Wing-Commander Charles Pickard, a legendary bomber pilot who led the drop squadron (but was backwards in coming forwards to admit that his plane was one of those that mis-dropped 😏)..
  • Tony Hill who flew the photo reconnaissance Spitfire that bought back the pictures so badly needed by the planners
  • Fred Cook the RAN officer commanding HMS Tormentor (the former Household Brigade Yacht Club at the mouth of the River Hamble) and responsible for the Naval element of the operation

..and so many more..

Brilliant book - very much recommended - going to give this one a 10+

* Field Marshal Sir Gerald Templer, the former Chief of the Imperial General Staff, once said to Mountbatten (allegedly) "You are so crooked, Dickie, that if you swallowed a nail, you would shit a corkscrew". 😏

Thursday, February 13

Normal service...

"So Carnehan weeds out the pick of his men, and sets the two of the Army to show them drill and at the end of two weeks the men can manoeuvre about as well as Volunteers. So he marches with the Chief to a great big plain on the top of a mountain, and the Chiefs men rushes into a village and takes it; we three Martinis firing into the brown of the enemy".

Kipling "The Man Who Would Be King"

.. should be resumed soon... 🀞
~~~~~~~~~~~~~~~~~~~~~~~~~~~~~~~~~~~~~

Apologies*, Steve the Wargamer was in urgent need of some sun, warmth and brightness^ so I've been in the Caribbean for a couple of weeks..  no military history of note, and no wargaming, but loads of good books read, and cheap local lager drunk... 😏

Spent a fair amount of time on this one... 

*With all due respect to my reader, clearly I'm not..  😁
^A friend of mine likens the winter in Britain to be something like living in a grey Tupperware box..  very apt...😏

~~~~~~~~~~~~~~~~~~~~~~~~~~~~~~~~~~~~~ 

 Laters, as the young people are want to say...

Saturday, January 18

Battle of Grande Battaglia

So as promised in the last post... I was suddenly hit with the need over Christmas for a big game..  I'm really loving the skirmish format with a small table and a dozen units/figures a side, but as a spectacle I guess it's not quite the ticket..  😁

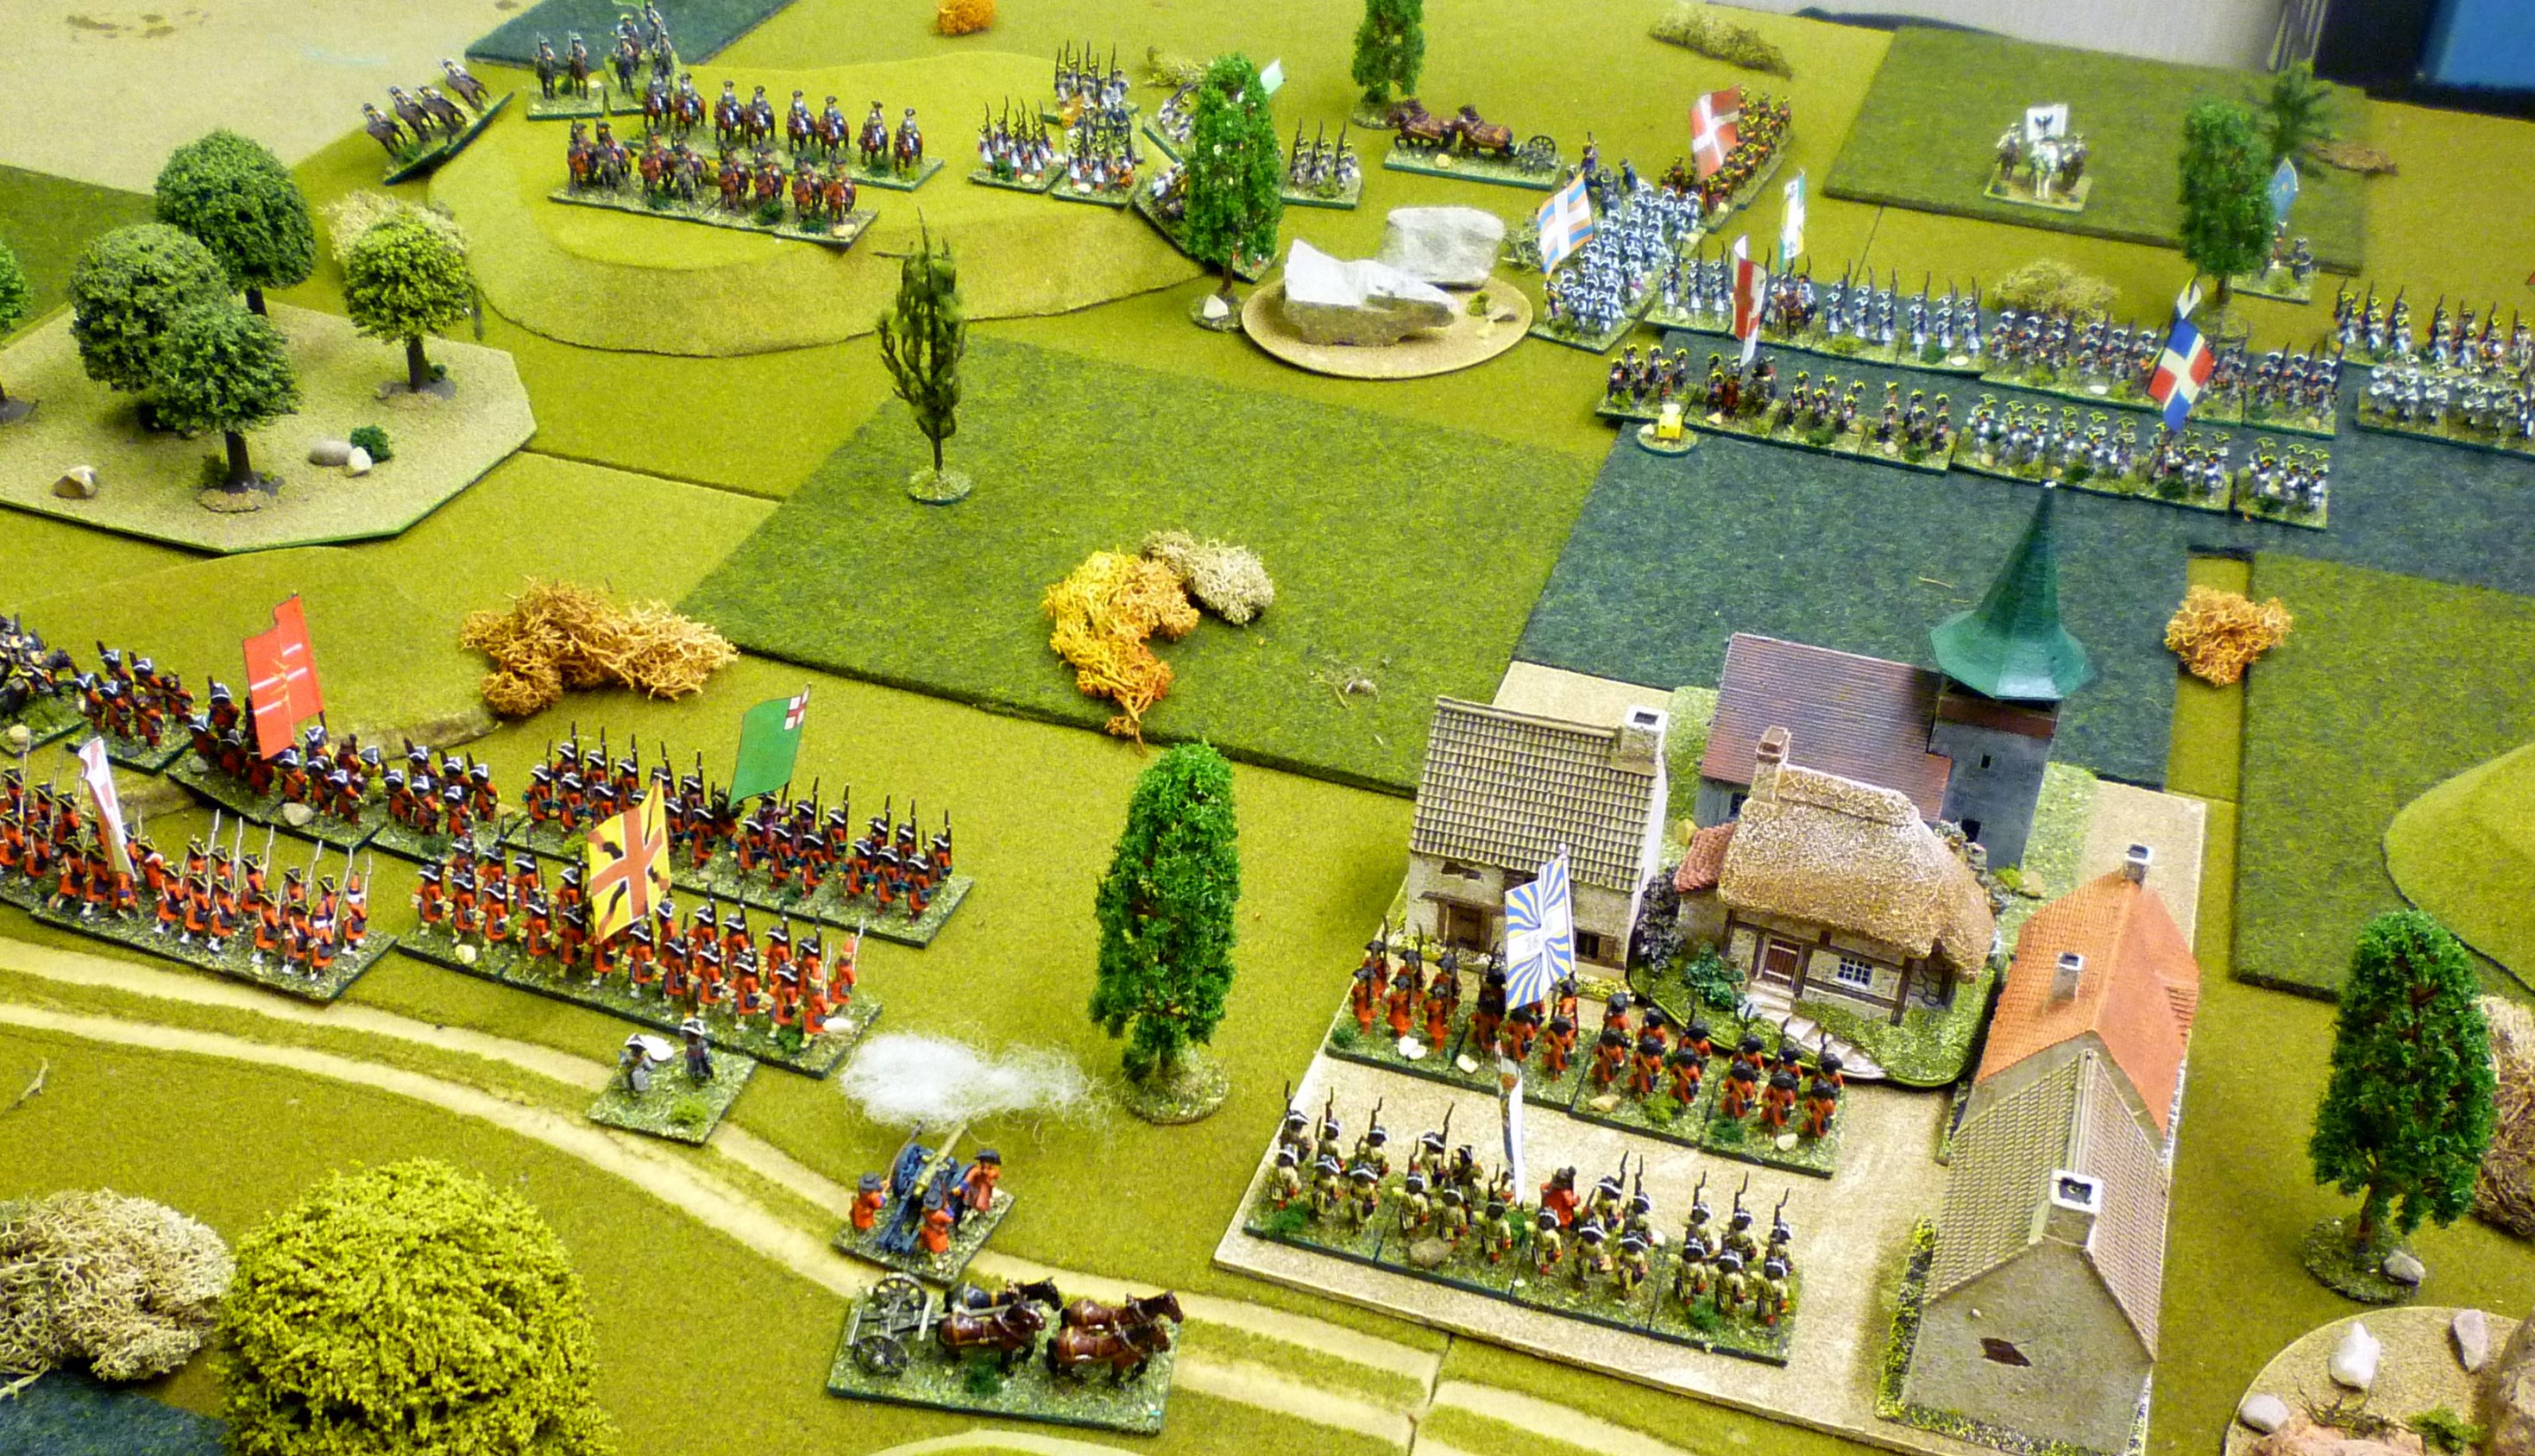
Having just rebased and reflagged Navarre though, it seemed opportune to get some more of the  Marlburian troops on the table, and so was born 'The Battle of Grande Battaglia'. Narrative via the captions on the pictures..

Start of game - all is quiet as the Allies contemplate the village of Grande Battaglia in front of them - supposedly named after a battle centuries before - are the Allies going to make a 'Blenheim mistake' as per the French at the battle of that name? πŸ˜€


End Move 1 - general advance by both sides.. I purposely loaded the table with both units and terrain so as to provide the maximum amount of friction for the opposing sides (and me)


End Move 2 - general advance by both sides continues.. one of the Allied artillery pieces has at last opened fire..  the other is limbered to try and find a better vantage point


End Move 3 - Allied right flank..  the horse have clashed!


End Move 3 - Allied left flank..  as you can see..  the French are having issues getting manoeuvring room..  that wood (top left) in particular was to provide an irritant for both sides..


End Move 4 - the Allies have occupied the village with two battalions..  to the right, in the far distance one of the French cavalry regiments has routed.. worryingly, the French cavalry has now managed to deploy two abreast..  they'll get overlap bonuses in any ensuing melee


End Move 4 - this time looking across the battlefield..  routing cavalry bottom right..  in the centre that front rank Allied cavalry regiment is shaken - they've been bounced back by the tactically superior French...  the advancing French infantry look fearsome!


End Move 5 - Allied right flank - boom! The Bavarian cuirassiers have given their lighter opponents a right good hiding.. the Danish (blue flag white cross) have also routed but as a result of poor morale checks following hits from the French artillery..


End Move 6 - looking across the table from the Allied right flank...  at the village (centre) the French infantry have come to close musketry as they desperately try to close to bayonet..  


End Move 6 - Allied left flank, and it's all beginning to go pear shaped for the Allies - the French infantry in their centre threw at least a half a dozen 11's (on 2D6) for their firing and Allied regiment after regiment has taken hits and is shaken - note the number of yellow dice - or routing..


End Move 6 - Allied right flank, and the only good news is that the last remaining Allied cavalry has now seen off the French cavalry..  the French infantry is streaming up so as to close off the threat to that flank that they pose..


End Move 7 - Allied left flank, have they managed to stabilise the situation?? Things are not good in the village - at least one of the two Allied regiments providing the garrison have been sent packing (bottom centre)..


End Move 7 - Allied right flank, and those dastardly cuirassiers have managed to regroup - top right - can they do the damage again!? The fight for the village is going hammer and tongs..  at least once the Allied infantry is driven in and the French come over the wall, only to be expelled in the next phase..


End Move 8 - Allied left flank, and unfortunately it's all fallen apart again - poor morale throws all round (lots of red dice indicating rout) - the Allies are bringing up cavalry (in column) to try and plug the gap


End Move 9 - Allied right flank, and the cuirassiers have finally managed to close with a shaken Allied cavalry regiment - uh oh... the Allied infantry are taking the fight to the French but look at that infantry battalion threatening the flank of the cavalry..


End Move 9 - Allied right flank, success at last! Against all the odds the cuirassier attack failed, and they have broken and run.. it's fairly clear though that the Allies are running out of steam..  and men..


End Move 10 - Allied left flank, it's all over bar the shouting..  French cavalry are poised to exploit the breakthrough and two thirds of the British cavalry are routing..


End Move 10 - Allied centre and right, more stable, but still fragile - some of those battalions are very low on strength but the remaining British cavalry, top right, are about to swing round the back of the hill and into the French rear


End Move 10 - all done and dusted - French win..  both Allied flanks have collapsed and the centre is not far from doing the same, though they do still hold the village..  the Allied commander orders his brigades to disengage and fall back on prepared rear positions..

Post Match Analysis:
  • Fun game, but the lack of space to deploy and manoeuvre in definitely caused some interesting tactical decisions to be made.
  • On the whole I would say that the French "turned up" for the battle but the Allies were a little, err..  absent minded.. in other words, the French were definitely the masters of the dice for this game.. 😏
  • From a starting strength of 90 each, the French ended the game with 41 strength points - of their units left on the table 1 was shaken. This compares with the Allies who ended up with 33 strength points but of the units left on the table 3 were routing, and 1 was shaken. Clear points decision I think...

~~~~~~~~~~~~~~~~~~~~~~~~~~~~~~~~~~~~~ 

 Laters, as the young people are want to say...