Apologies for how long it's taken to get this post completed.... there were a ton of pictures to sort through, and with the trip to Scotland time got away from me. Either way, I'm not going to continue boring you with a move by move relation of the game... I hope that by now you have a fairly good'ish view of how the rules play..
So for Bluebear Jeff's benefit we'll start off with a close up of the action in move 12 (below)
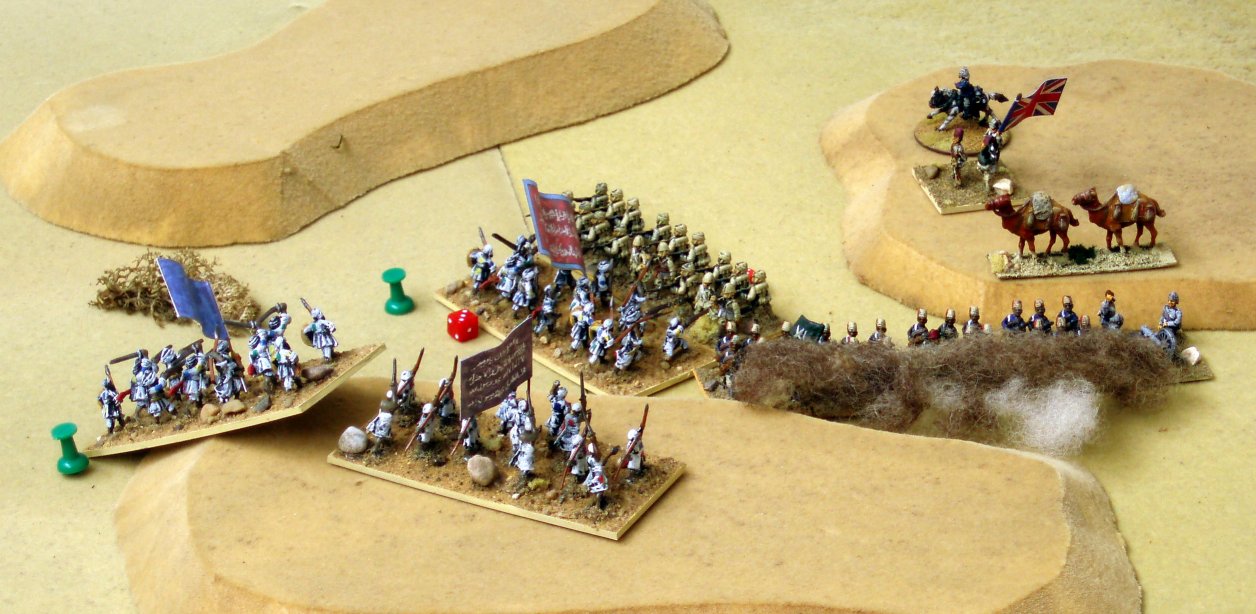
The Dervish have contacted the British cavalry on the right of the picture and have inflicted significant casualties...
In the meanwhile the main Imperial firing line continues to blaze away - the red dices indicate casualties however, so they are not getting everything their own way...
So for Bluebear Jeff's benefit we'll start off with a close up of the action in move 12 (below)
The Dervish have contacted the British cavalry on the right of the picture and have inflicted significant casualties...
In the meanwhile the main Imperial firing line continues to blaze away - the red dices indicate casualties however, so they are not getting everything their own way...
 |
| A reminder that the green pin indicates a rifle armed Dervish unit - a black flag indicates that the stand (which comprise two bases in game terms) has already lost a base... |
To all intents and purposes the Imperial force is locked in place - it cannot advance due to the constant wave of attacks..
 |
| Overview of the same move... |
..and then catastrophe - the British cavalry are wiped out to a man - only the tiny screw gun remains to guard that open flank... the "good" news is that the Hadendowa and that half unit of Dervish have been wiped out and the threat to the front has eased, at least for the time being..
 |
| Catastrophe - British cavalry destroyed but the Dervish have paid dearly.. |
The British react by refusing one flank of the Sudanese so as to bring at least some rifles to bear on the rampaging Dervish... showing commendable restraint the screw gun continues to bang away throughout..

Given time, the entire Sudanese battalion swing round so as to bring their fire to bear - they are helped in that the hitherto successful Dervish fail a pluck test to close on the line..

Given time, the entire Sudanese battalion swing round so as to bring their fire to bear - they are helped in that the hitherto successful Dervish fail a pluck test to close on the line..
 |
| The dervish unit on the right has failed a "pluck" (ie. morale) test - yellow pin - they've also taken heavy casualties - over 50% |
An overview of the same move (below).. further Dervish reinforcements have arrived - move cavalry and another unit of foot..

...and in the next move (below) another Dervish foot unit arrives while in the distance the Imperial force has almost been contacted by the first of the rifle armed Dervish units and a desperate struggle ensues...

A close up view - from behind the British lines for a change - the North Middlesex are down a base and firing for all they are worth..
 |
...but are still contacted (below) by the Dervish - brave boys...!

..but the North Middlesex are triumphant and drive them off - with only time for a quick sip of water they stand to for the next onslaught - this is the third or fourth they have managed to fight off!
The Sudanese swing back in line with their colleagues and await the inevitable..
..but the North Middlesex are triumphant and drive them off - with only time for a quick sip of water they stand to for the next onslaught - this is the third or fourth they have managed to fight off!
The Sudanese swing back in line with their colleagues and await the inevitable..
 |
| Dervish cavalry are closing - and there's Hadendowa on the prowl... |
A rag tag of shot torn, and shell damaged Dervish continue to race towards the Imperial lines... the screw gun has withdrawn to the top of the dune so as to gain the height advantage.. not surprisingly the Dervish are failing pluck tests and in two instances slow almost to a halt before they reach the Imperial lines..

...and are destroyed in their tracks (below) leaving the cavalry and just one part Dervish unit... one of the other dervish units has been forced to flee...

...but not for long (below) they stop and rally.. happily the Imperial force sends the cavalry and the other Dervish unit reeling to join them...
...even so, is it me, or does that concentration of Dervish in the bottom right look worrying?

Must be about move 17 or so by now, and the Dervish block is approaching the dune - it's a good move as they are partially sheltered from some of the Imperial fire...

...next move and they start to climb the dune - this is the last Dervish effort - there are no more units on the table, and no more reinforcements...

...crash!! The Imperial force manages to destroy half one Dervish unit but the other unit and a half close to contact... the Sudanese in the meanwhile have lost a stand..

Hurrah! The Imperials see them off - they might yet make it (and trust me I have had my doubts on several occasions!)
The screw gun crew has take it's first casualties from the remains of the Arab rifle unit on the hill..

..and so the Imperial force mops up the remnants of the opposition, and moves wearily towards the coast, pausing only to split their force so as to divide the fire of the venerable 12 pounder that the Dervish have deployed close to the village before destroying it in short order...
...the Imperial force has triumphed, and as the sirens on board HMS Turbulent sound out triumphantly, Major the Honourable St John Wade-Smith parades his troops on the beach - they have suffered badly but have made it through... His Majesty Leopold II's observing officer Captain Lucien Verbeek (with his horse Teufel..) will have much to report on in his next dispatch..

Post Match Analysis:

...and are destroyed in their tracks (below) leaving the cavalry and just one part Dervish unit... one of the other dervish units has been forced to flee...

...but not for long (below) they stop and rally.. happily the Imperial force sends the cavalry and the other Dervish unit reeling to join them...
...even so, is it me, or does that concentration of Dervish in the bottom right look worrying?

Must be about move 17 or so by now, and the Dervish block is approaching the dune - it's a good move as they are partially sheltered from some of the Imperial fire...

...next move and they start to climb the dune - this is the last Dervish effort - there are no more units on the table, and no more reinforcements...

...crash!! The Imperial force manages to destroy half one Dervish unit but the other unit and a half close to contact... the Sudanese in the meanwhile have lost a stand..

Hurrah! The Imperials see them off - they might yet make it (and trust me I have had my doubts on several occasions!)
The screw gun crew has take it's first casualties from the remains of the Arab rifle unit on the hill..

..and so the Imperial force mops up the remnants of the opposition, and moves wearily towards the coast, pausing only to split their force so as to divide the fire of the venerable 12 pounder that the Dervish have deployed close to the village before destroying it in short order...
...the Imperial force has triumphed, and as the sirens on board HMS Turbulent sound out triumphantly, Major the Honourable St John Wade-Smith parades his troops on the beach - they have suffered badly but have made it through... His Majesty Leopold II's observing officer Captain Lucien Verbeek (with his horse Teufel..
) will have much to report on in his next dispatch..
We've fought with many men acrost the seas,
An' some of 'em was brave an' some was not:
The Paythan an' the Zulu an' Burmese;
But the Fuzzy was the finest o' the lot.
Post Match Analysis:
- A long game - I stopped counting, but I would suggest somewhere in the region of about 20 moves...
- The rules still work fairly well - I had to make a few decisions on the fly where rulings were not clear cut, but I have indicated what those are throughout the narrative...
- Despite this, for the next game I'm thinking of rolling out my own home grown rules again to see how they compare... what I will do is lift the Dervish reaction table in it's entirety from these rules to replace the more complex one that I have - though I may tweak the "Enemy not in sight" options slightly to add some other actions (at the moment they're just stand or move)
- Casualties were heavy for the Imperials - the heaviest they have suffered in all the games that I've played - this was very definitely no walk in the park, and the Imperial troops had to work hard for their victory..
- the North Middlesex lost 11 men (from a total of 24) almost 50% casualties!
- the Rutlandshire Yeomanry (the British cavalry) were destroyed in their entirety
- the Sudanese Battalion lost 9 (also from a total of 24)
- Casualties were heavier for the Dervish, of course - in all twelve "rubs" (or units) were destroyed, three Hadendowa, two cavalry, and the rest were Arab sword and spear men with the exception of the two rifle armed units (who were quire effective - if there had been just one more of them then the Imperial casualties would have been even heavier)
The blistering sun, hot desert winds, and blood soaked sand will be talking about this battle for many seasons! Thanks for the battle reports and action pictures.
ReplyDeleteAnother excellent report, Steve. Thank you, sir.
ReplyDelete-- Jeff
Excellent game & detailed report. Love the terrain. Best, Dean
ReplyDeleteWow! What a fantastic post. A great looking game and batrep. 20 turns for one game is a lotta turns, how long did the game take in reality?
ReplyDeleteReally good report and lovely photos. Thanks Steve.
ReplyDeleteCheers guys - comments much appreciated, as ever..
ReplyDeleteRay - I have the unalloyed pleasure and luxury of a permanent gaming table, so once I kick it off I can leave the game set up for as long as I like... I played this game solo over about a week... a couple of two hour sessions, and usually I played a move before going to work in the morning... as I say... luxury!
Really enjoyed this. Love your writing style - not too many words but just enough to convey the tension. Neat looking troops and terrain too, thank you very much.
ReplyDeleteChris G
Great conclusion to a great game.
ReplyDeleteA cracking action, gripping right down to the wire.
ReplyDelete